


Table of contents
- What are review request messages?
- Key benefits of review request messages
- Where you can send review requests from
- Review link (review balancing vs. custom link)
- SMS requests
- Creating or editing an SMS template
- Email requests
- Creating or importing an email template
- Selecting templates for the first send and follow-up attempts (sequence)
- How to set up review request messages (step by step)
- Frequently asked questions
What are review request messages?
Review request messages automate the way you ask your customers for public reviews. Futuria CRM can send customised SMS and email messages after check-in, repeat them at scheduled intervals until the customer clicks the link, and send traffic to the right destination using your review link.
Key benefits of review request messages
Understanding the benefits helps you set up requests so that they fit your business goals.
- Brand consistency: create templates that match your tone and your brand for both SMS and email.
- Automation: schedule when the first request goes out and how often follow-up attempts are sent until the customer clicks.
- Personalisation: use dynamic fields such as contact and account variables for tailored messages.
- Flexibility: send customers to your Google Business Profile or to a custom destination; add several links in emails.
- Control: choose which templates are active for the first send and which to use for each follow-up attempt in your sequence.
Where you can send review requests from
Once you have set up the templates and the frequency, you can request reviews from several sections of Futuria CRM. Use the method that best suits your team's workflow.
- Reputation → Requests: send and monitor requests in bulk or one by one.
- Contact record: open a contact and choose Send review request.
- Automations: use the Review request action to automate sends based on triggers (for example, after an appointment status change).
- Channels: this guide covers SMS and email; WhatsApp requests are available under Reputation → Settings → WhatsApp requests (to be configured separately if needed).
Review link (review balancing vs. custom link)
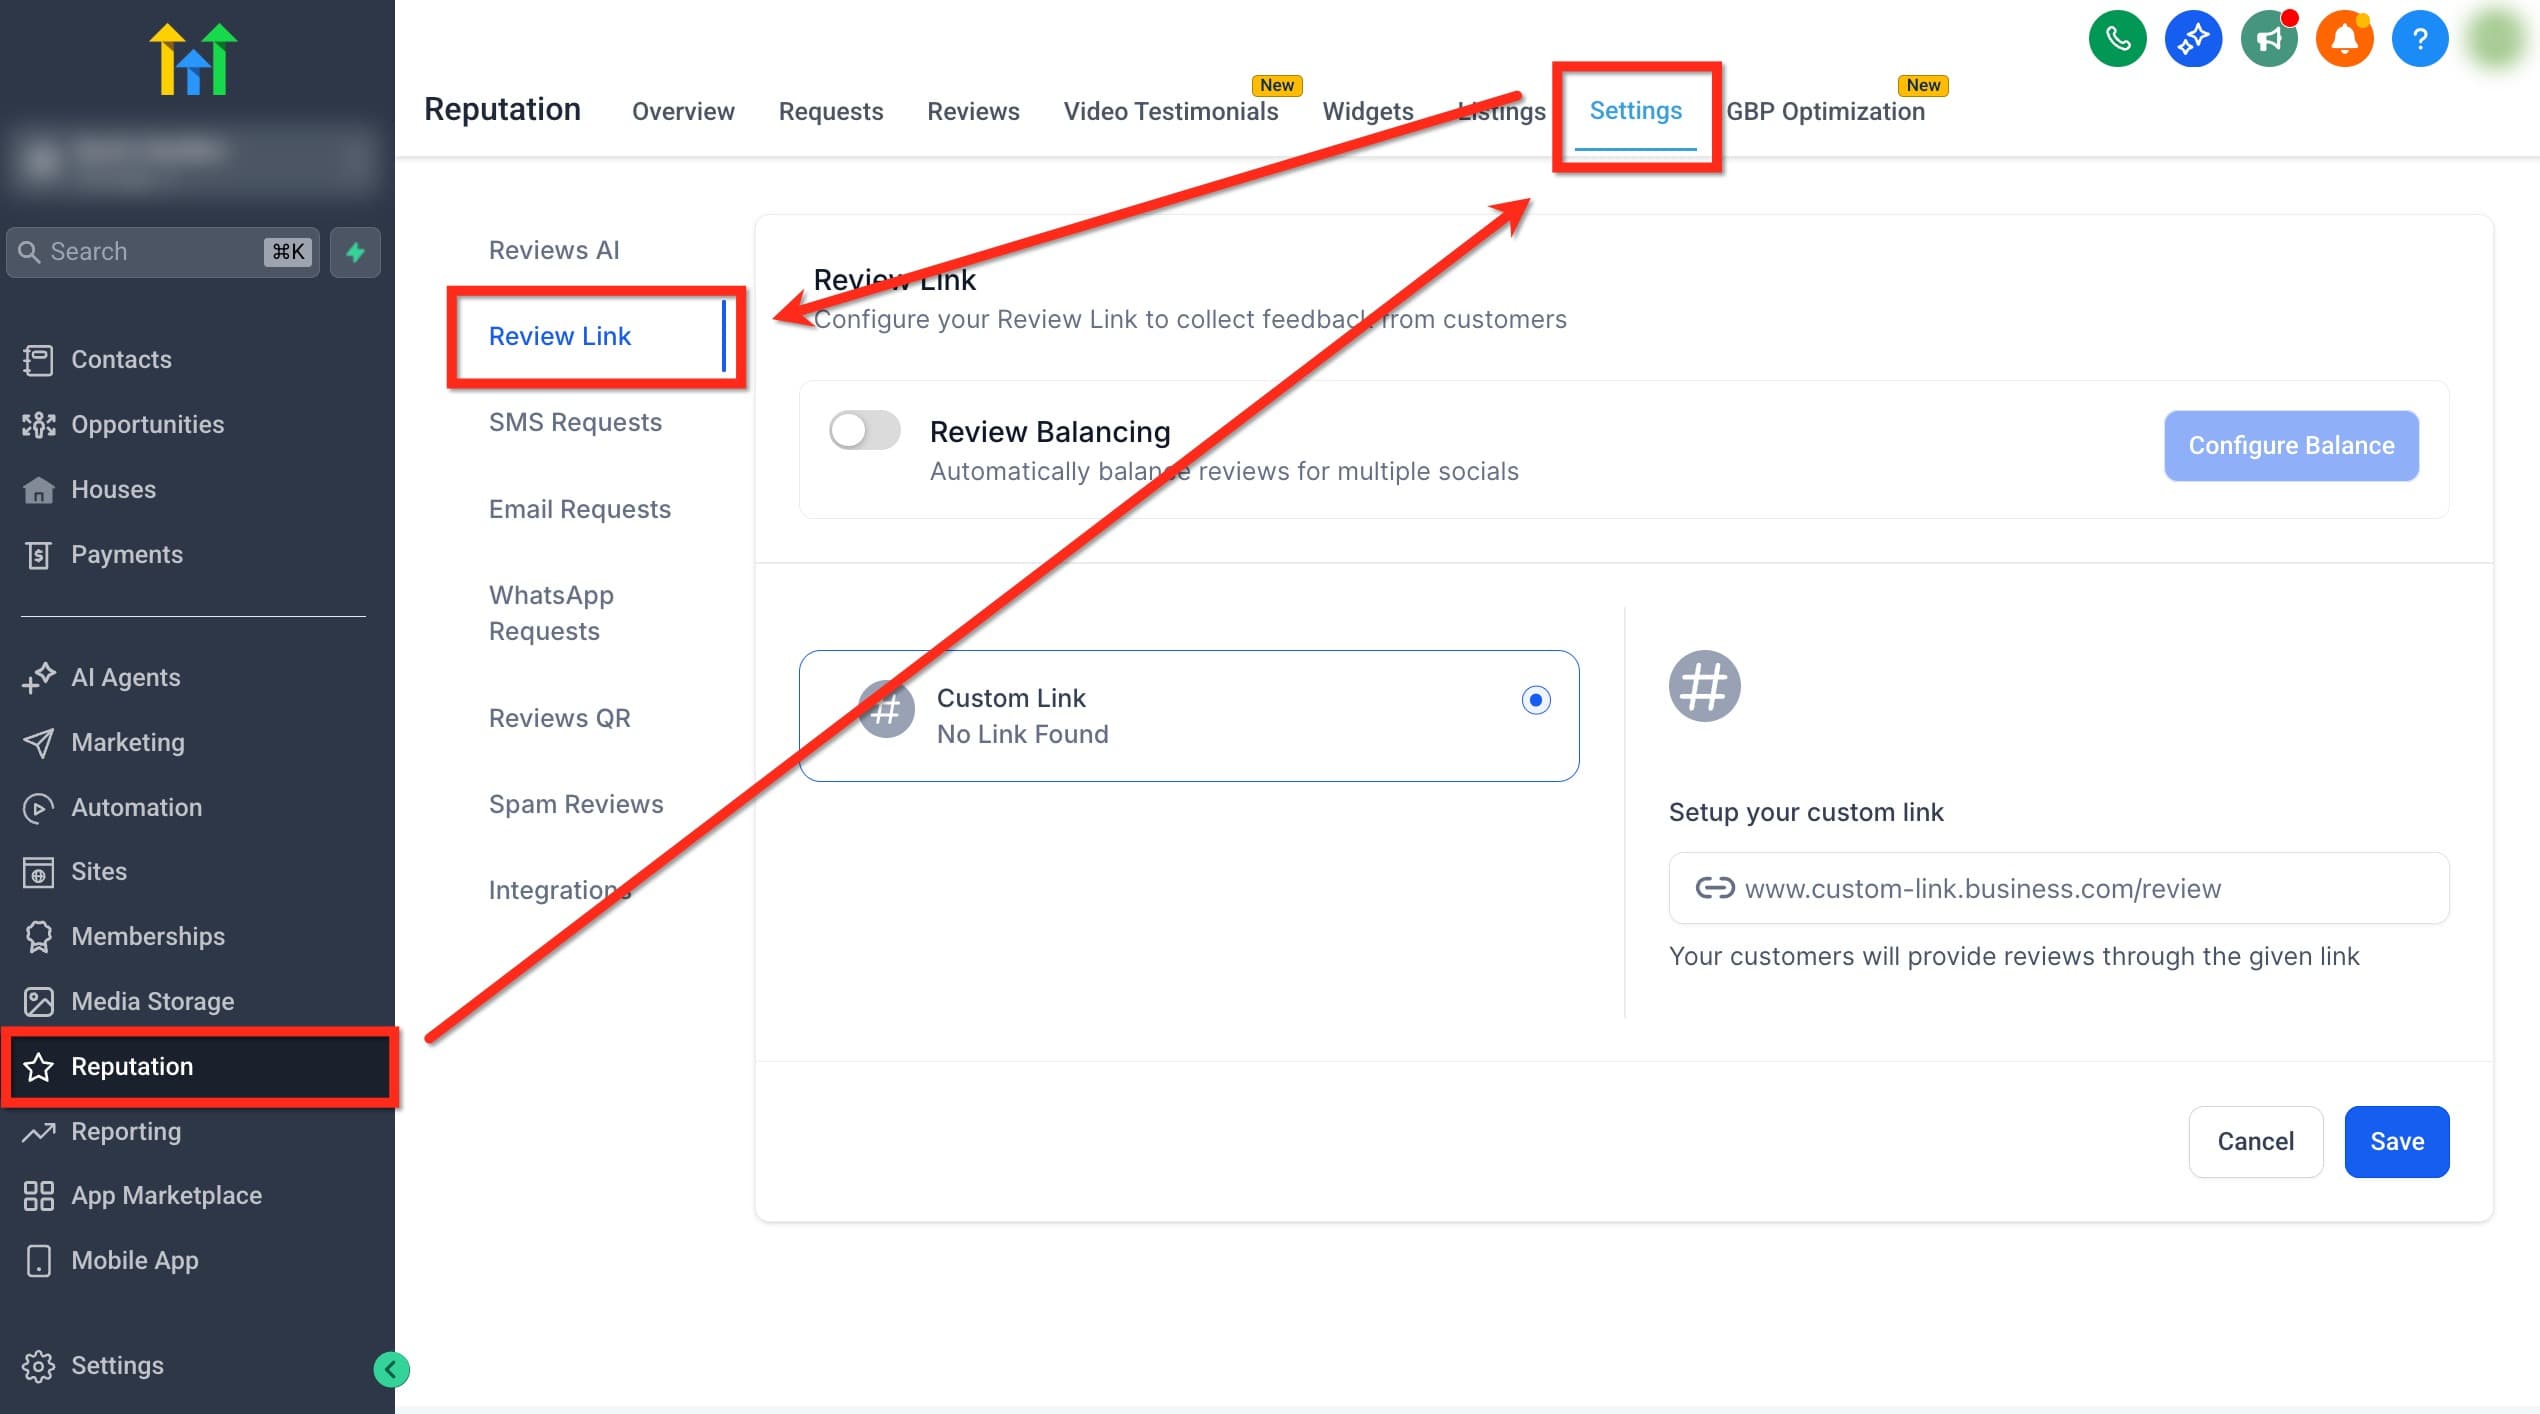
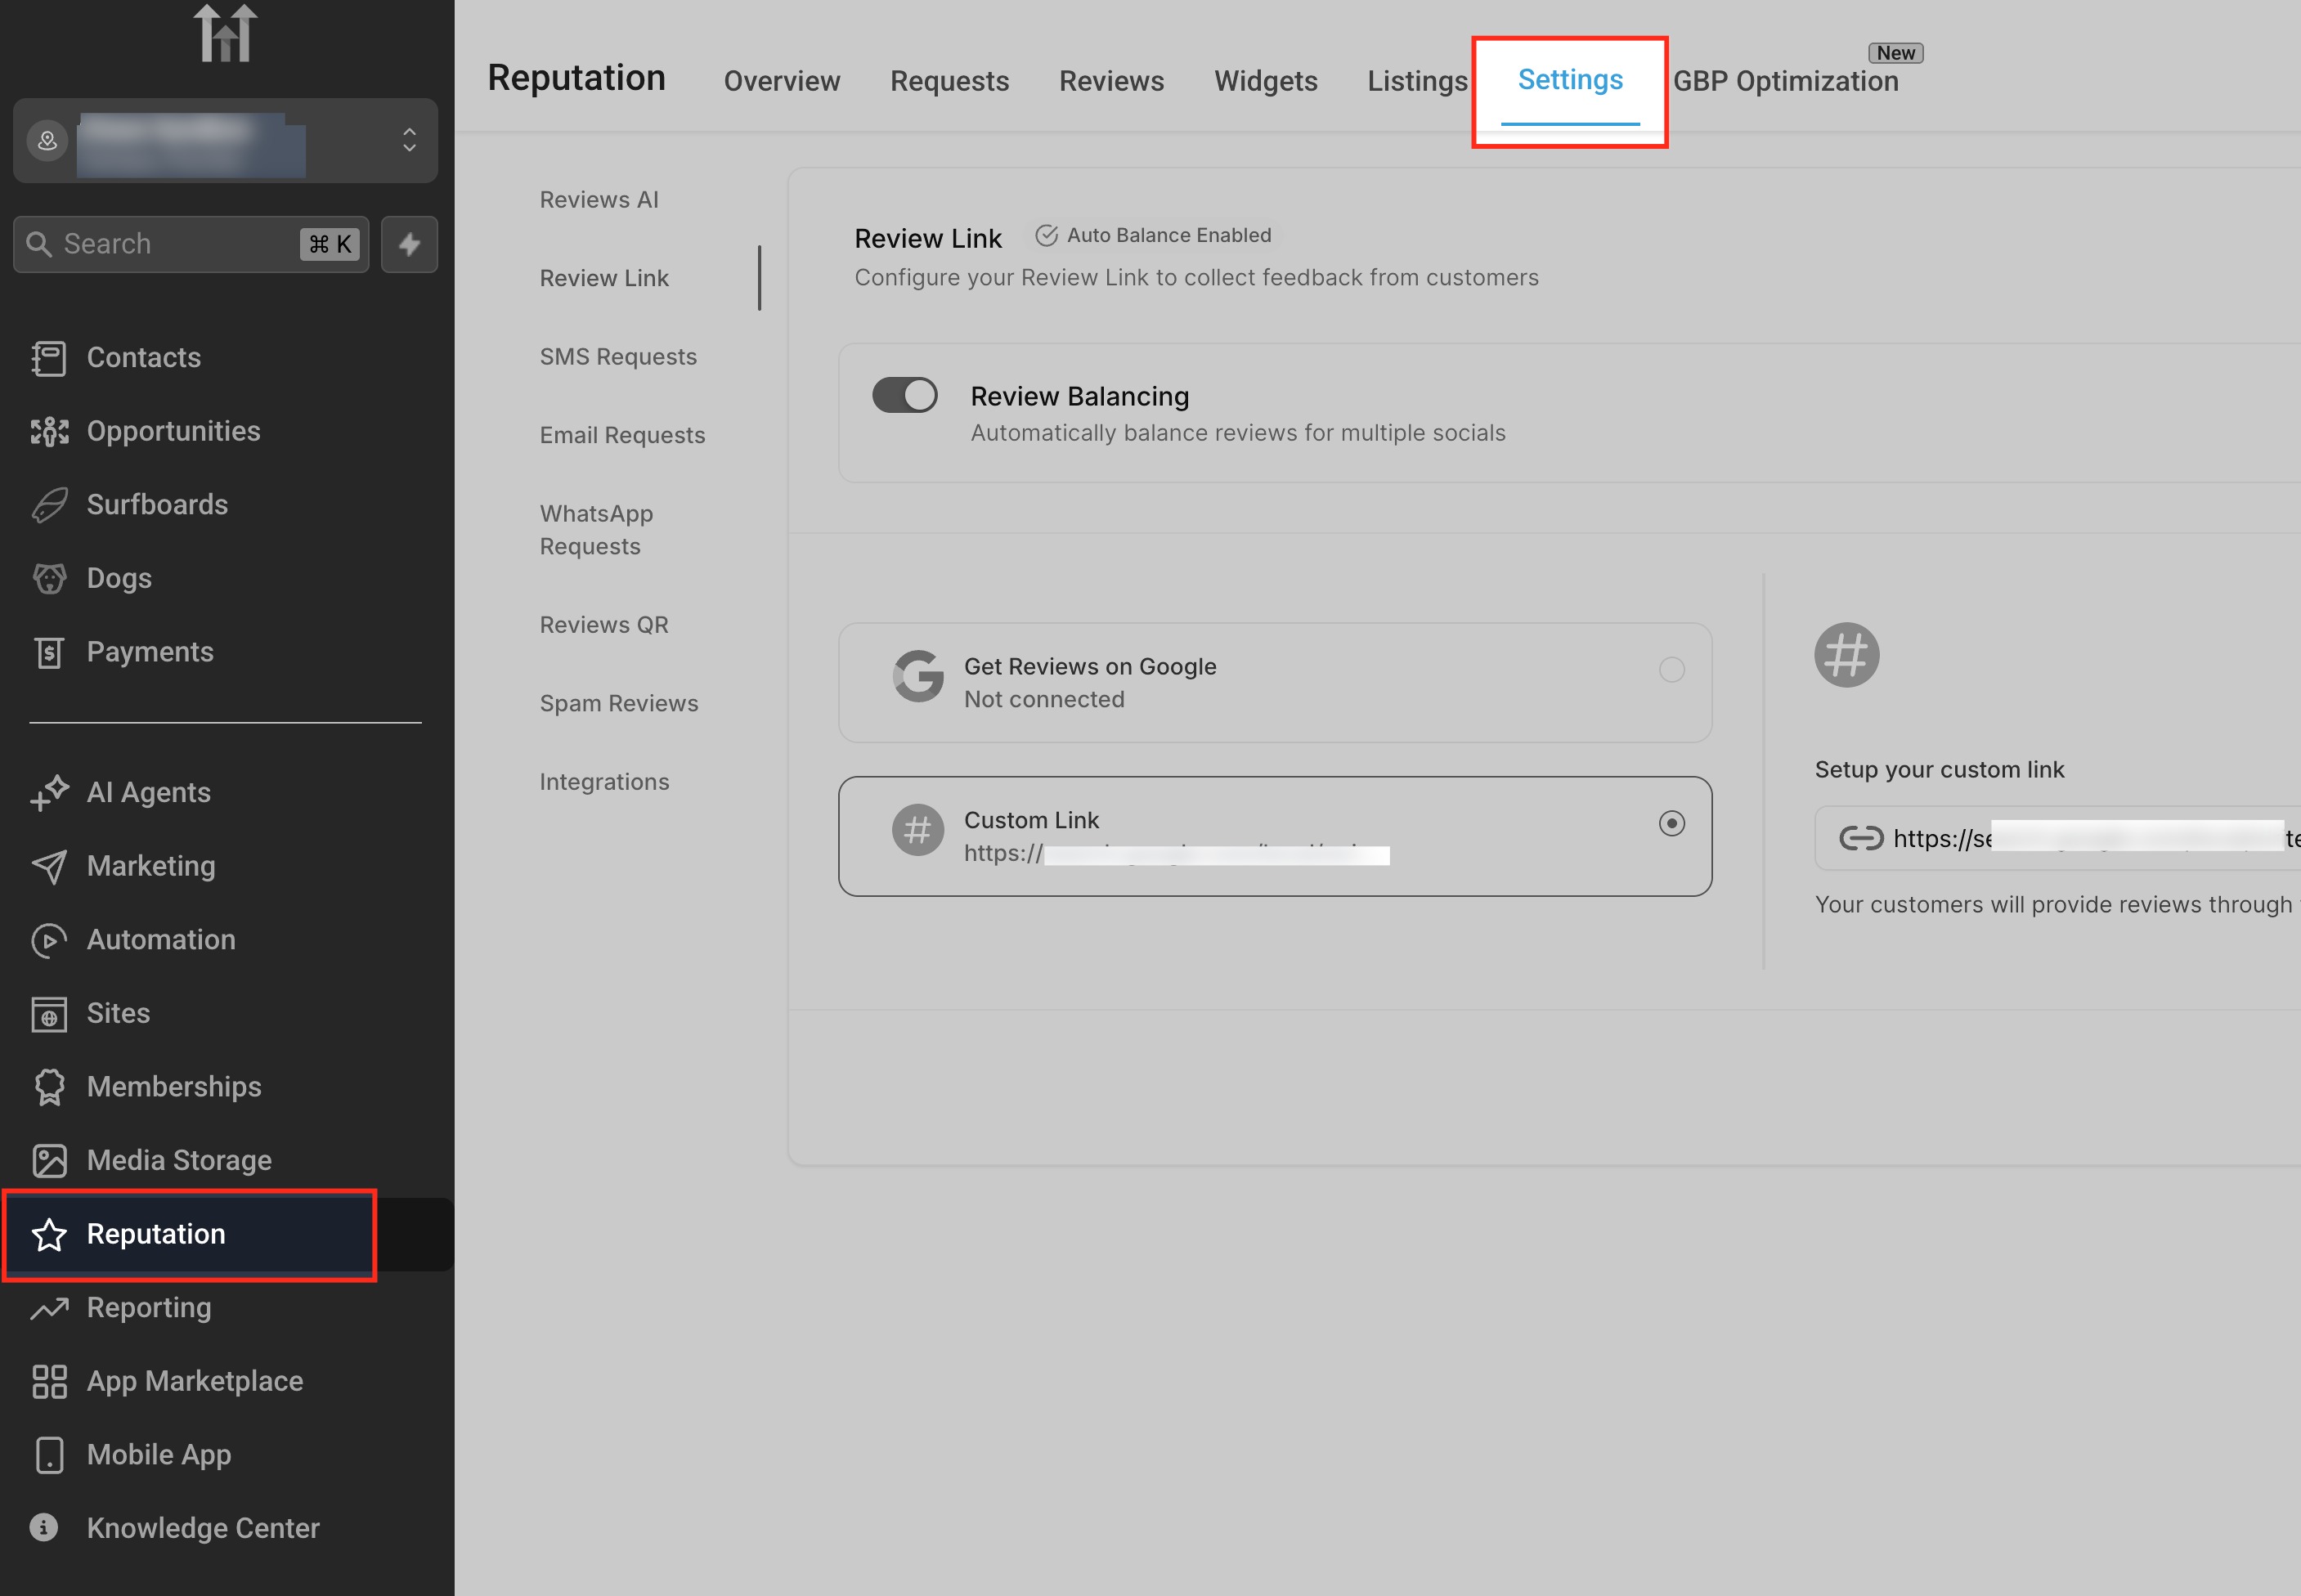
The review link is the URL inserted into your requests. You can let Futuria CRM balance reviews across the supported platforms (for example, Google) or override that option with a single destination using a custom URL.
Where to find it: Reputation → Settings → Review link
Activation and frequency controls
- Review balancing: turn it on to distribute review traffic automatically across the platforms you have set up.
- Get reviews on Google: connect your Google Business Profile (GBP) to send traffic to your Google listing.
- Custom link: select it and paste a specific URL if you want to send every customer to a single page.
Tip: if you use a custom link, check that it opens the review form directly. If you use balancing, make sure your integrations are connected correctly.
SMS requests
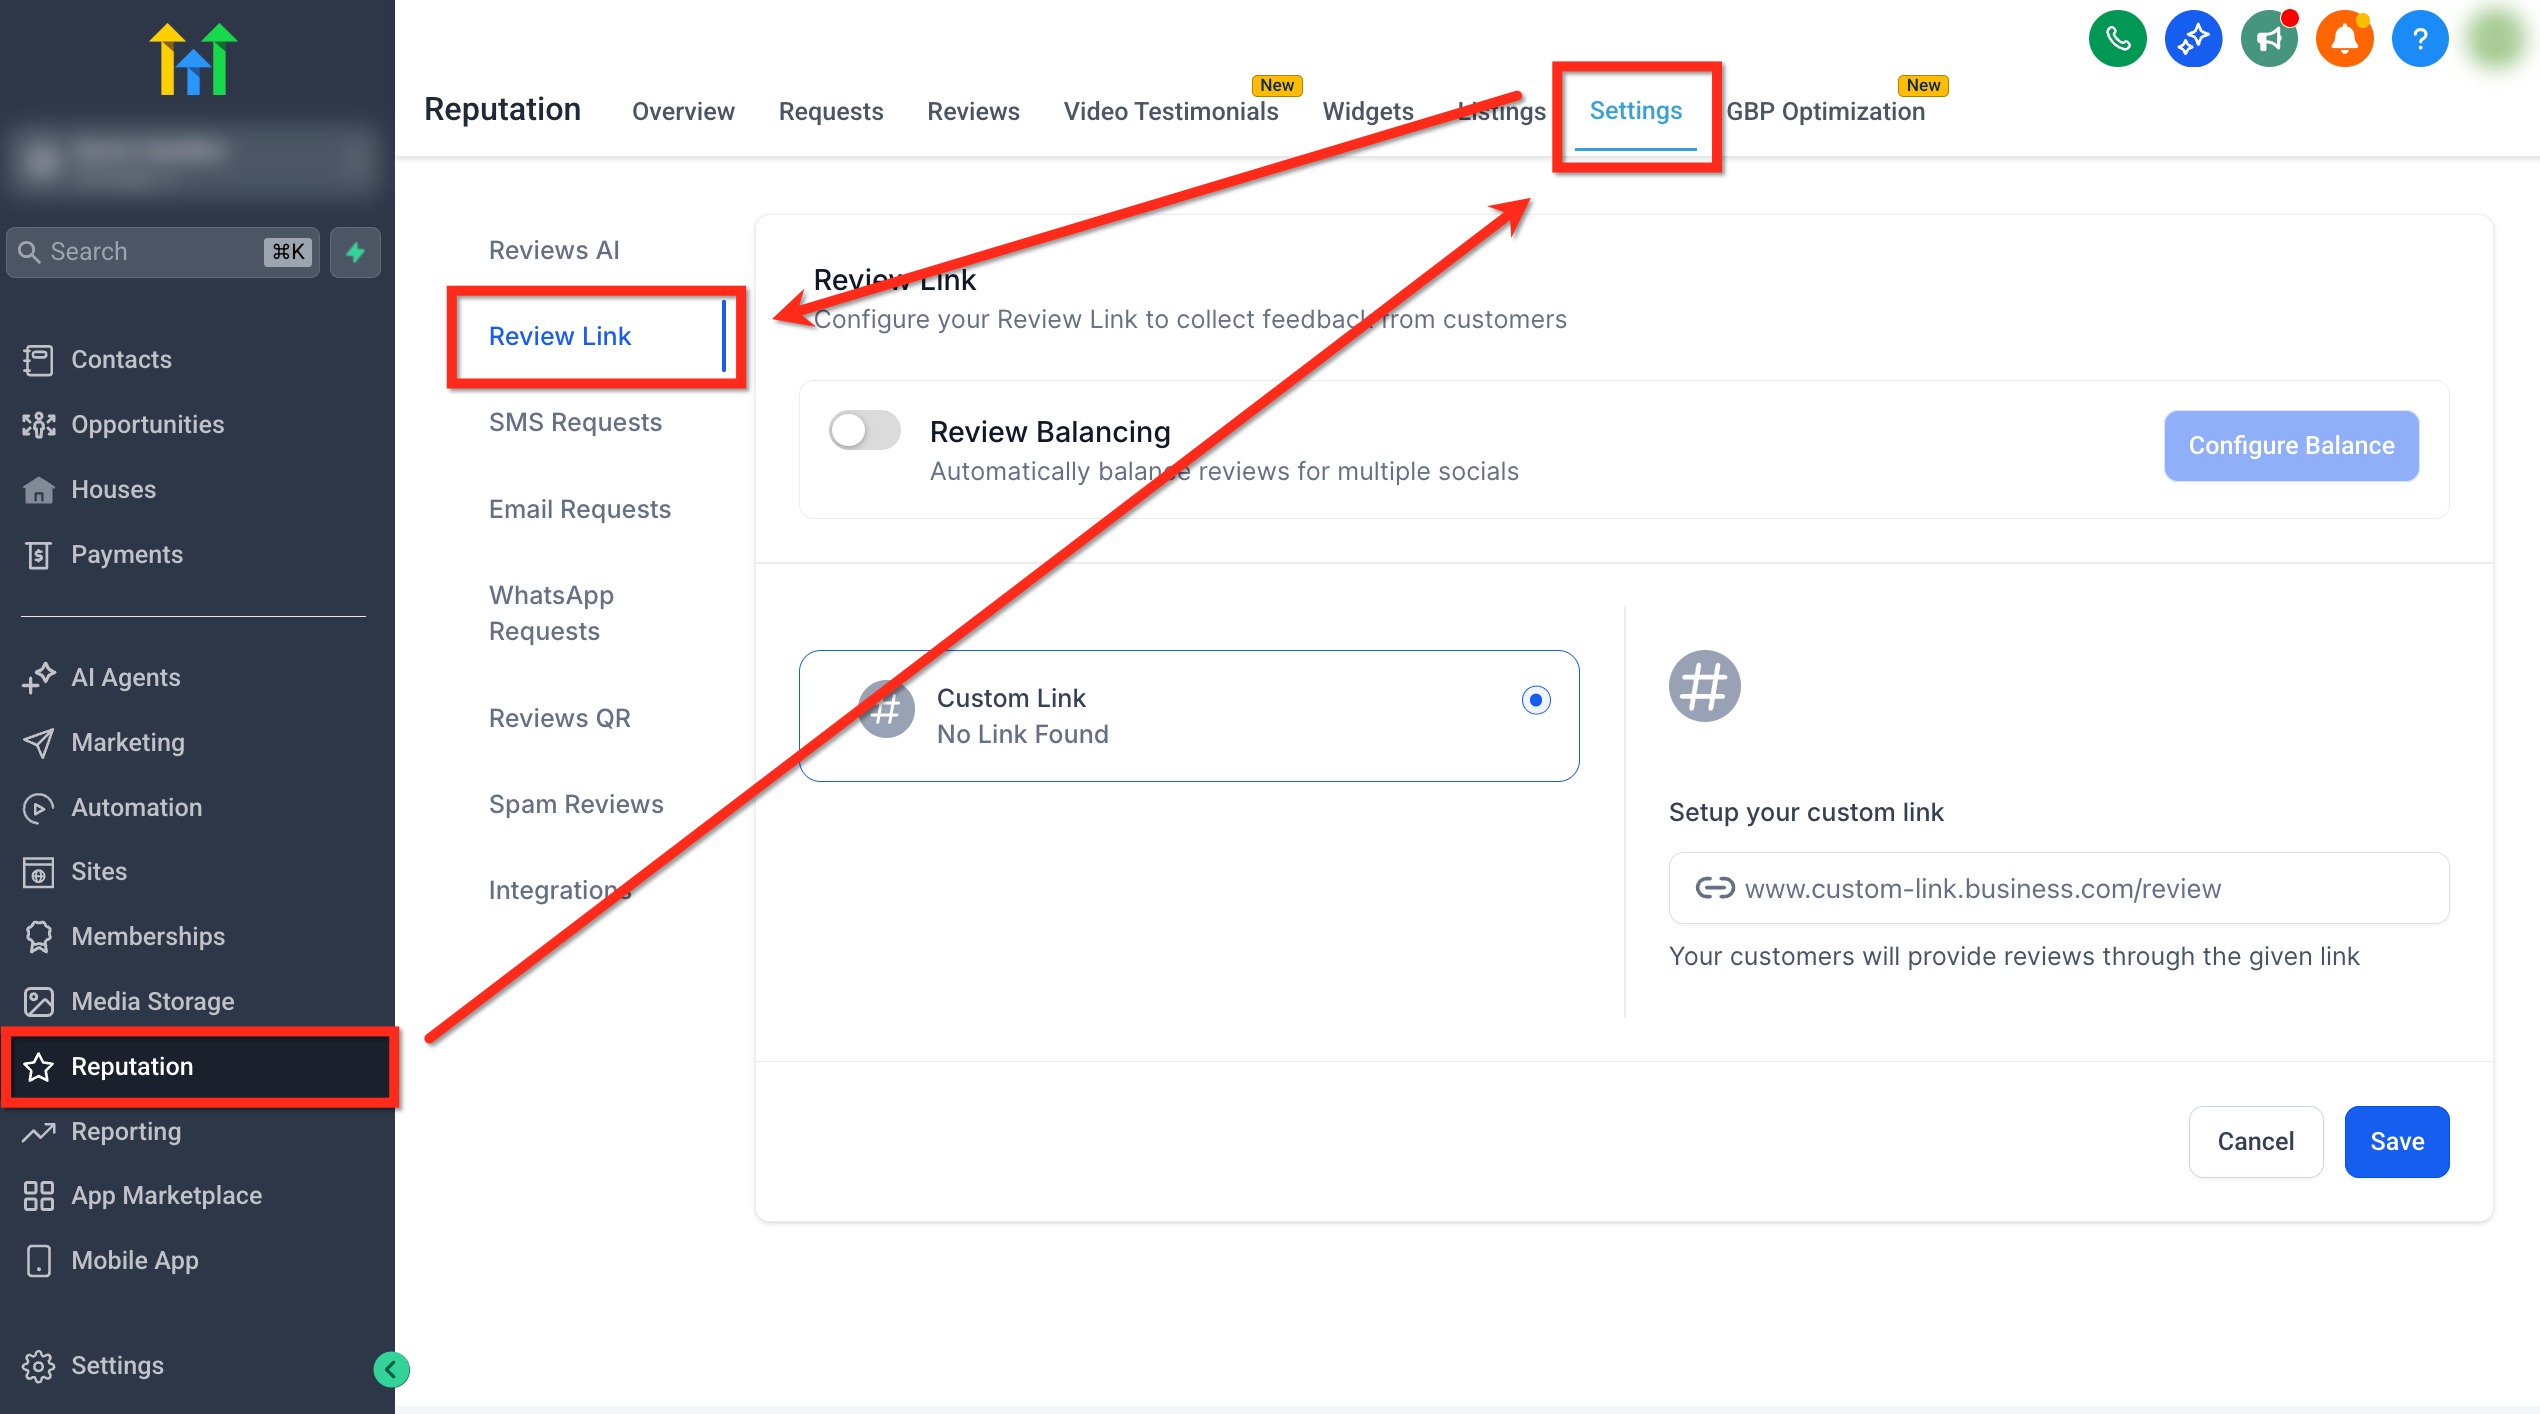
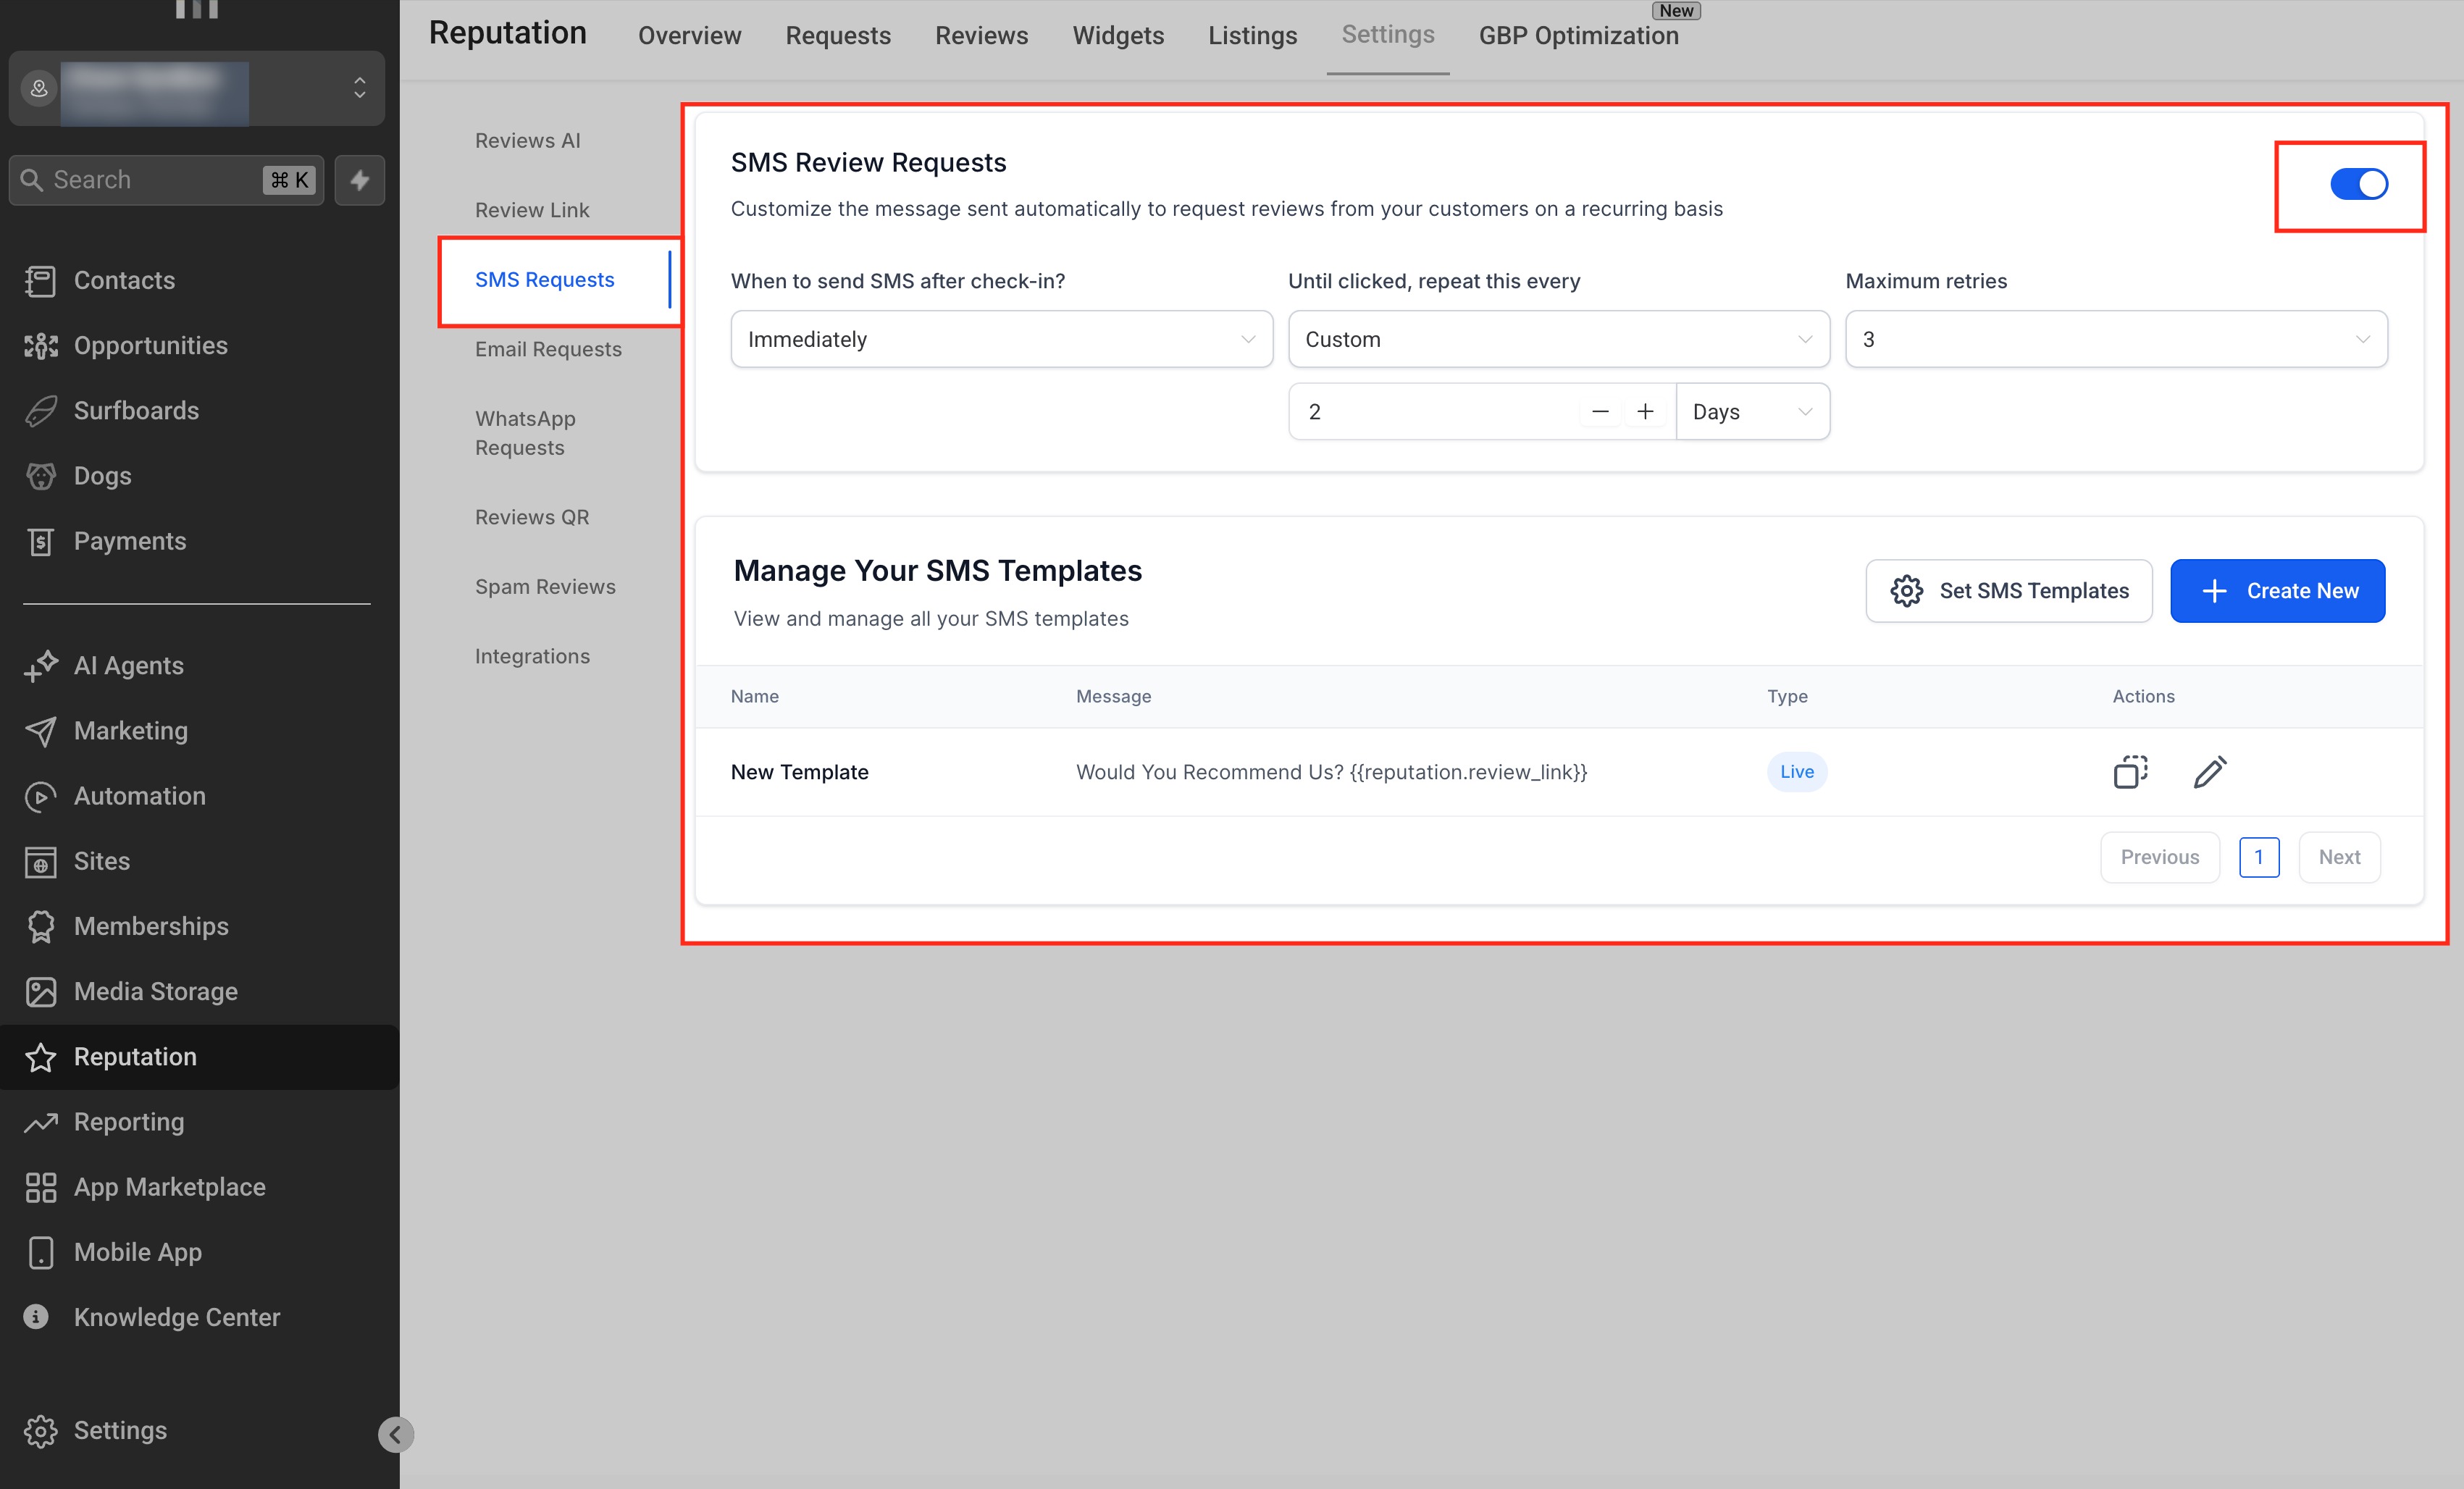
SMS requests are quick and personal. Use the toggle to turn them on, decide when to send the first message, set how often attempts are repeated, and create templates that include your review link and an optional image.
Navigation: Reputation → Settings → SMS requests
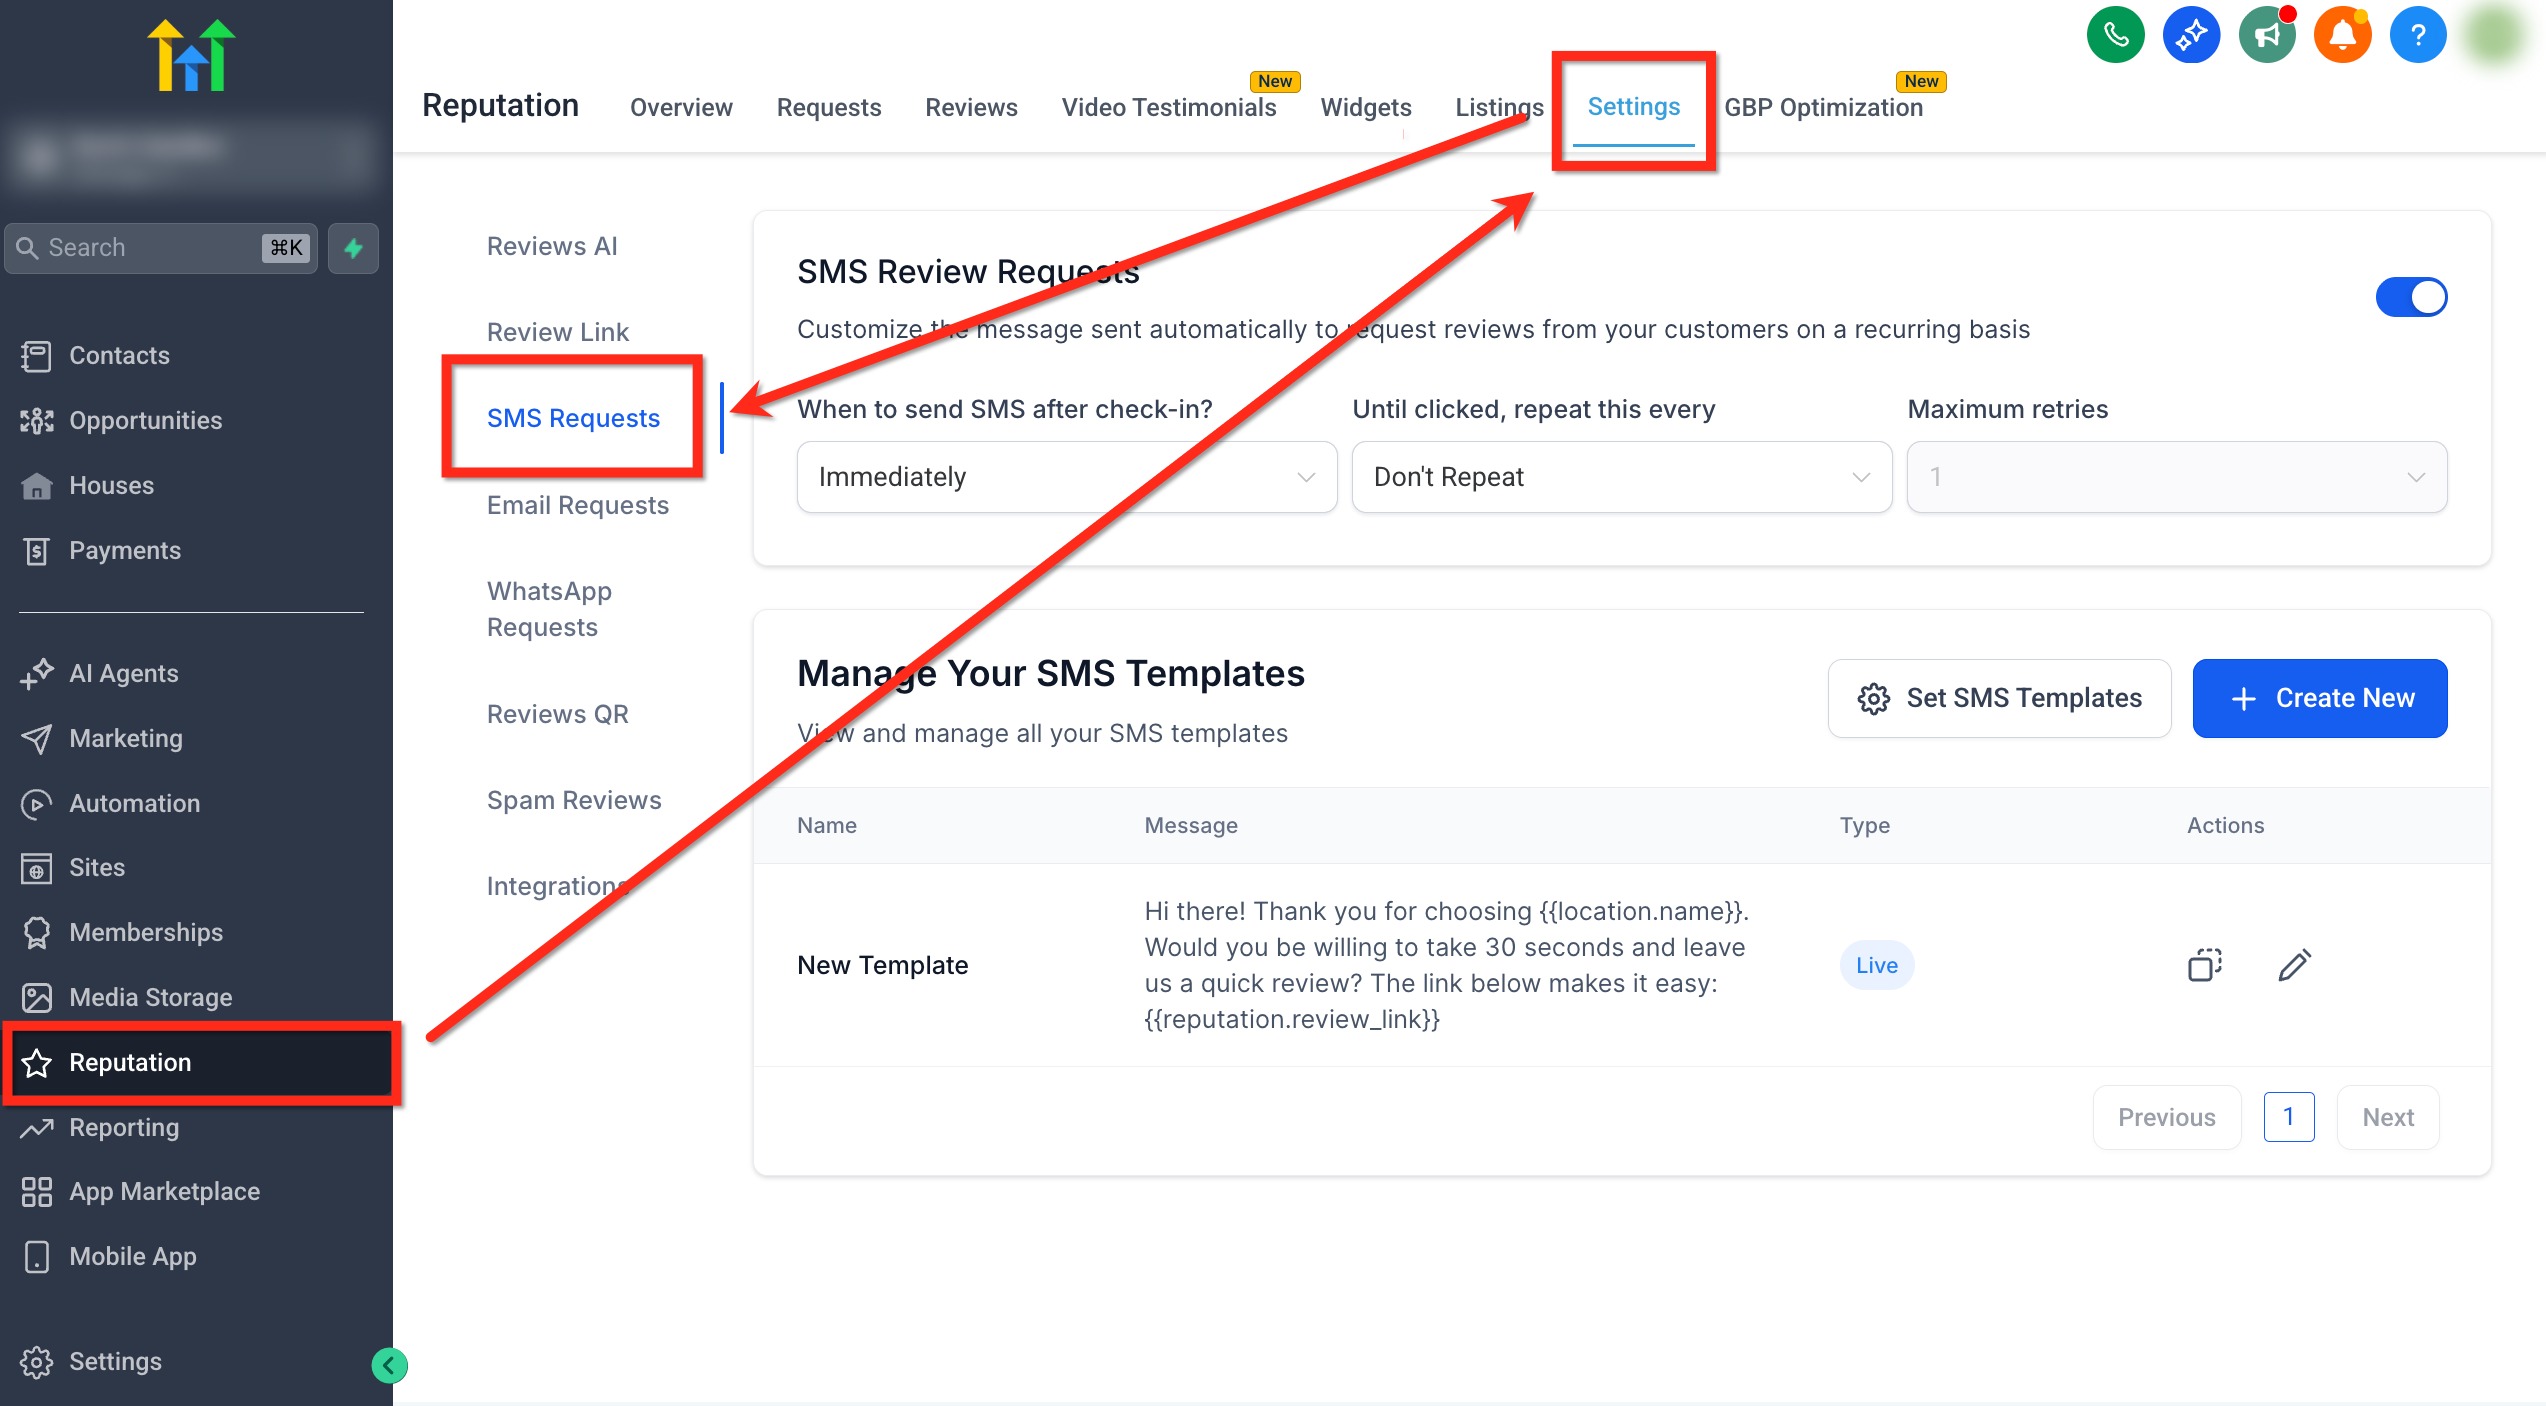
Activation and frequency controls
- Enable review requests by SMS: turn on the toggle in the top right.
- When should the SMS be sent after check-in?: choose when the first message goes out (for example, Immediately).
- Until clicked, repeat every: choose an interval (supports Custom with a number + Days).
- Maximum number of attempts: set how many reminders can be sent if the link is not clicked.
Creating or editing an SMS template
- Click Create new (or Edit on an existing template).
- Choose Create from scratch or Select from predefined templates. In the editor, add a Template name. Optionally, enable Request with image (or add an image URL).
- Write your message and insert the review link token: {{reputation.review_link}}.
- Click Save.
A note on costs: if you enable the request with an image, the message may be sent as an MMS and incur different charges. Check with your provider.
Email requests
Email requests allow richer branding, images and several review destinations. Turn the feature on, set timings and attempts, then create or import templates in the drag-and-drop editor.
Navigation: Reputation → Settings → Email requests
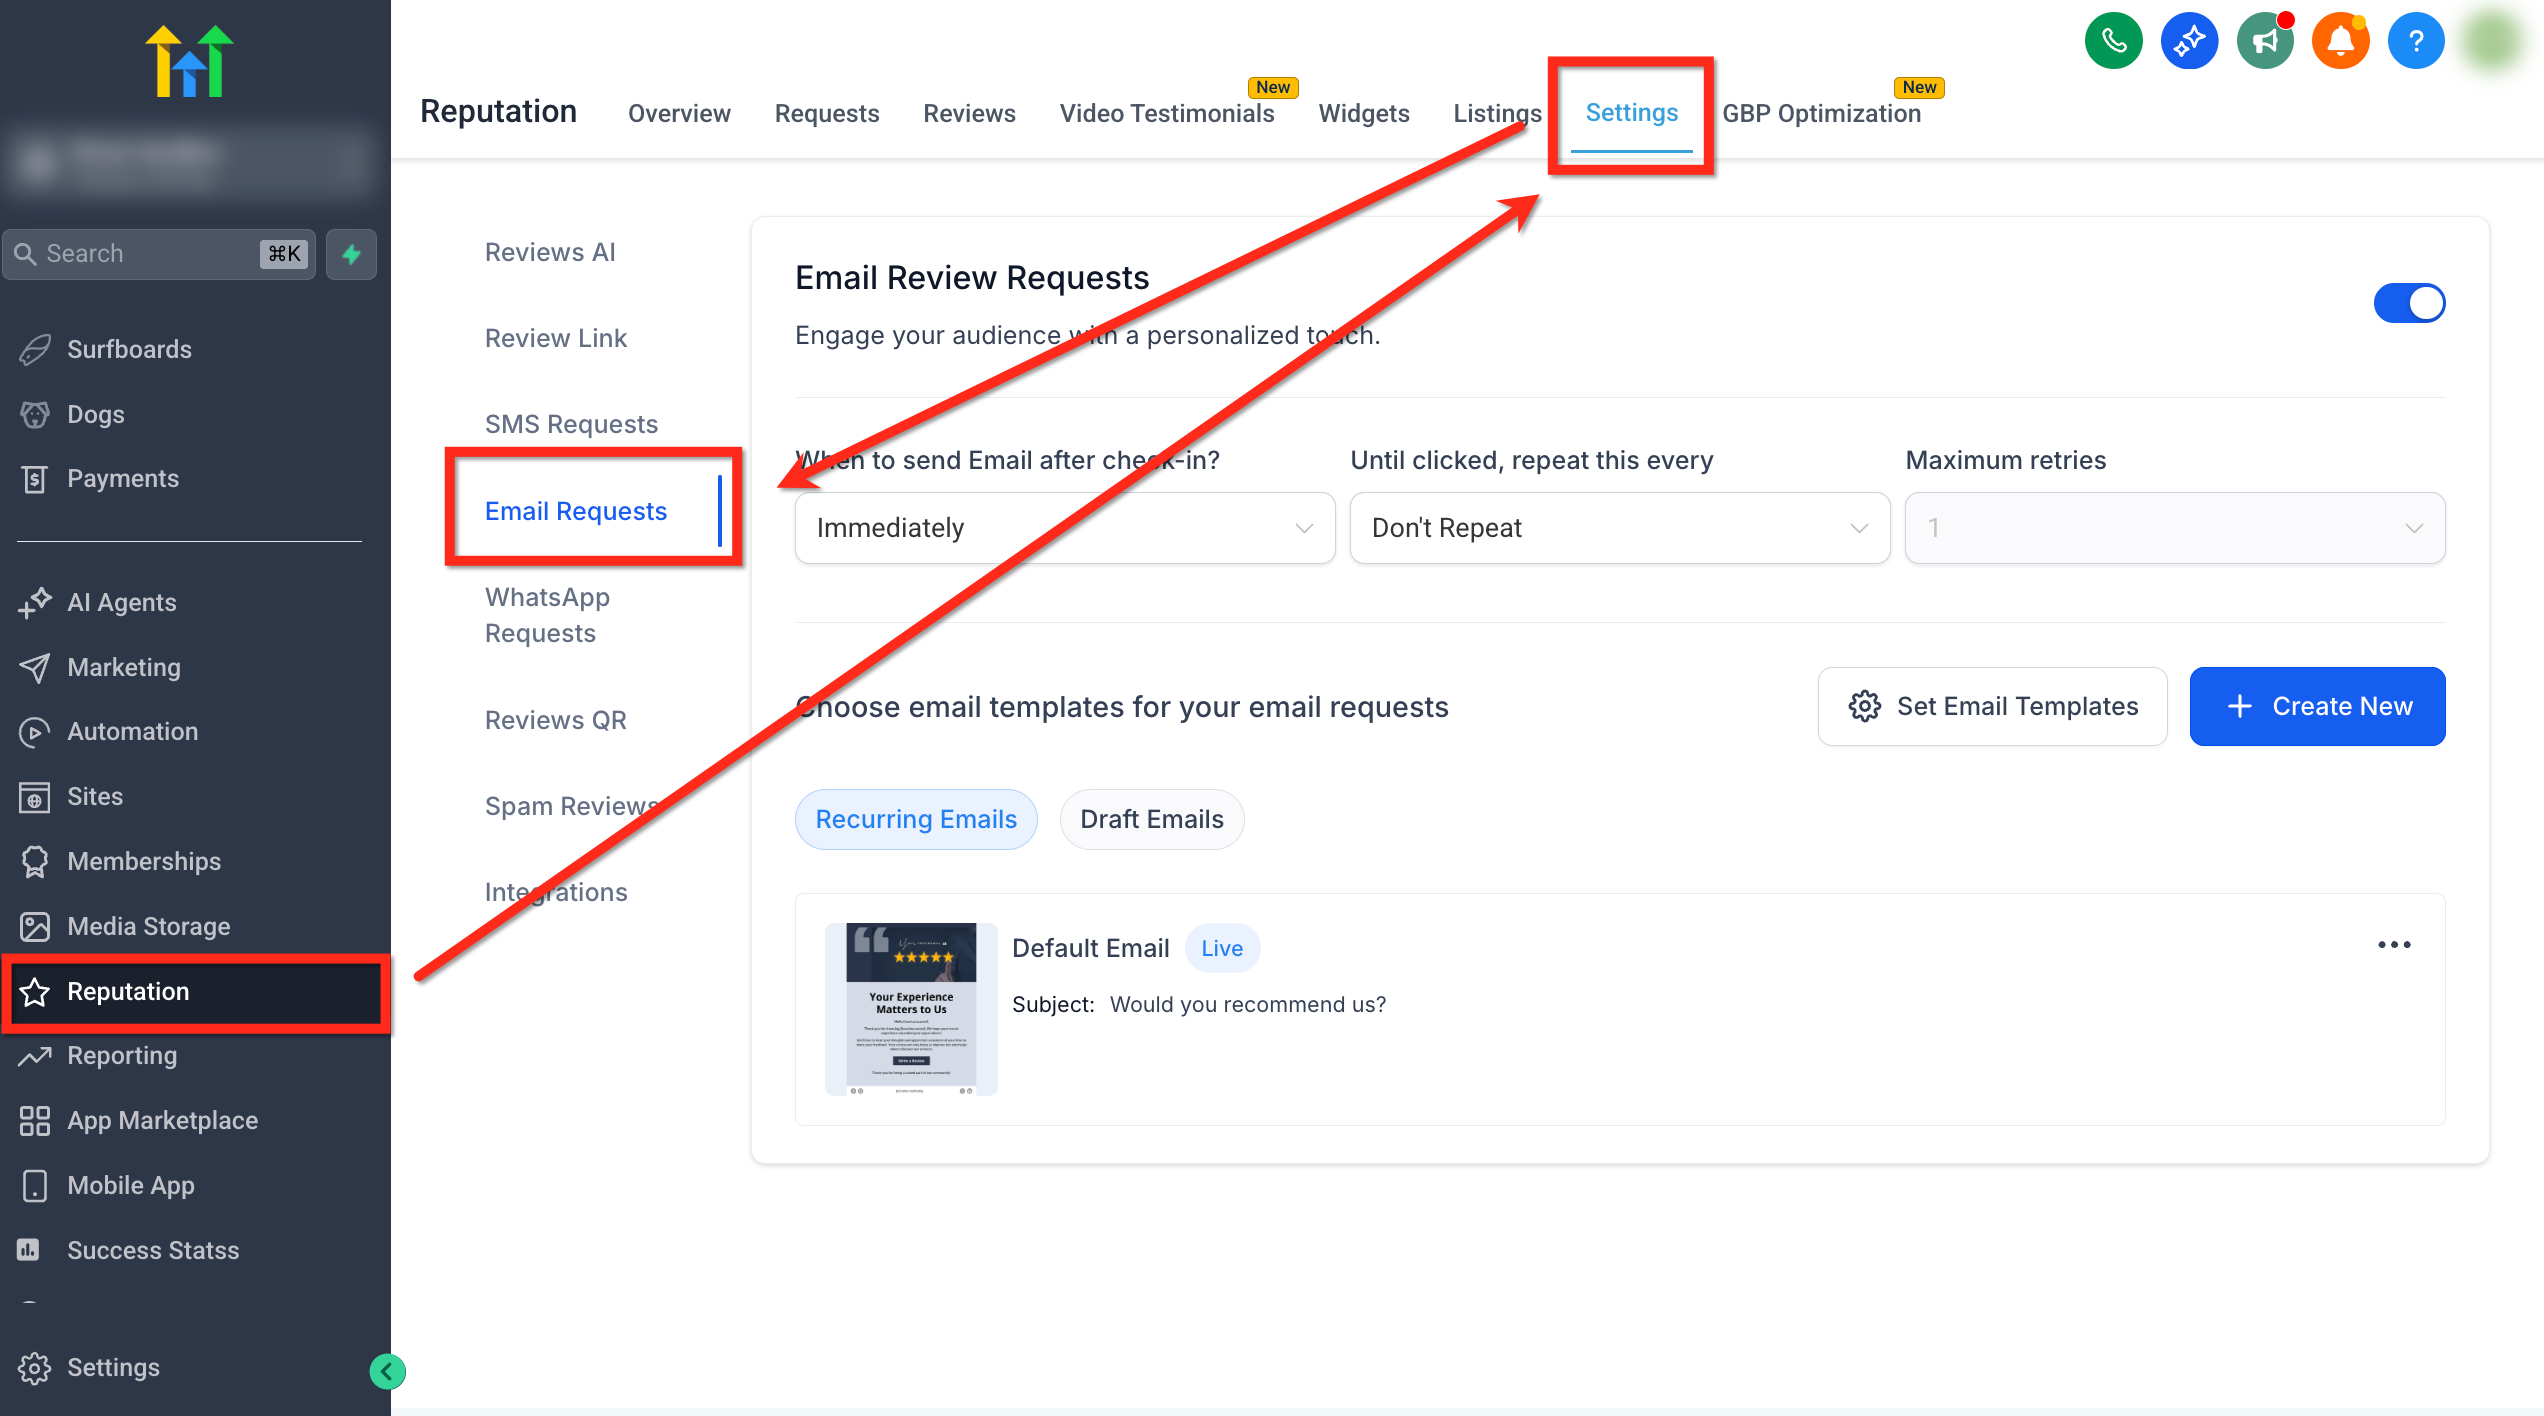
Activation and frequency controls
- Enable review requests by email: turn on the toggle in the top right.
- When should the email be sent after check-in?: choose the initial delay (for example, 1 hour).
- Until clicked, repeat every: set the repeat interval (supports Custom with a number + Days).
- Maximum number of attempts: choose how many reminders to send.
Note: "after check-in" refers to the moment the "Send review request" action is triggered, either manually (from a contact record or from Reputation → Requests) or automatically through an automation. The timing you select here determines how long after that trigger the message is sent.
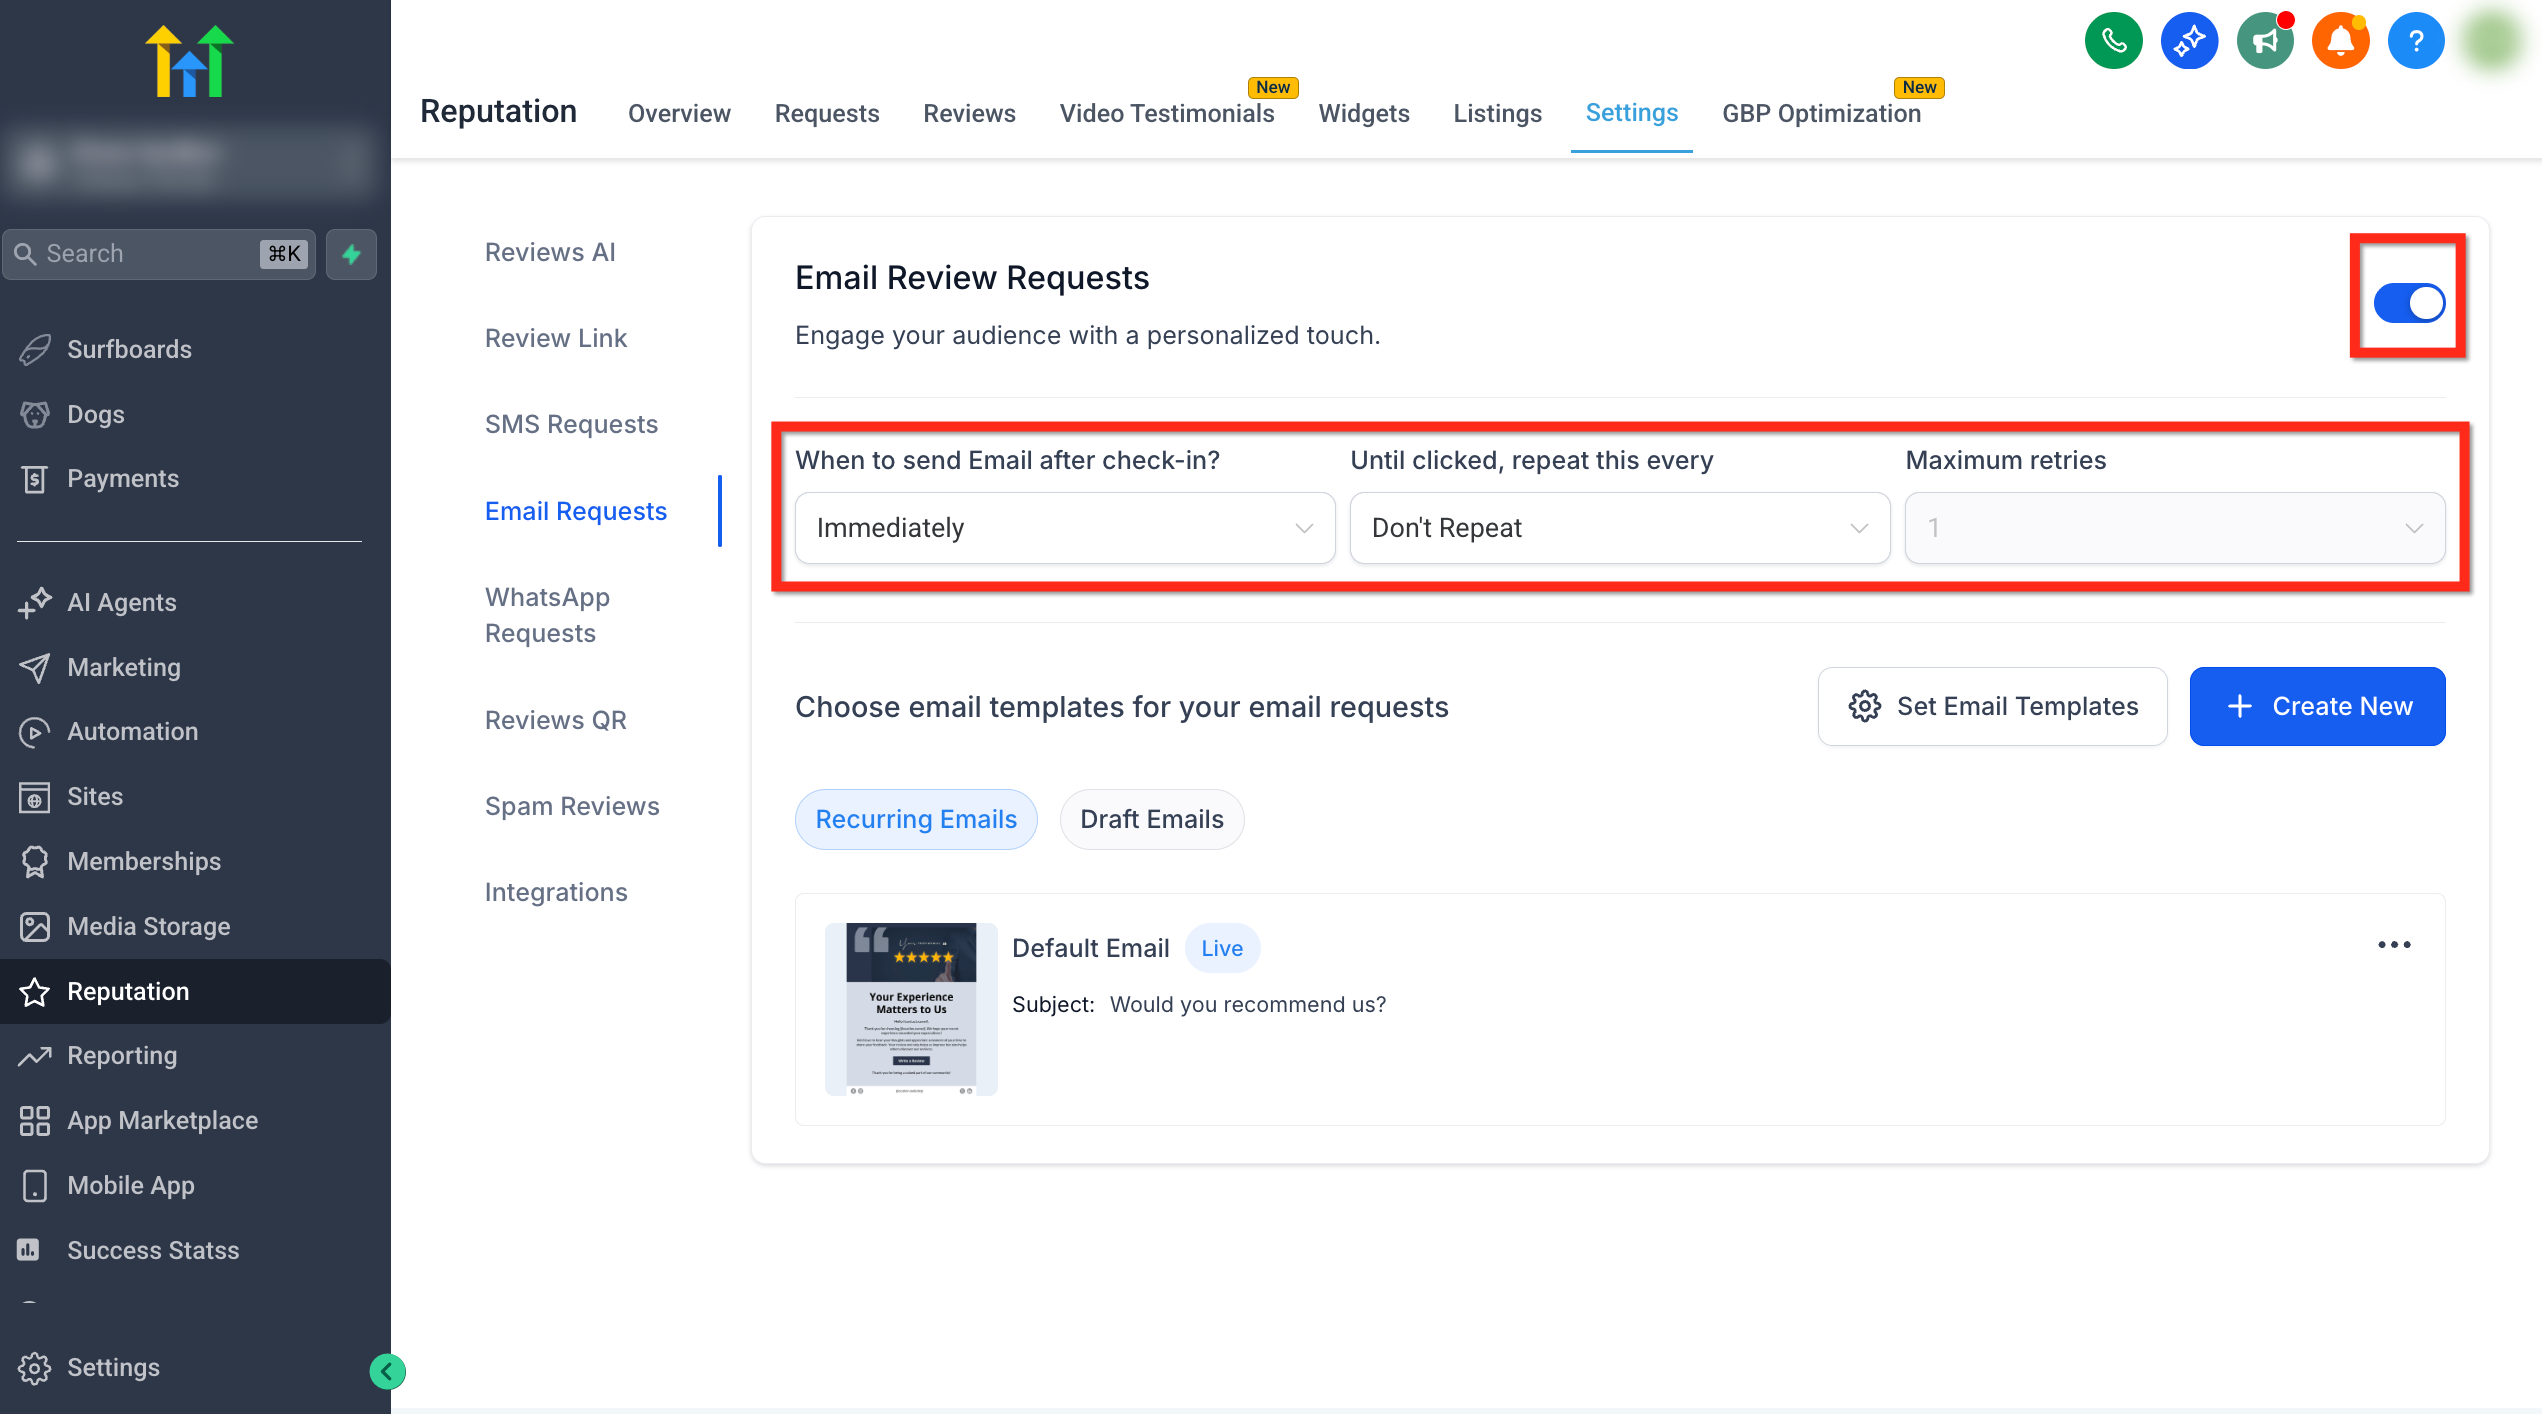
Creating or importing an email template
- Click Create new → Create new template or Import from the template library.
- In the email editor, add your branding and your content.
- Drag the Review link element into the email (or set the main button to use the review link).
- Save the template.
Selecting templates for the first send and follow-up attempts (sequence)
Turning on SMS/email requests is not enough; you also need to tell Futuria CRM which template to use for the initial send and for each follow-up attempt. This selection controls exactly what customers receive at every step.
- For emails: click Set email templates, select the template for the first send and assign templates to each attempt slot, then click Save.
- For SMS: click Set SMS templates, then select your templates for the first send and the attempts and save.
How to set up review request messages (step by step)
Step 1: Set up the review link
In the left-hand sidebar, click Reputation, then open the Settings tab at the top. Under Review link, turn on the Review balancing option or select Custom link and paste your URL into Set your custom link.
Step 2: Enable SMS requests
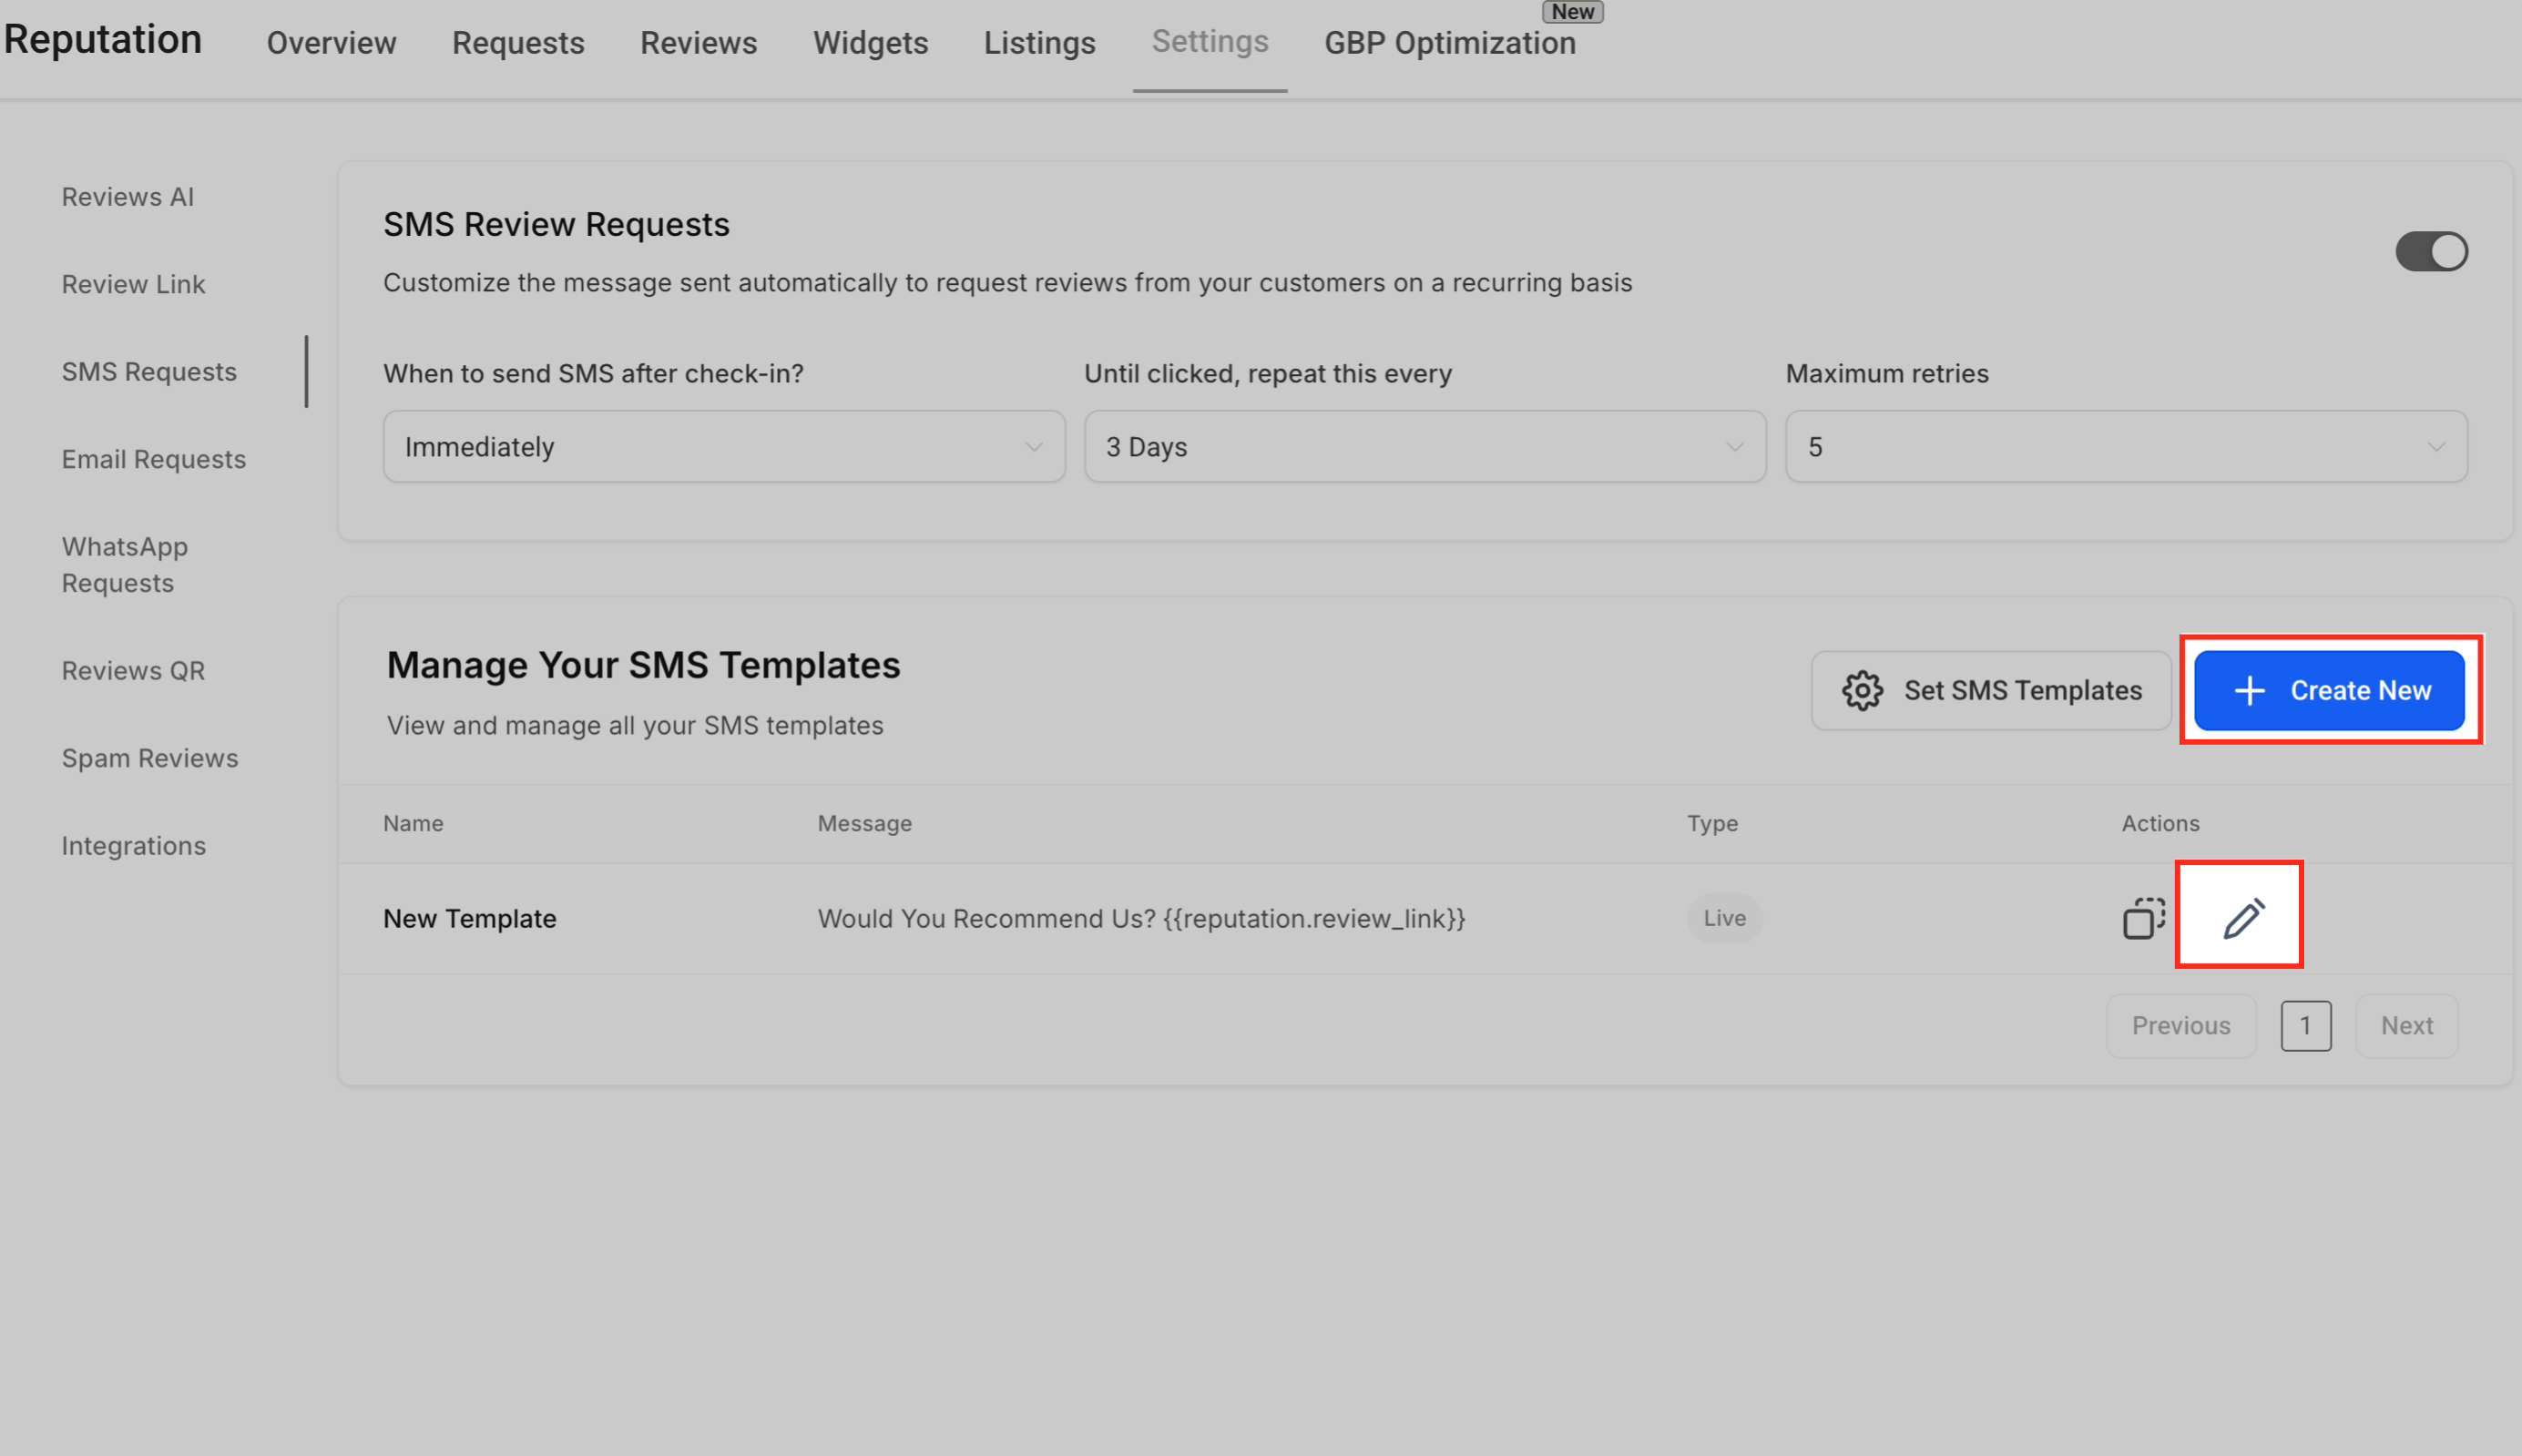
Go to Reputation → Settings → SMS requests and turn on the toggle in the top right. Set When to send after check-in, choose the repeat interval and the Maximum number of attempts, then use Create new or Set SMS templates to manage the messages.
Step 3: Add an SMS template
Click Create new to build a new review request by SMS, or use the pencil (edit) icon to edit the selected template. The templates you create or edit here appear in the list and can be assigned to the sequence.
Step 4: Choose the template type
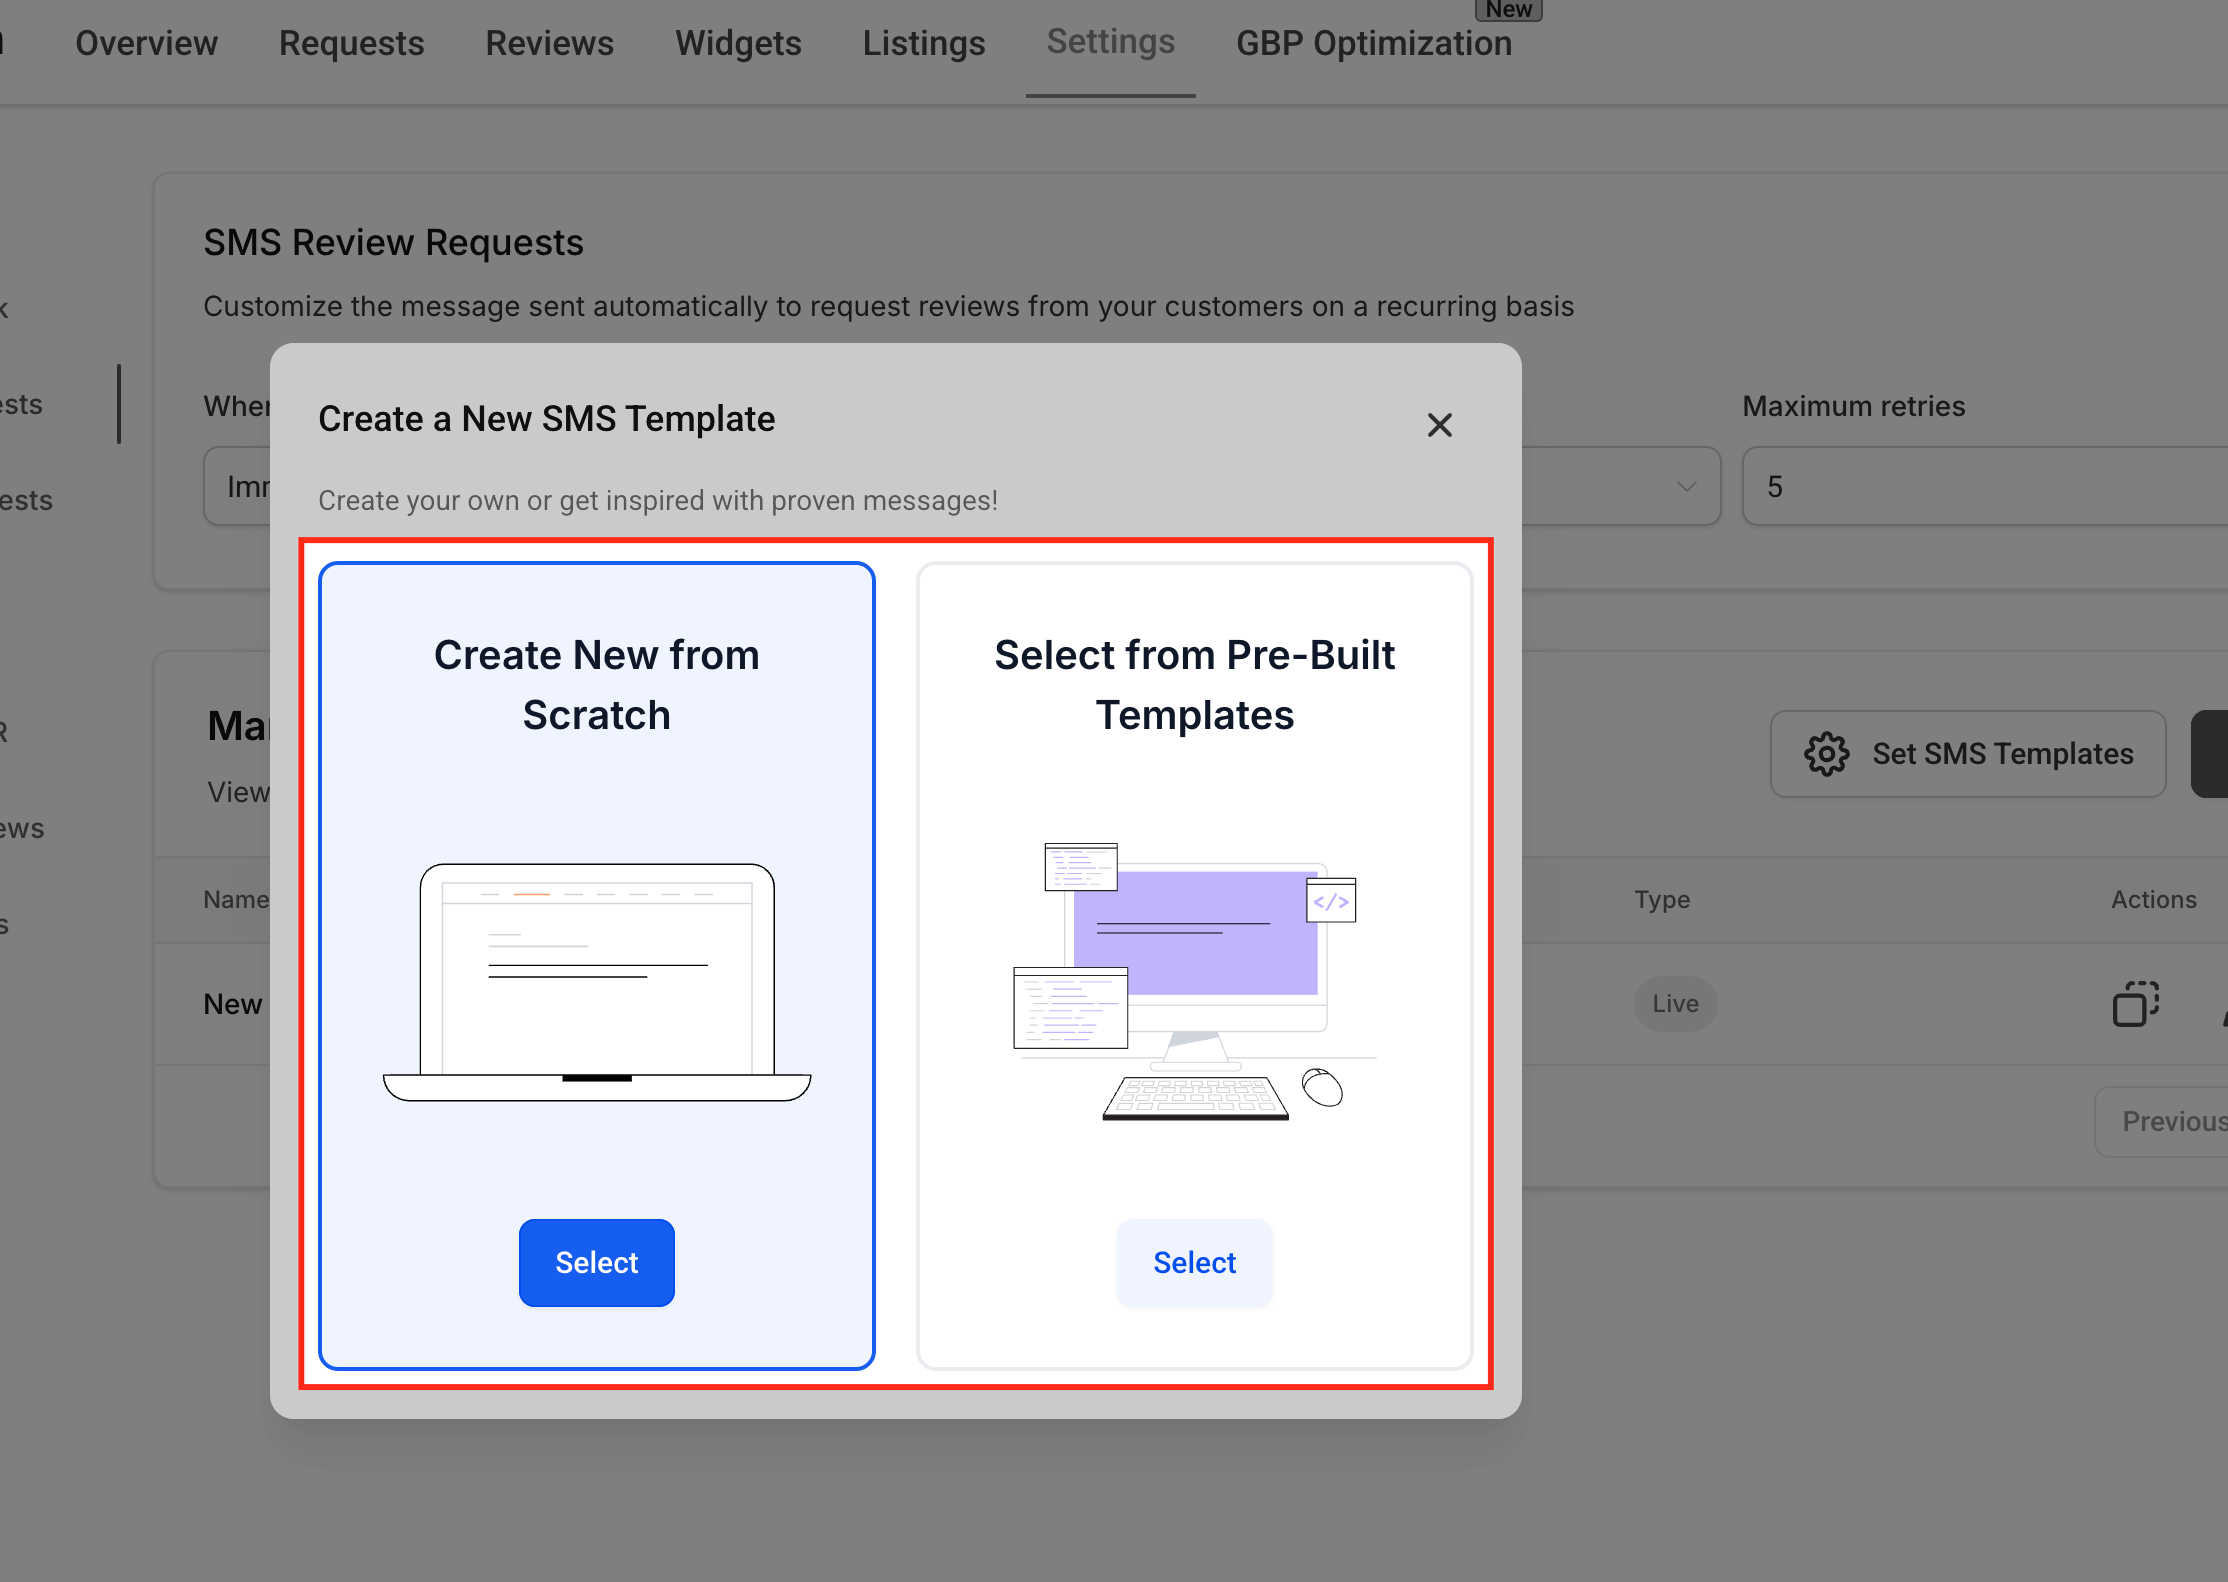
After clicking Create new, choose how to start: Create from scratch or Select from predefined templates. Click Select under the option you prefer: start from scratch for full control, or use a proven template to move faster.
Step 5: Choose a predefined template
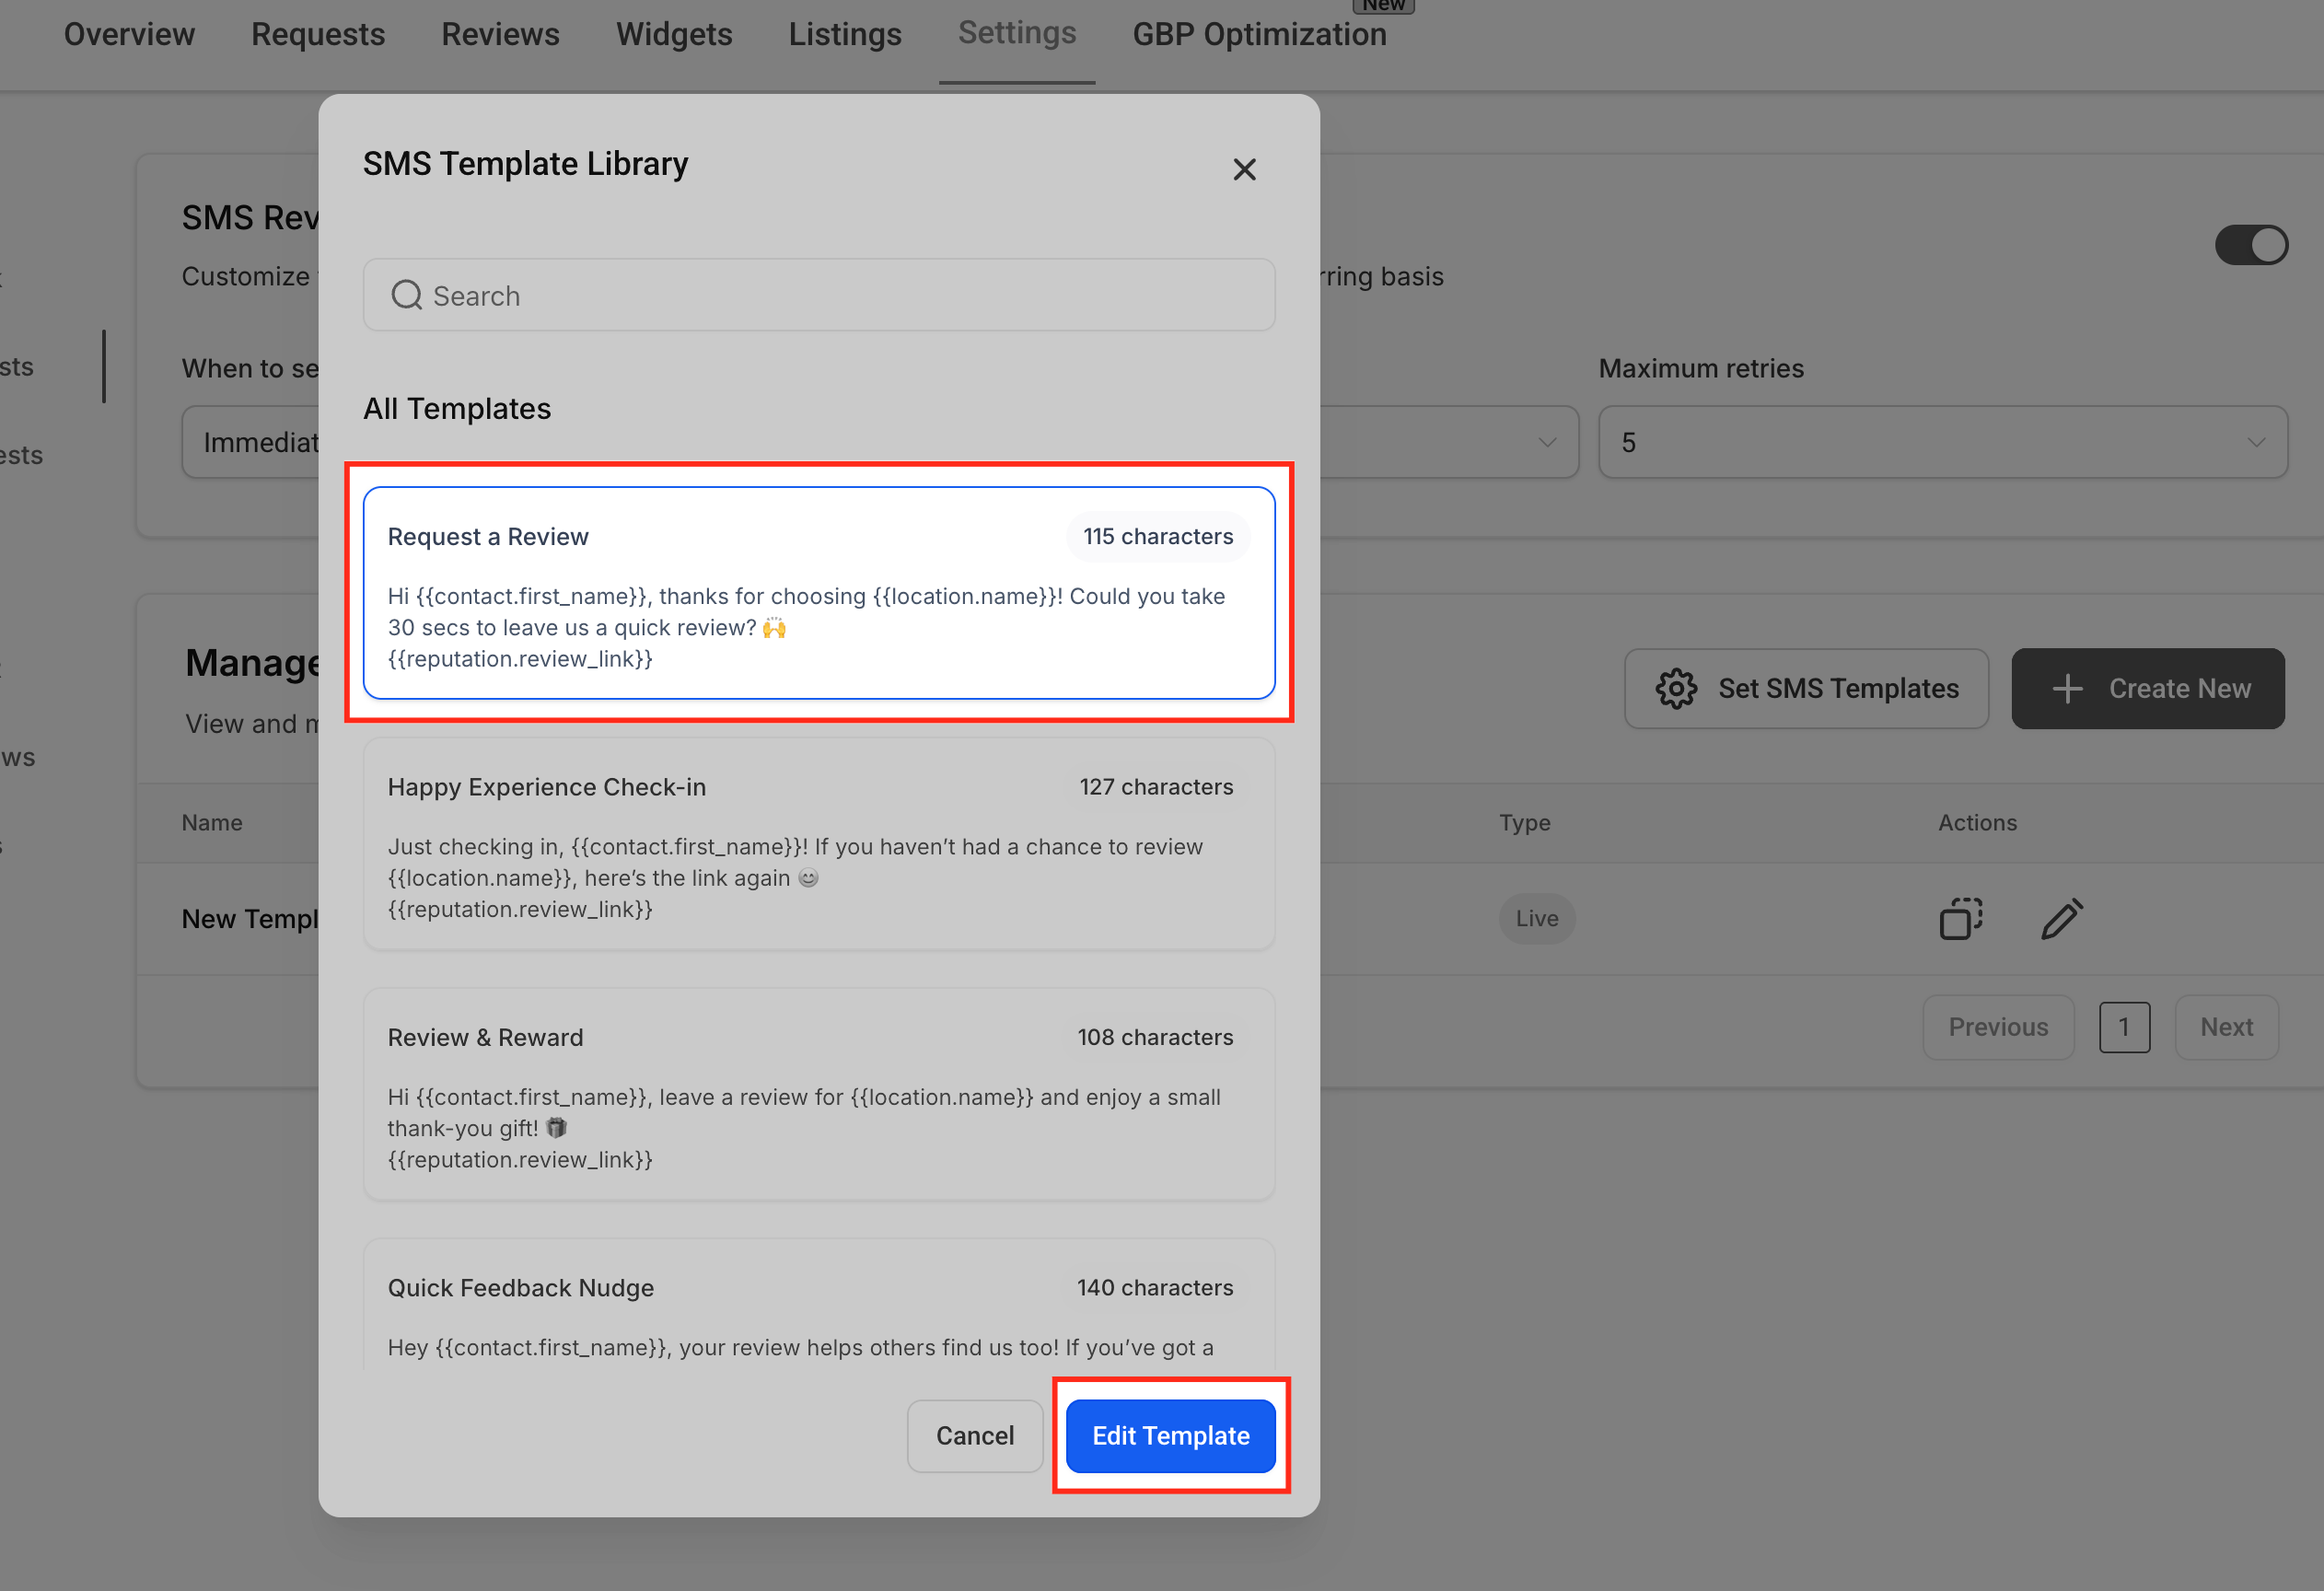
From the SMS template library, select a predefined option such as Request a review. Click Edit template to open and customise it, where you can change the text while keeping the {{reputation.review_link}} token.
Step 6: Customise the SMS template
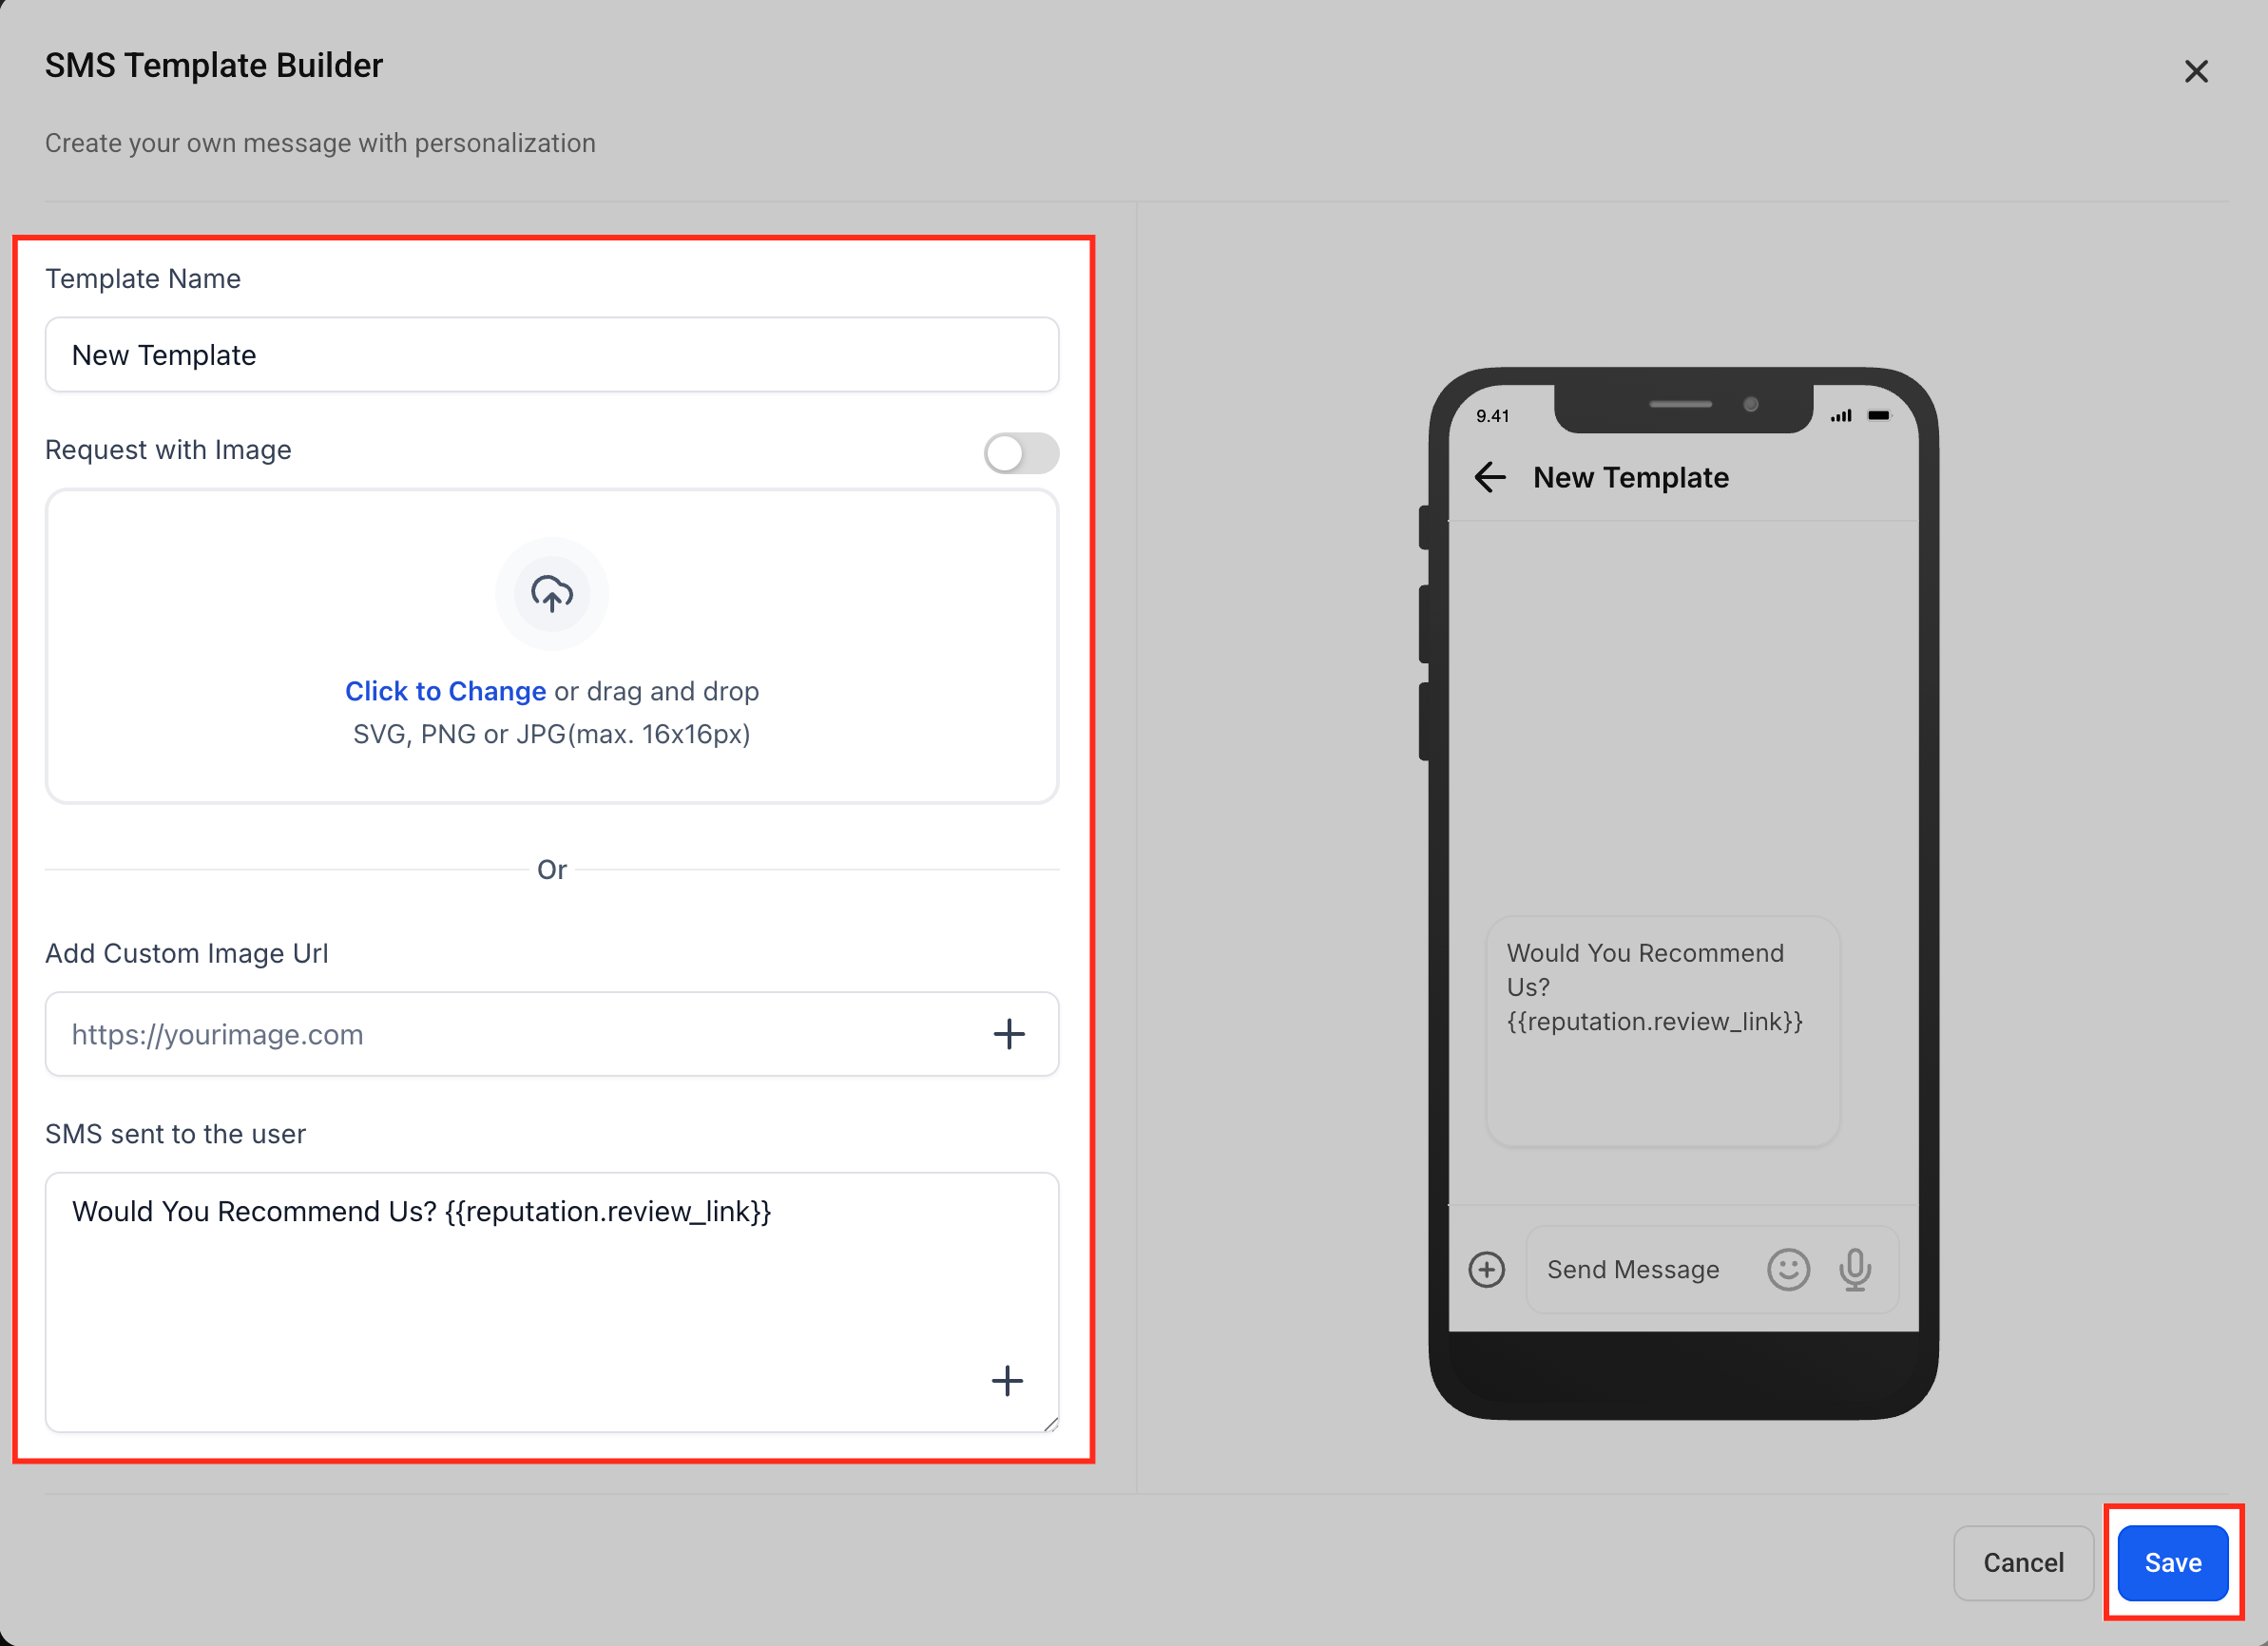
Enter a Template name, optionally enable Request with image to upload or link an image, and write your message using {{reputation.review_link}}. Check the phone preview on the right, then click Save.
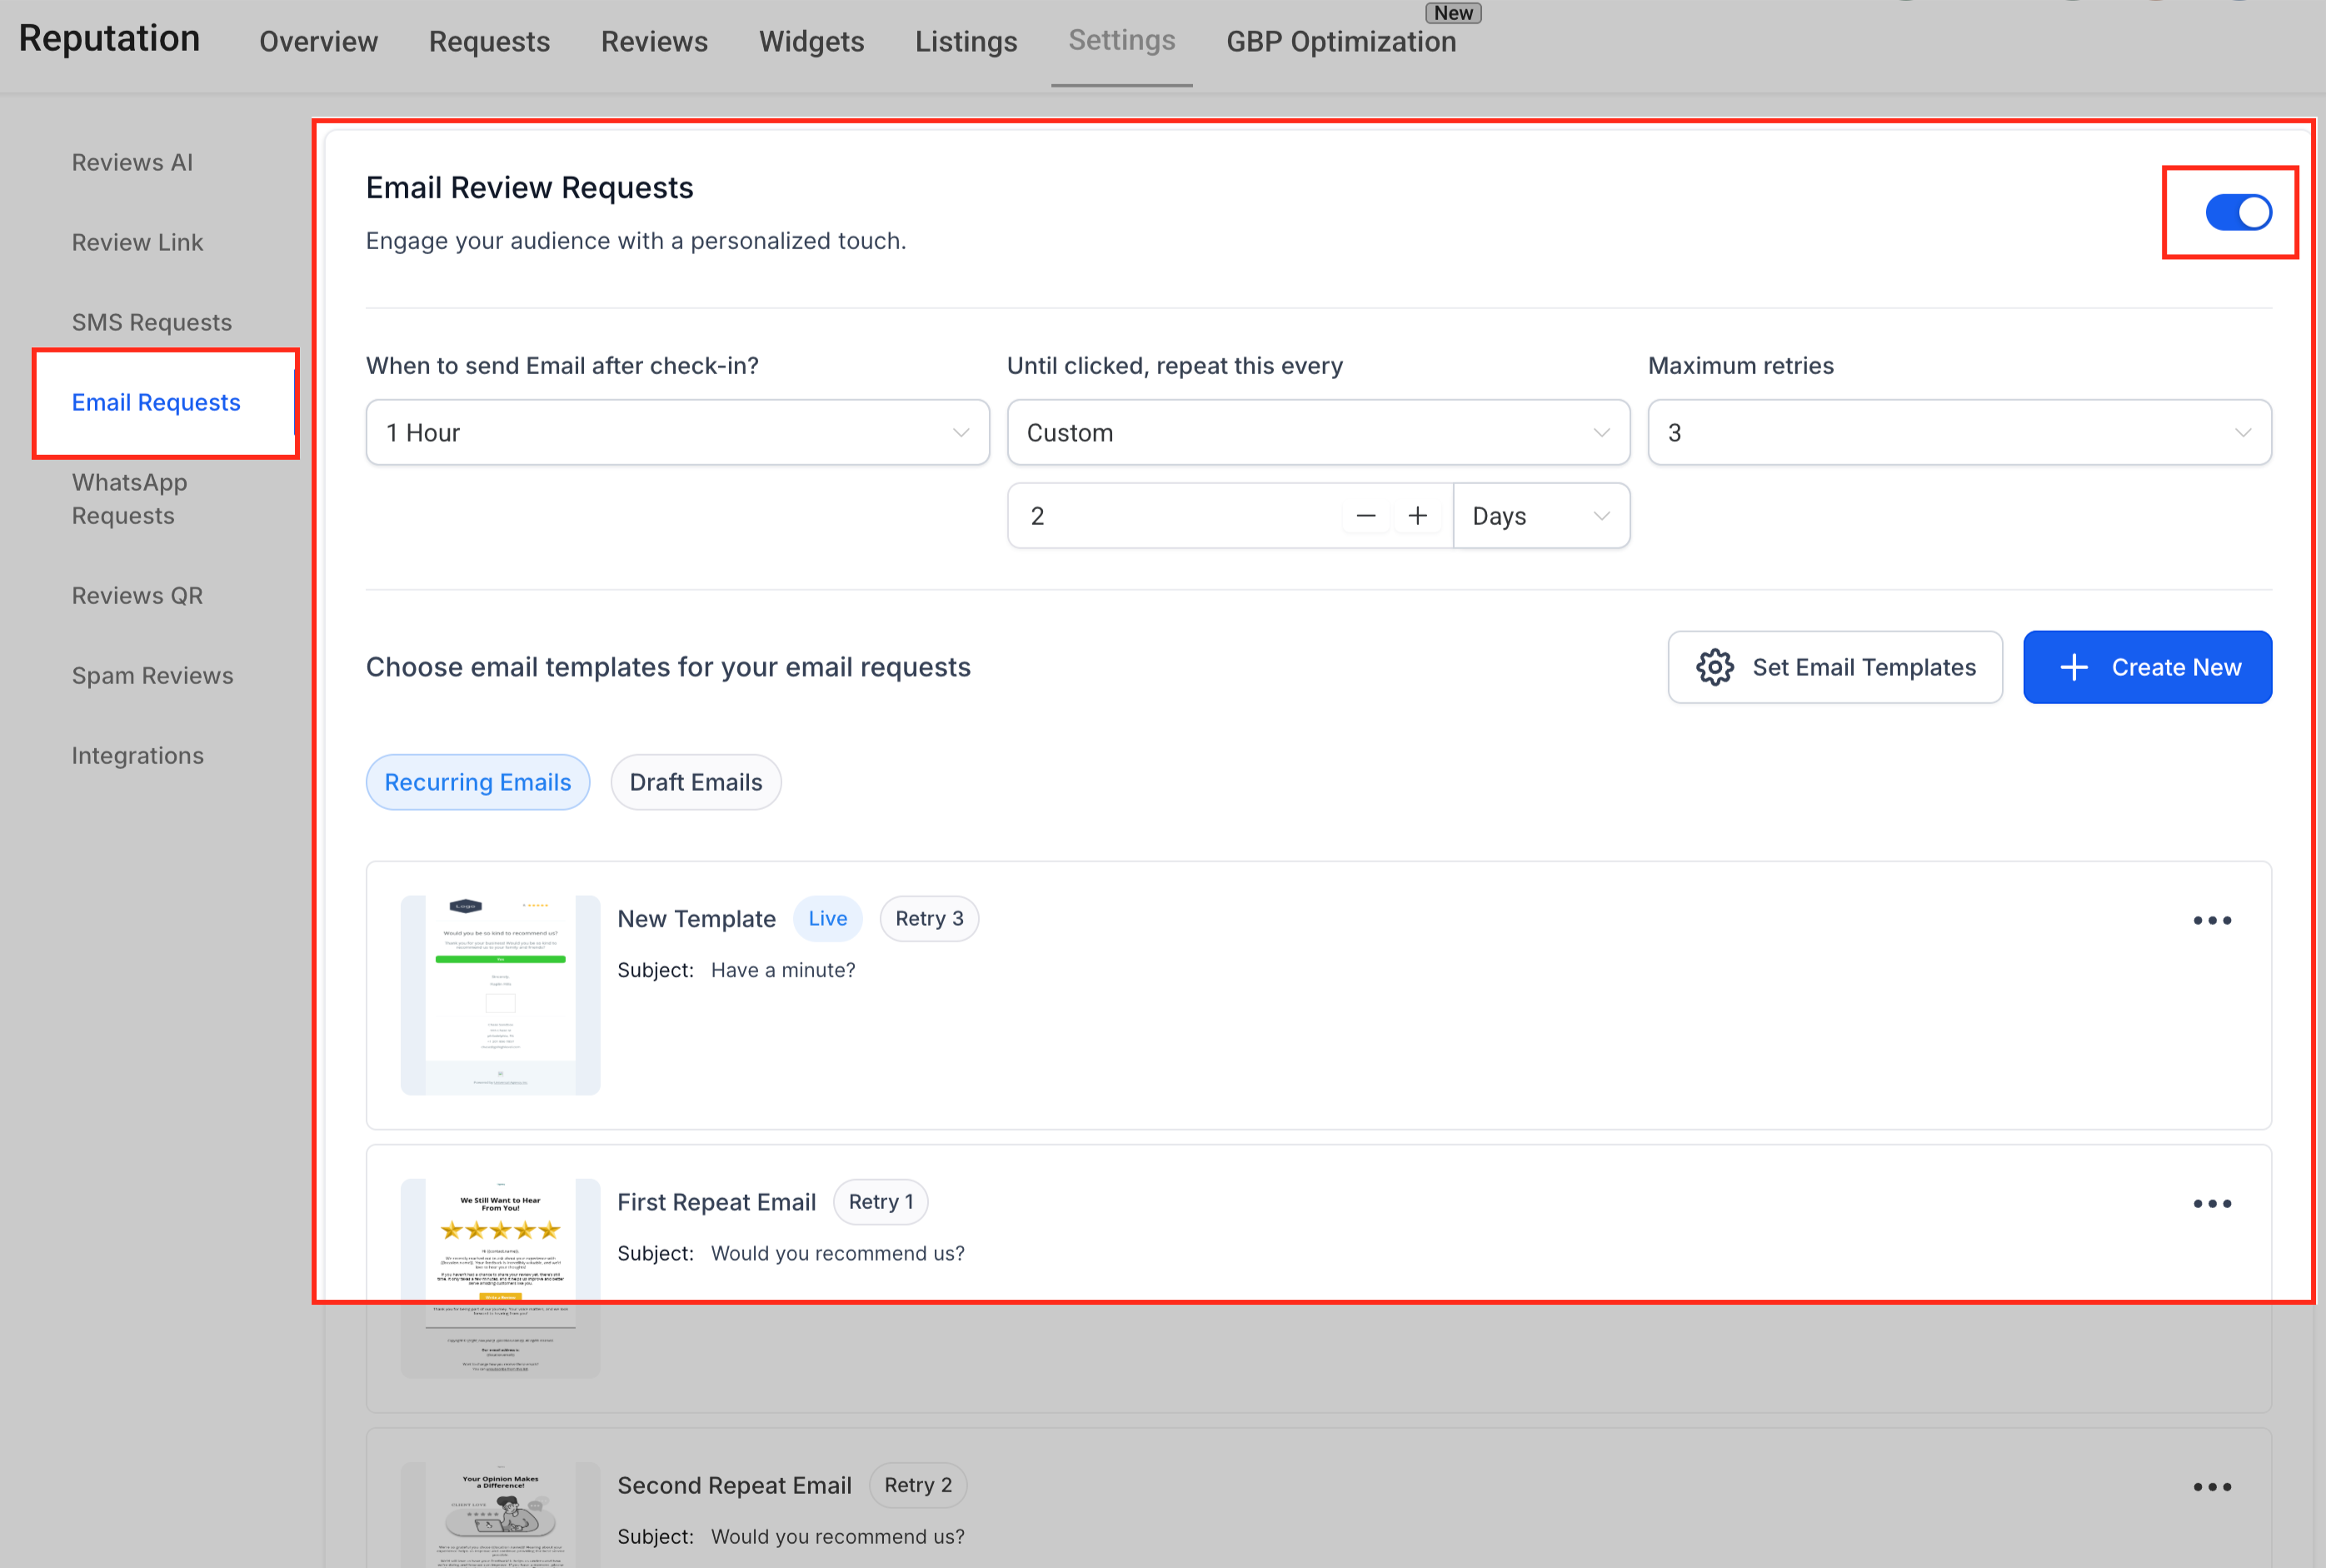
Step 7: Enable email requests
Go to Reputation → Settings → Email requests and turn on the toggle in the top right. Use the controls to set when to send, the repeat interval and the maximum number of attempts, then manage the templates via Set email templates or Create new.
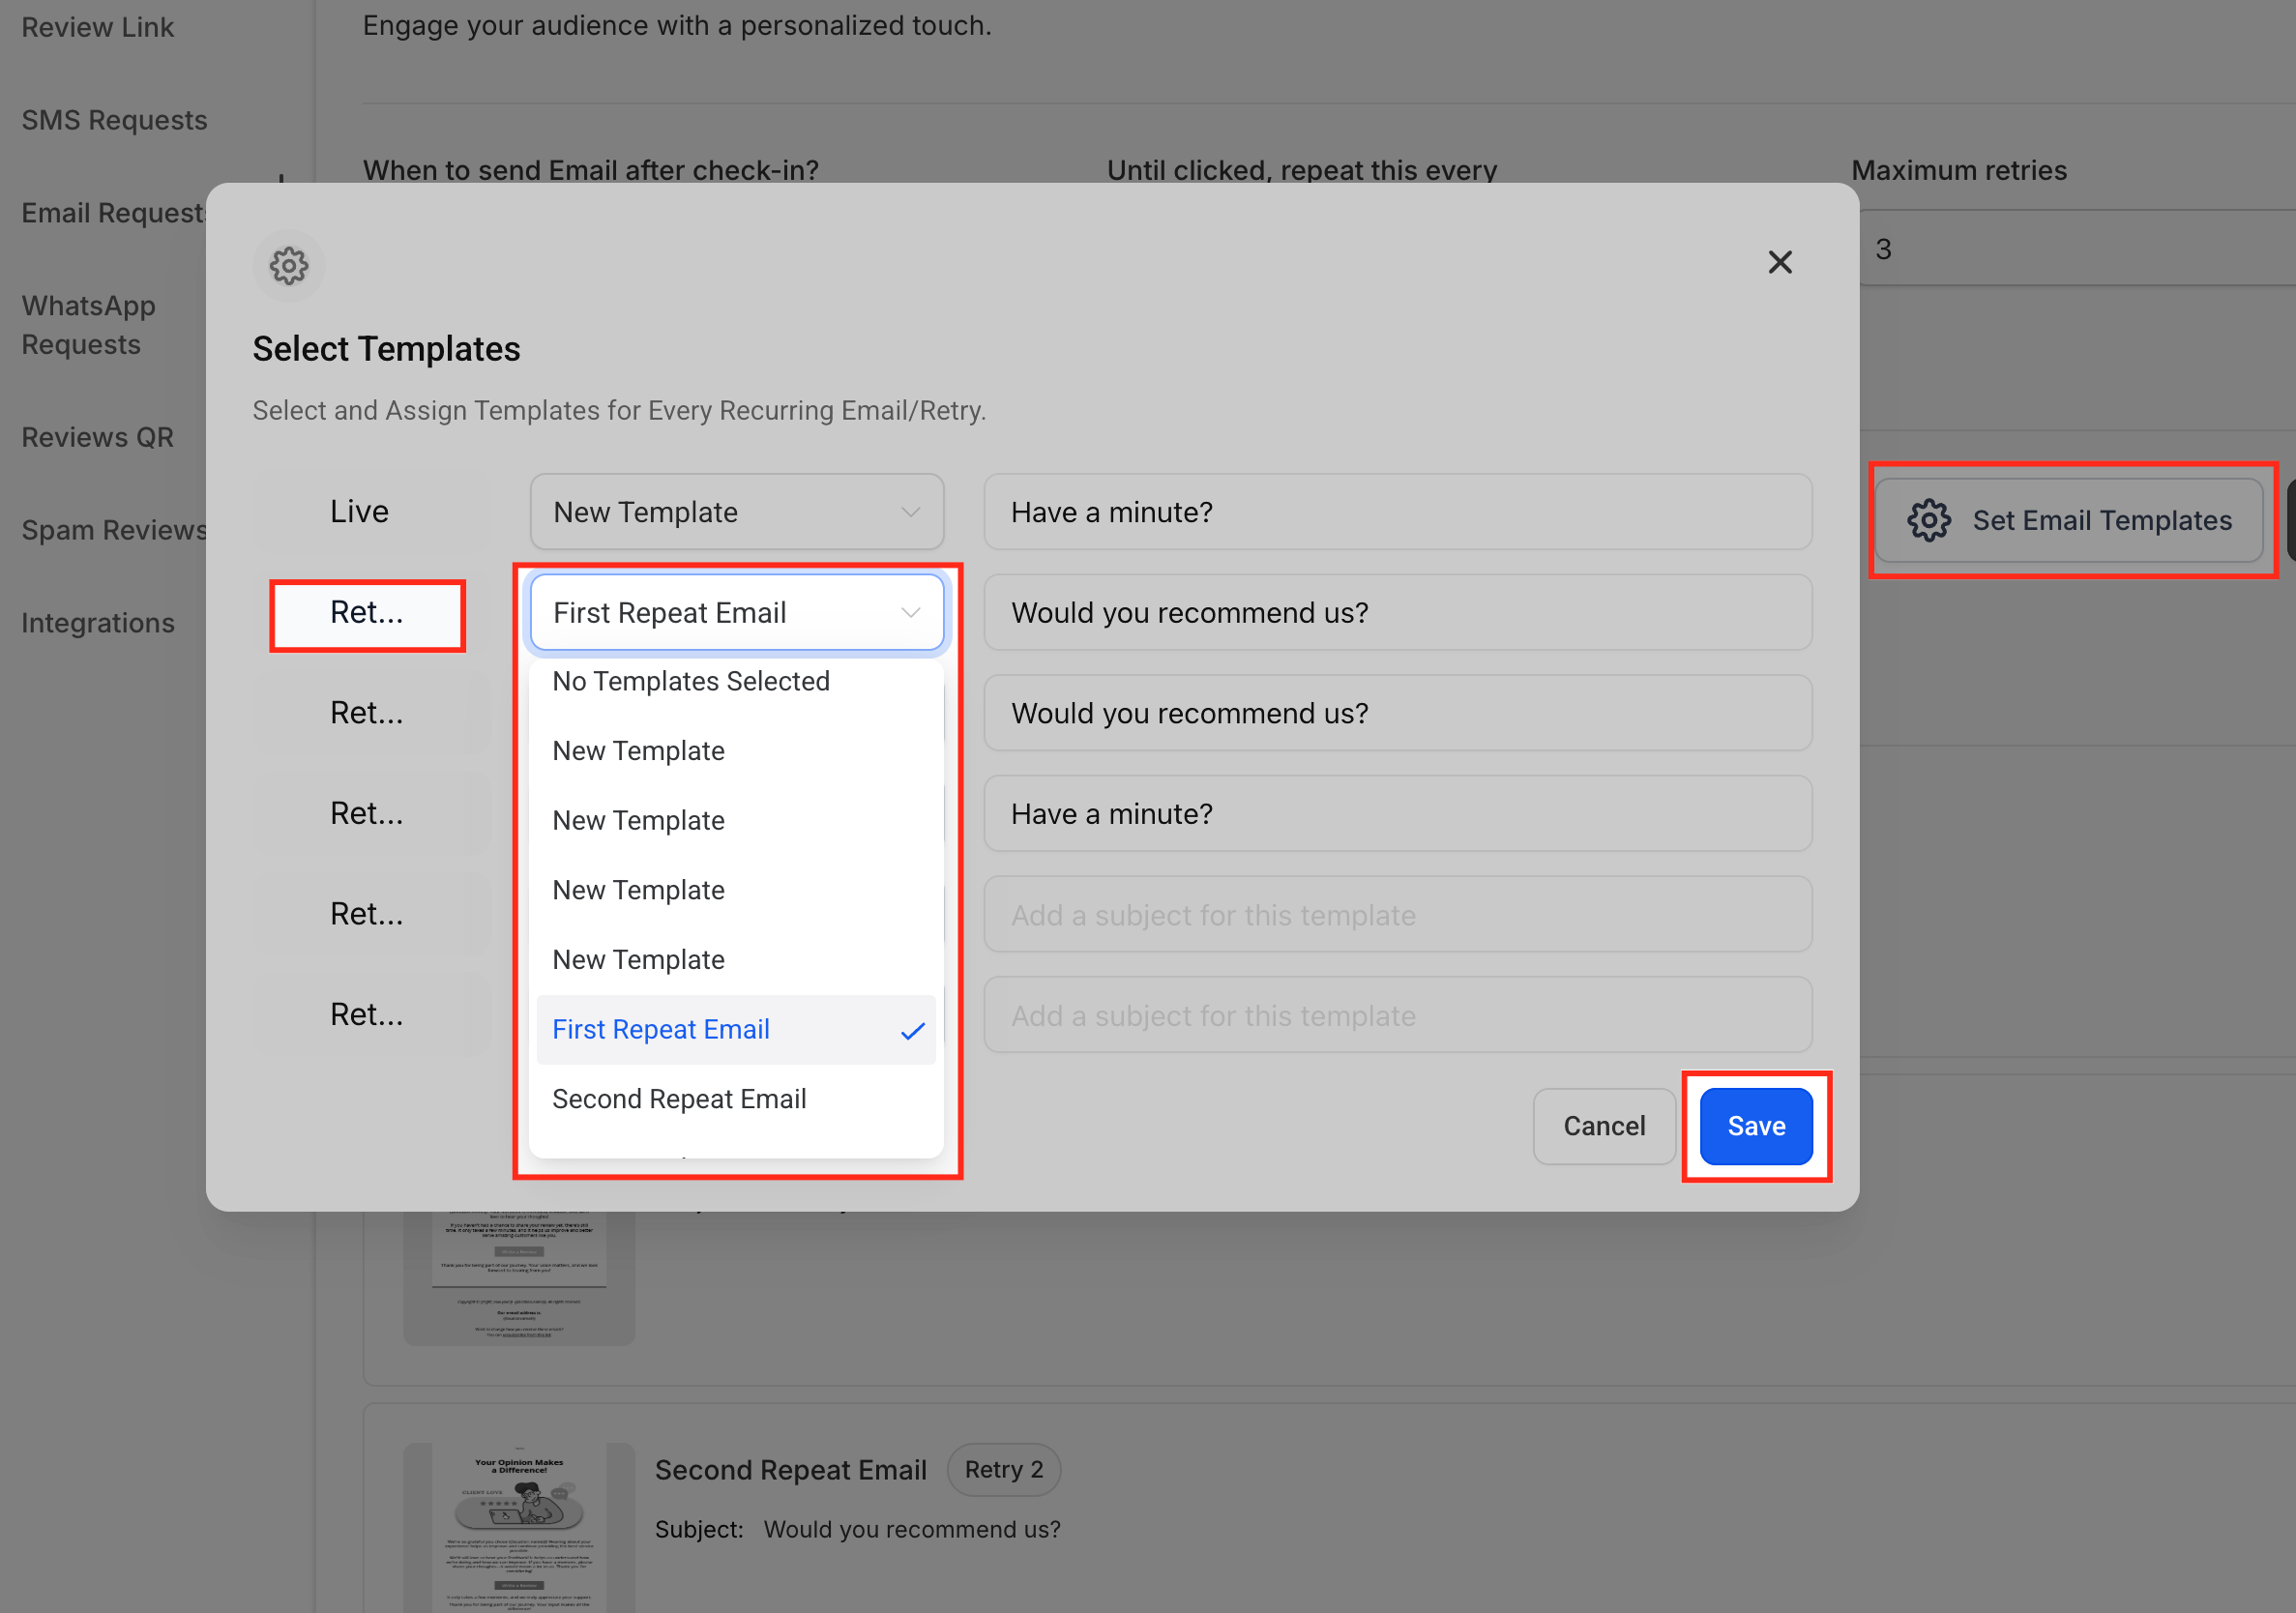
Step 8: Assign the email sequence
Click Set email templates to choose which template is sent first (First send) and which ones to use for each Attempt slot from the drop-down menus. Review or edit the email subject lines if needed, then click Save to apply the sequence.
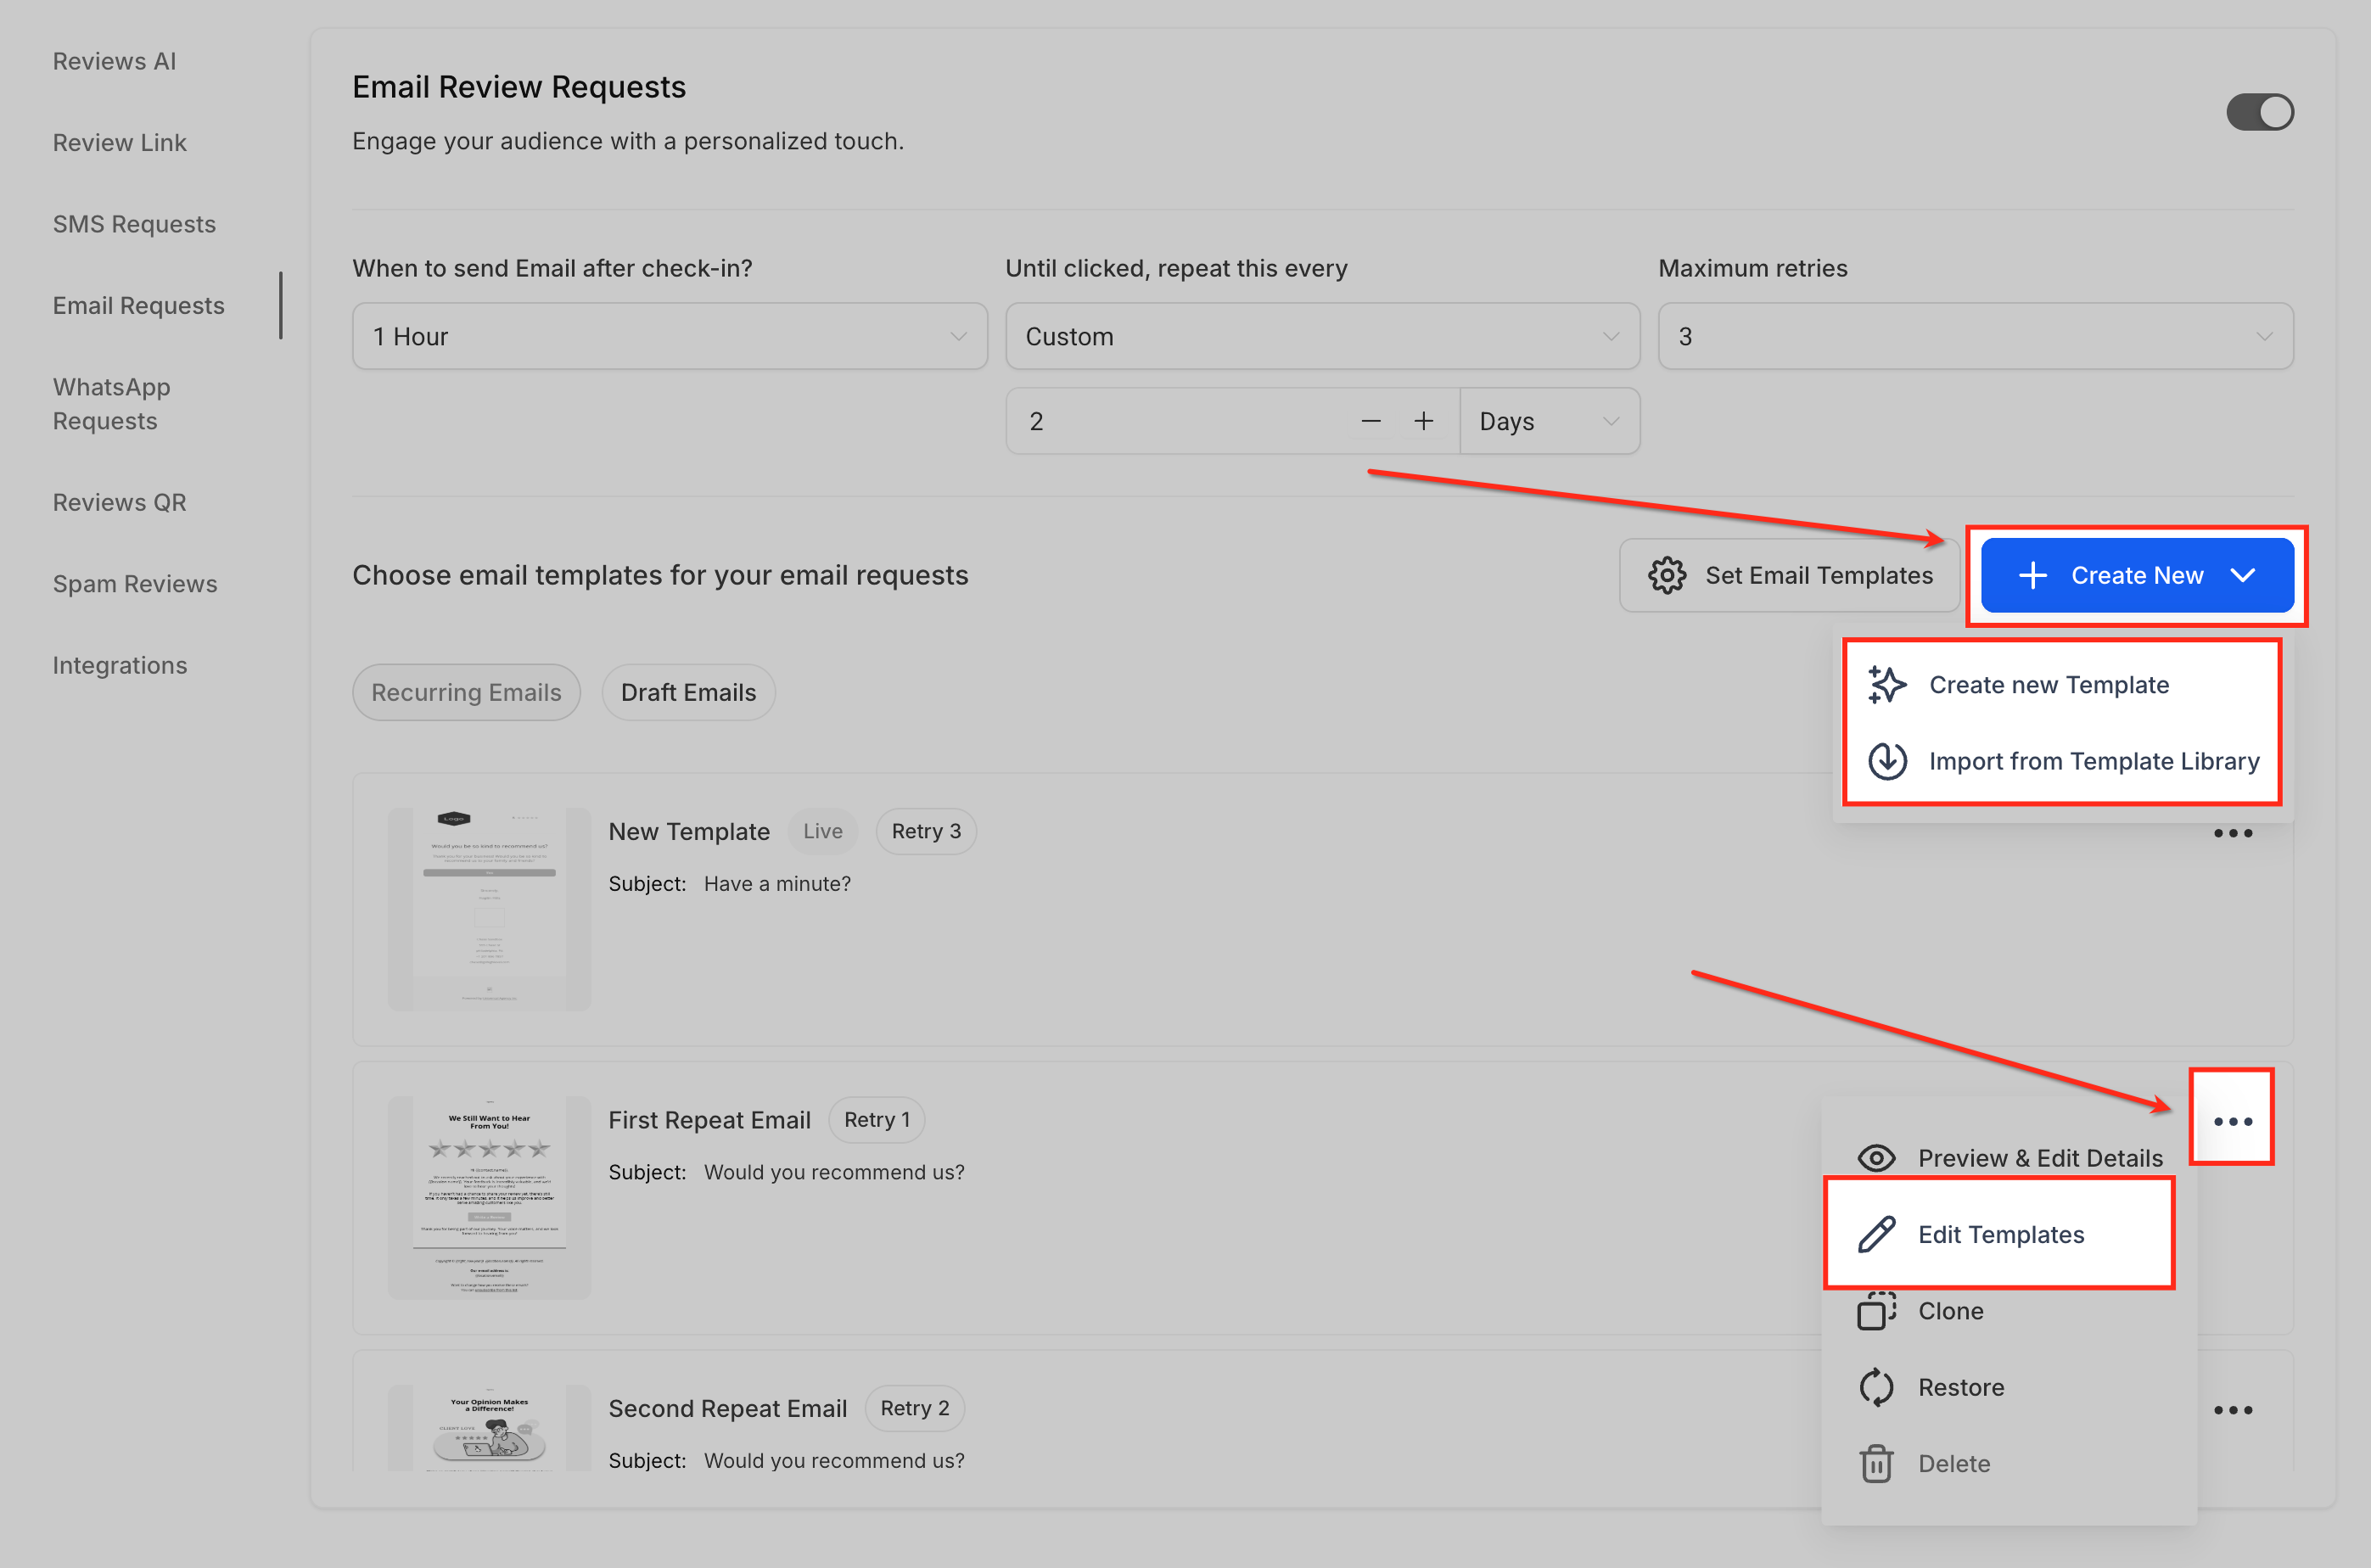
Step 9: Create or import an email
Use the Create new drop-down to Create a new template or Import from the template library. To edit an existing design, click the ⋯ menu on a template card and choose Edit template; you will assign them later via Set email templates.
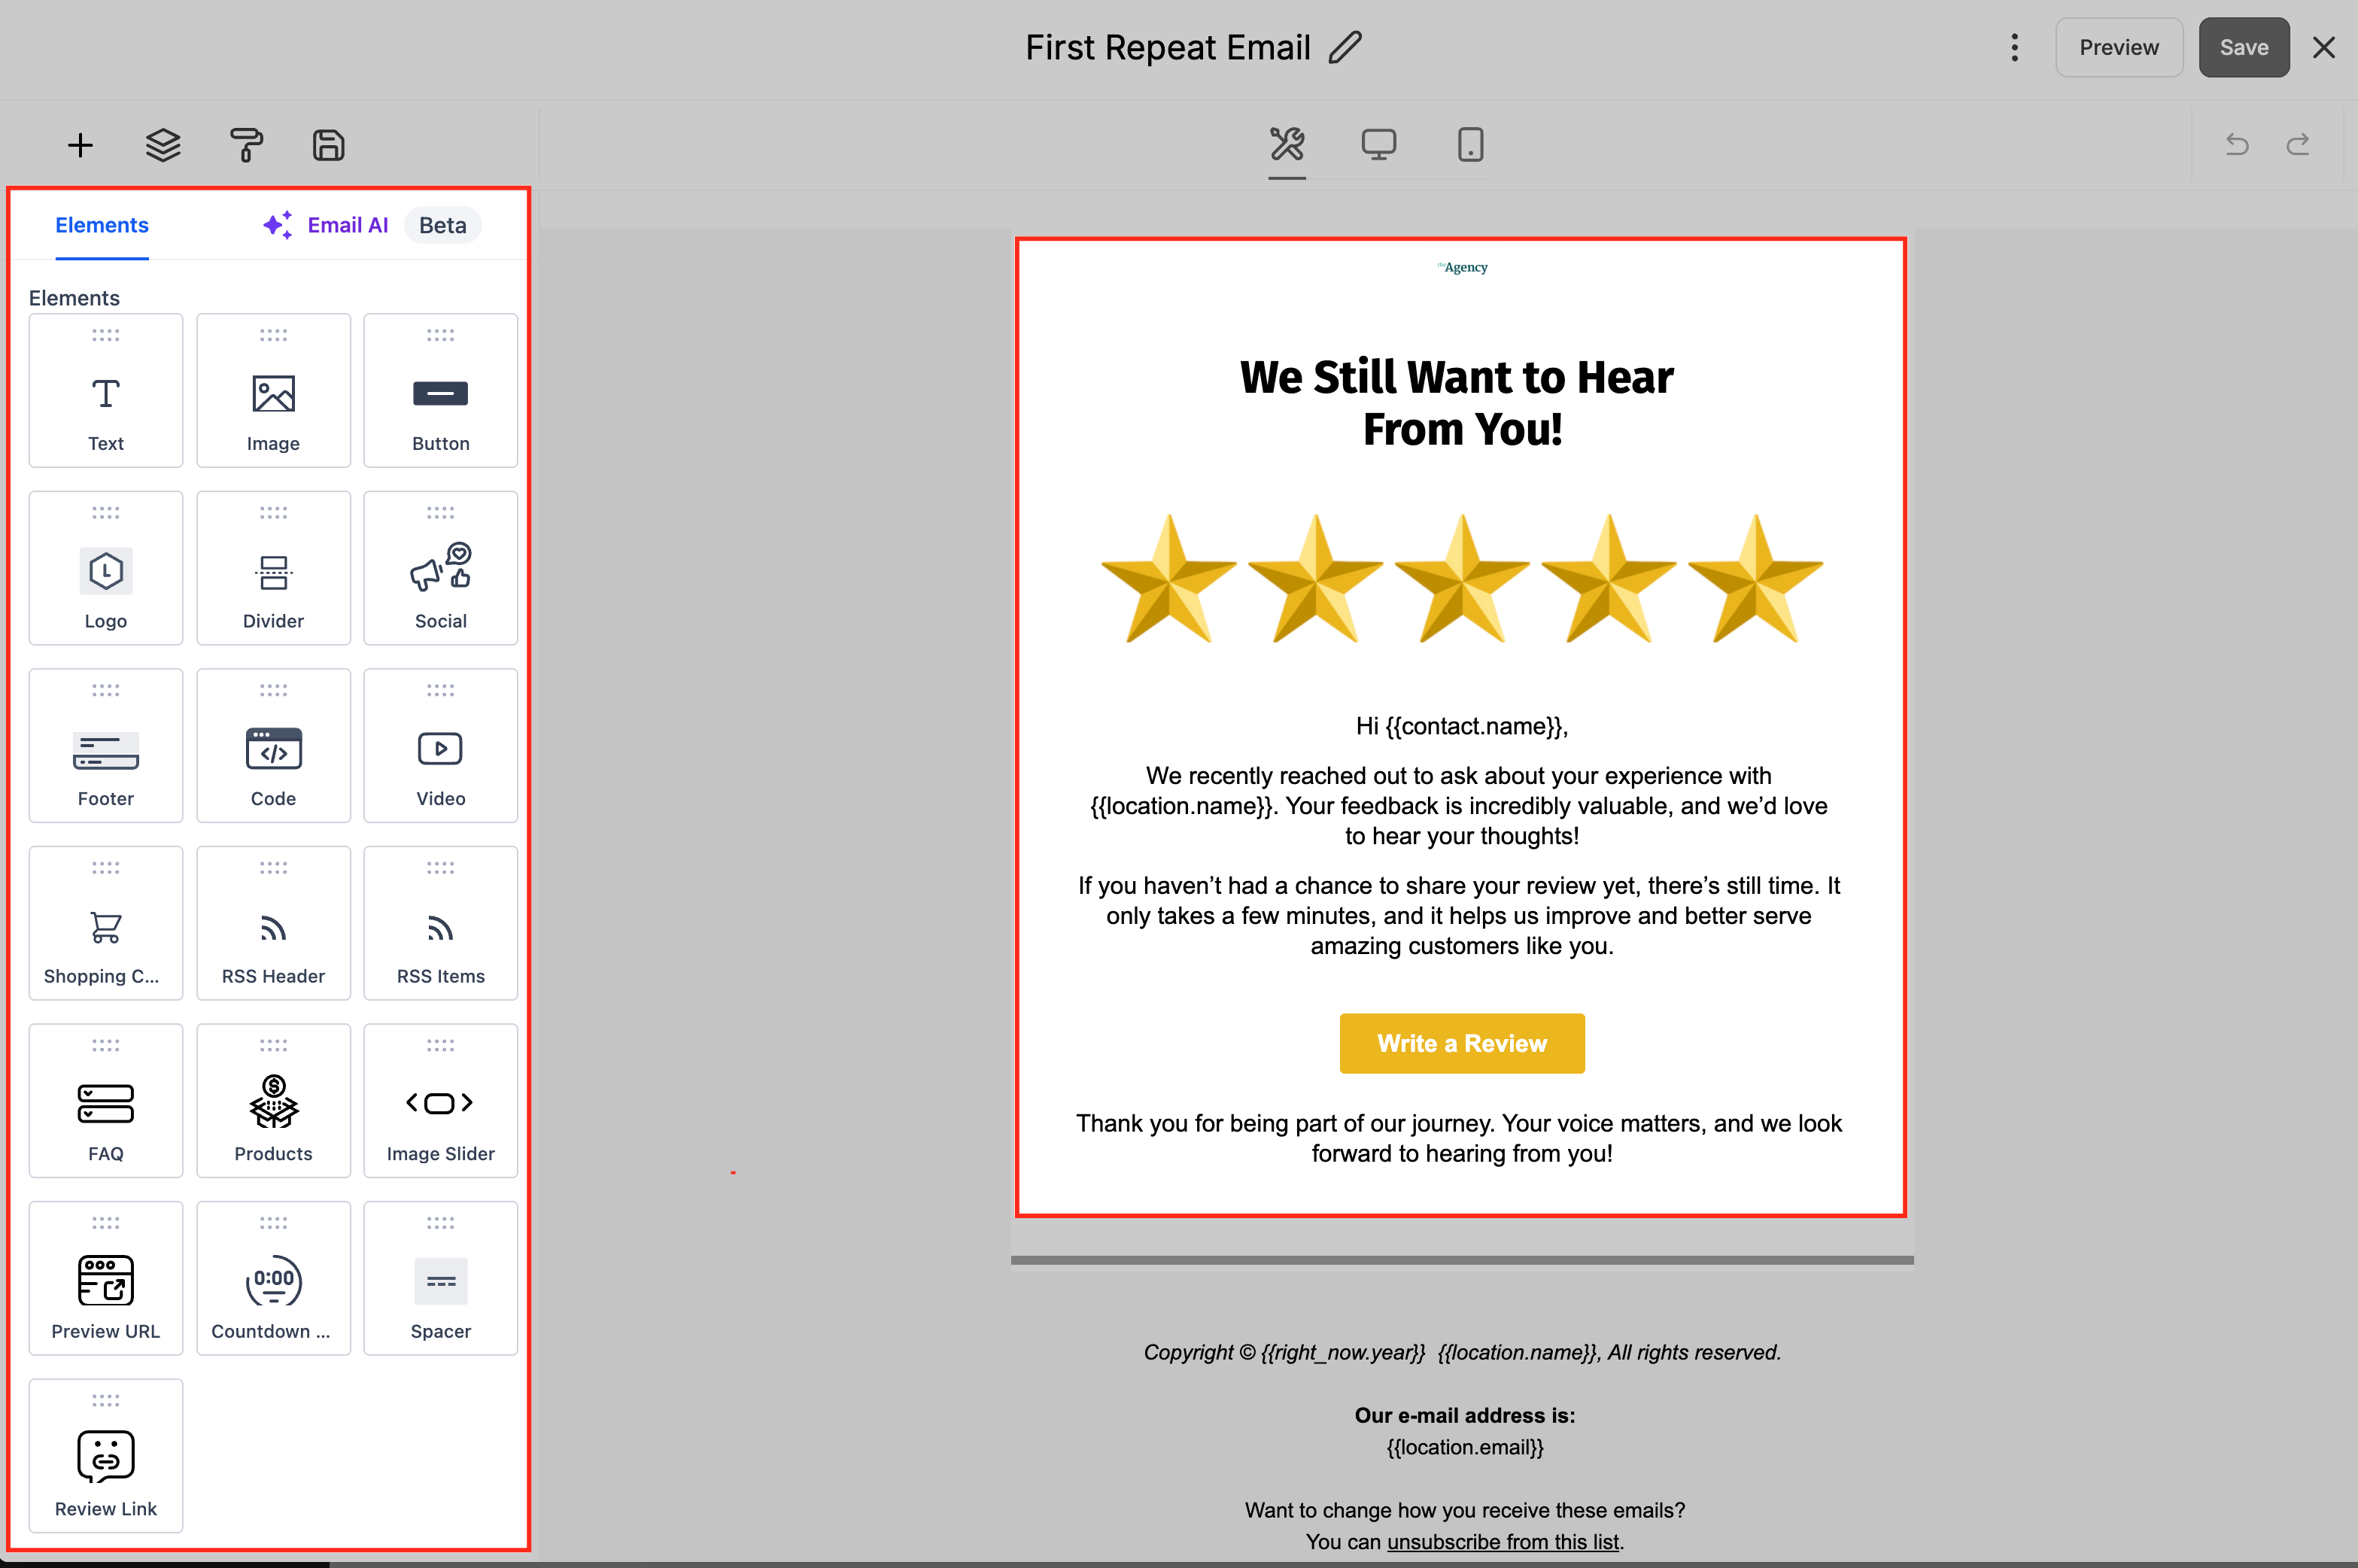
Step 10: Design the email content
Use the drag-and-drop editor to add text, images and buttons from the Elements panel on the left. Drag the Review link element (bottom left) into your layout so that the CTA opens the review URL you have set up, then click Save in the top right.
Frequently asked questions
What happens after a customer clicks the review link?
The schedule of attempts stops for that channel as soon as the click is detected, preventing any further sends to that contact.
What is the difference between review balancing and a custom link?
Balancing distributes traffic across the review sites you have connected (for example, Google). A custom link sends everyone to a single destination that you choose.
Which token should I use in SMS messages for the review URL?
Use {{reputation.review_link}}. It automatically uses the review link you have set up under Reputation → Settings → Review link.
Can emails include more than one review destination?
Yes. In the email editor you can use the Review link element and, in some templates, set up several review buttons if the design supports it.
How many attempts should I set?
Most teams start with 2-3 attempts. The right number depends on engagement, industry norms and compliance requirements.
Does adding an image to an SMS change the cost?
It may be sent as an MMS, which can carry different rates depending on the carrier. Check the rates of your messaging provider.
Do I have to connect my Google Business Profile?
Only if you want to send reviews to Google using balancing. If you prefer another site or a page of your own, set up a custom link instead.
Can I automate requests without manual sends?
Yes. Add the Review request action in an automation to trigger sends automatically (for example, after a "check-in").