



Table of contents
- What is a custom object?
- Key benefits of custom objects
- Field types and unique fields
- Associations and labels
- Where you can use custom objects
- How to set up custom objects
- Step 1 — Create the object
- Step 2 — Add the object details
- Step 3 — Edit the object details
- Optional — Delete a custom object (irreversible)
- Using custom objects in workflows (automations)
- Triggers available for custom object workflows
- Actions available for custom object workflows
- How to create a workflow for a custom object
- Frequently asked questions
What is a custom object?
Custom objects let you define new record types, each with its own fields, associations and automations, so that your CRM mirrors your real processes. They are ideal when the standard objects are not enough (for example, to track a "Property" with specific data such as MLS, number of rooms, status; or a "Pet" with breed and vaccinations). Once you have created an object, you can use it across different views, filters and automations.
Key benefits of custom objects
Understanding the practical benefits helps you design data models that stay flexible and future-proof.
Flexibility: define any entity with customised fields, labels and associations.
Automation: trigger workflows when a record is created or updated and run actions specific to the object.
Analytics: analyse object data through smart lists and the list view, then filter precisely using advanced filters.
Governance: maintain data integrity with clear ownership; administrators manage the object definitions.
Access and limits: the feature is available on all plans, with a limit of 10 custom objects per account.
Field types and unique fields
Choosing the right field types and uniqueness rules keeps your data clean and easy to manage.
The unique field types currently supported are: single-line text, multi-line text, number, phone.
Limit: up to 10 unique fields per object.
Scope: uniqueness is enforced at account level and across every entry point (user interface, workflows, forms, API).
Irreversible change: if you remove the uniqueness attribute from a field, you will not be able to make it unique again in the future.
Associations and labels
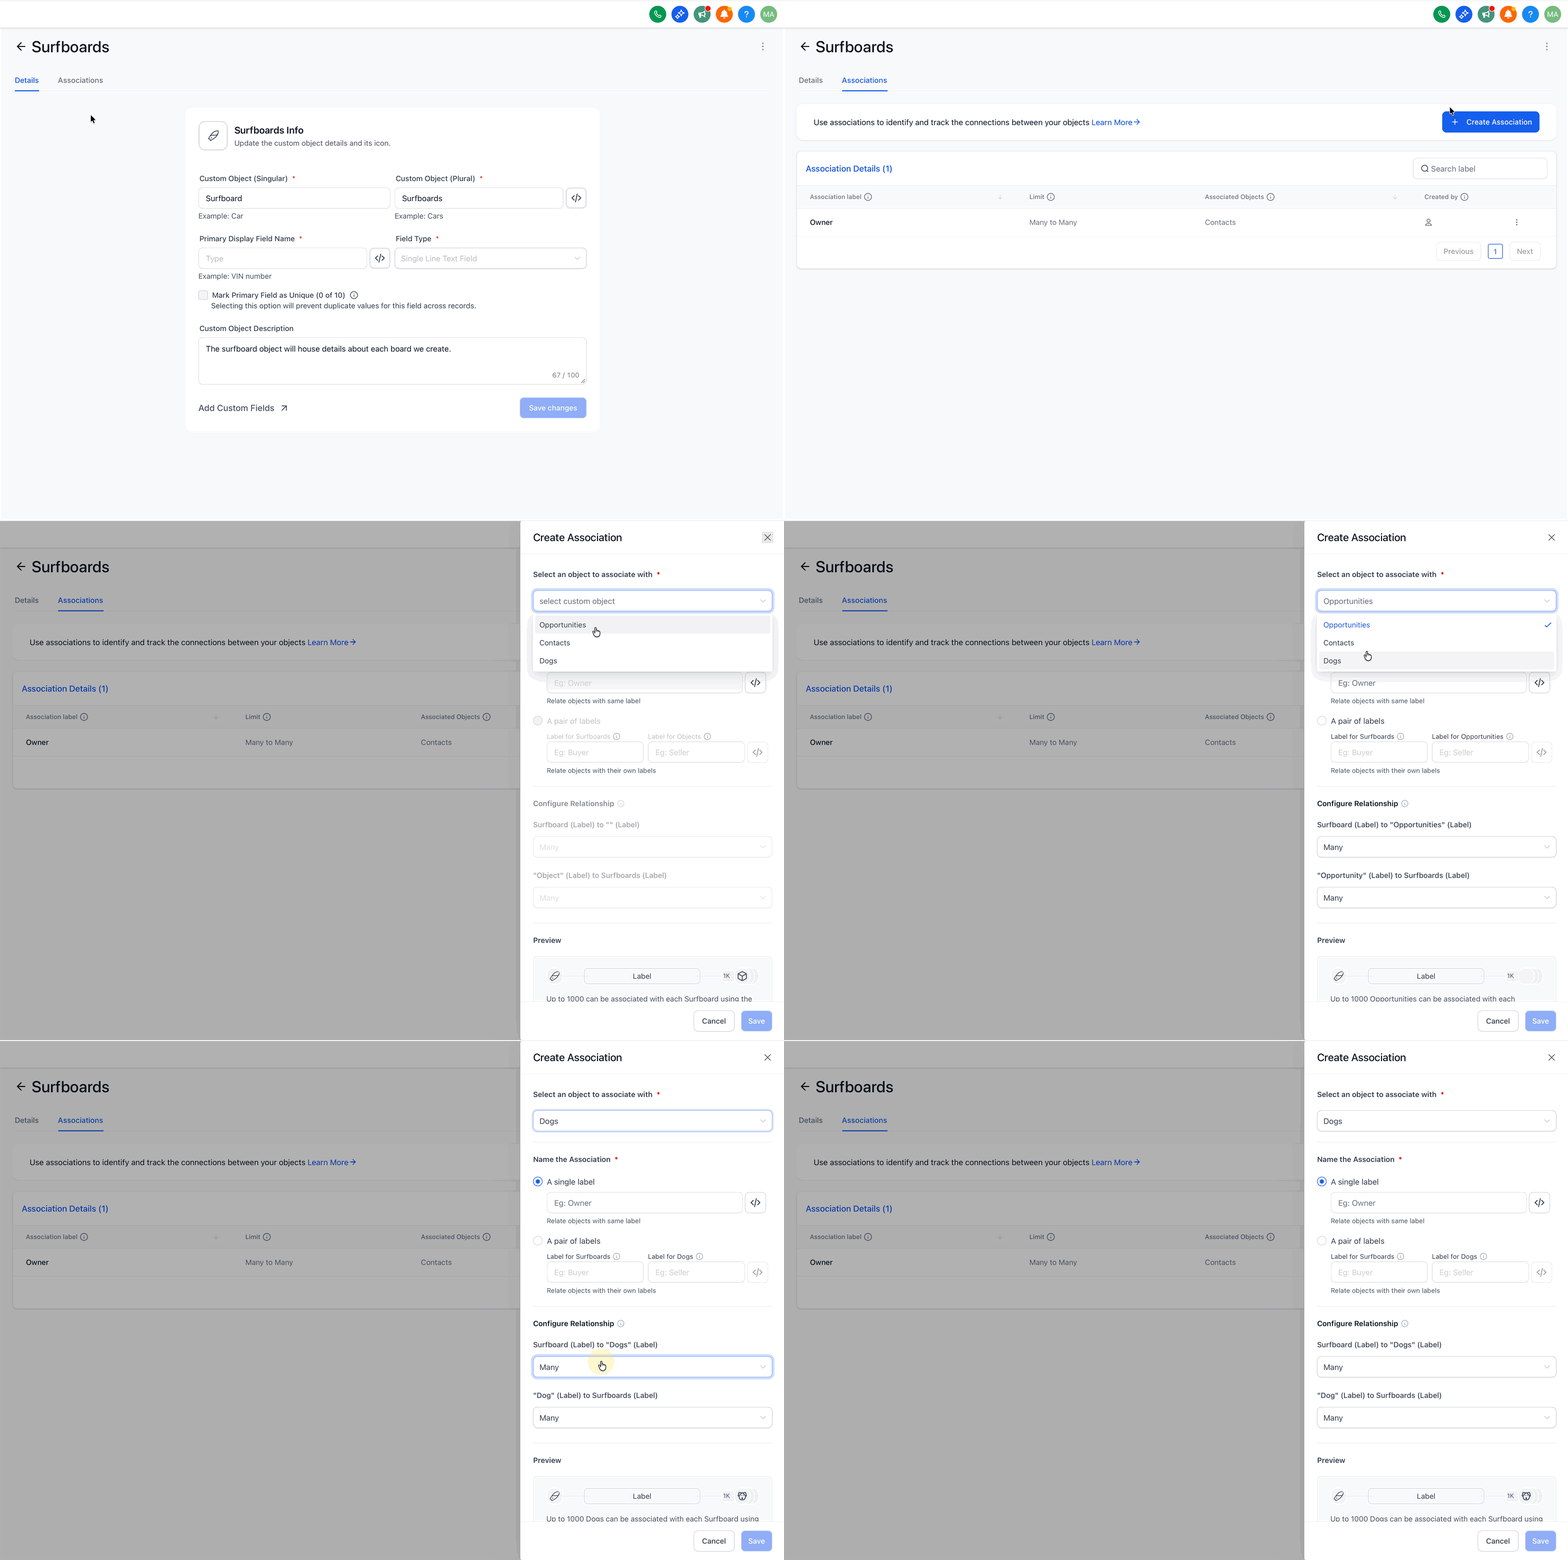
Associations link records (for example, Opportunity ↔ Property) to reflect real-world relationships and power cross-object views.
Define "many-to-many" or "one-to-many" links between objects.
Use associations in smart lists, filters and automations.
Label limit: up to 10 unique labels between any two objects (for clarity, such as "Buyer of", "Listed in").
Opportunities now support flexible associations with custom objects for unified context in the sales pipeline.
Where you can use custom objects
Choosing the right areas for custom objects makes sure your set-up is powerful and compatible. Use this table to see current availability and plan your implementations with confidence.
| Availability | Feature |
|---|---|
| Supported | Contacts and opportunities (associations), workflows (triggers and actions), forms, surveys and quizzes, smart lists, list view, advanced filters, reports/dashboards, API, webhooks, tasks |
| Not supported | Email campaigns, bulk emails, bulk SMS, conversations interface, funnels and websites (dynamic data from custom objects), calendars and scheduling, reputation/reviews, payments and invoicing, internal features of the Company object |
| Coming soon | Notes, funnels and websites (dynamic linking), AI knowledge base, sending emails via workflow to associated contacts |
How to set up custom objects
A clean initial set-up guarantees stable automations and reports as your data model grows. The steps below have been simplified for readability.
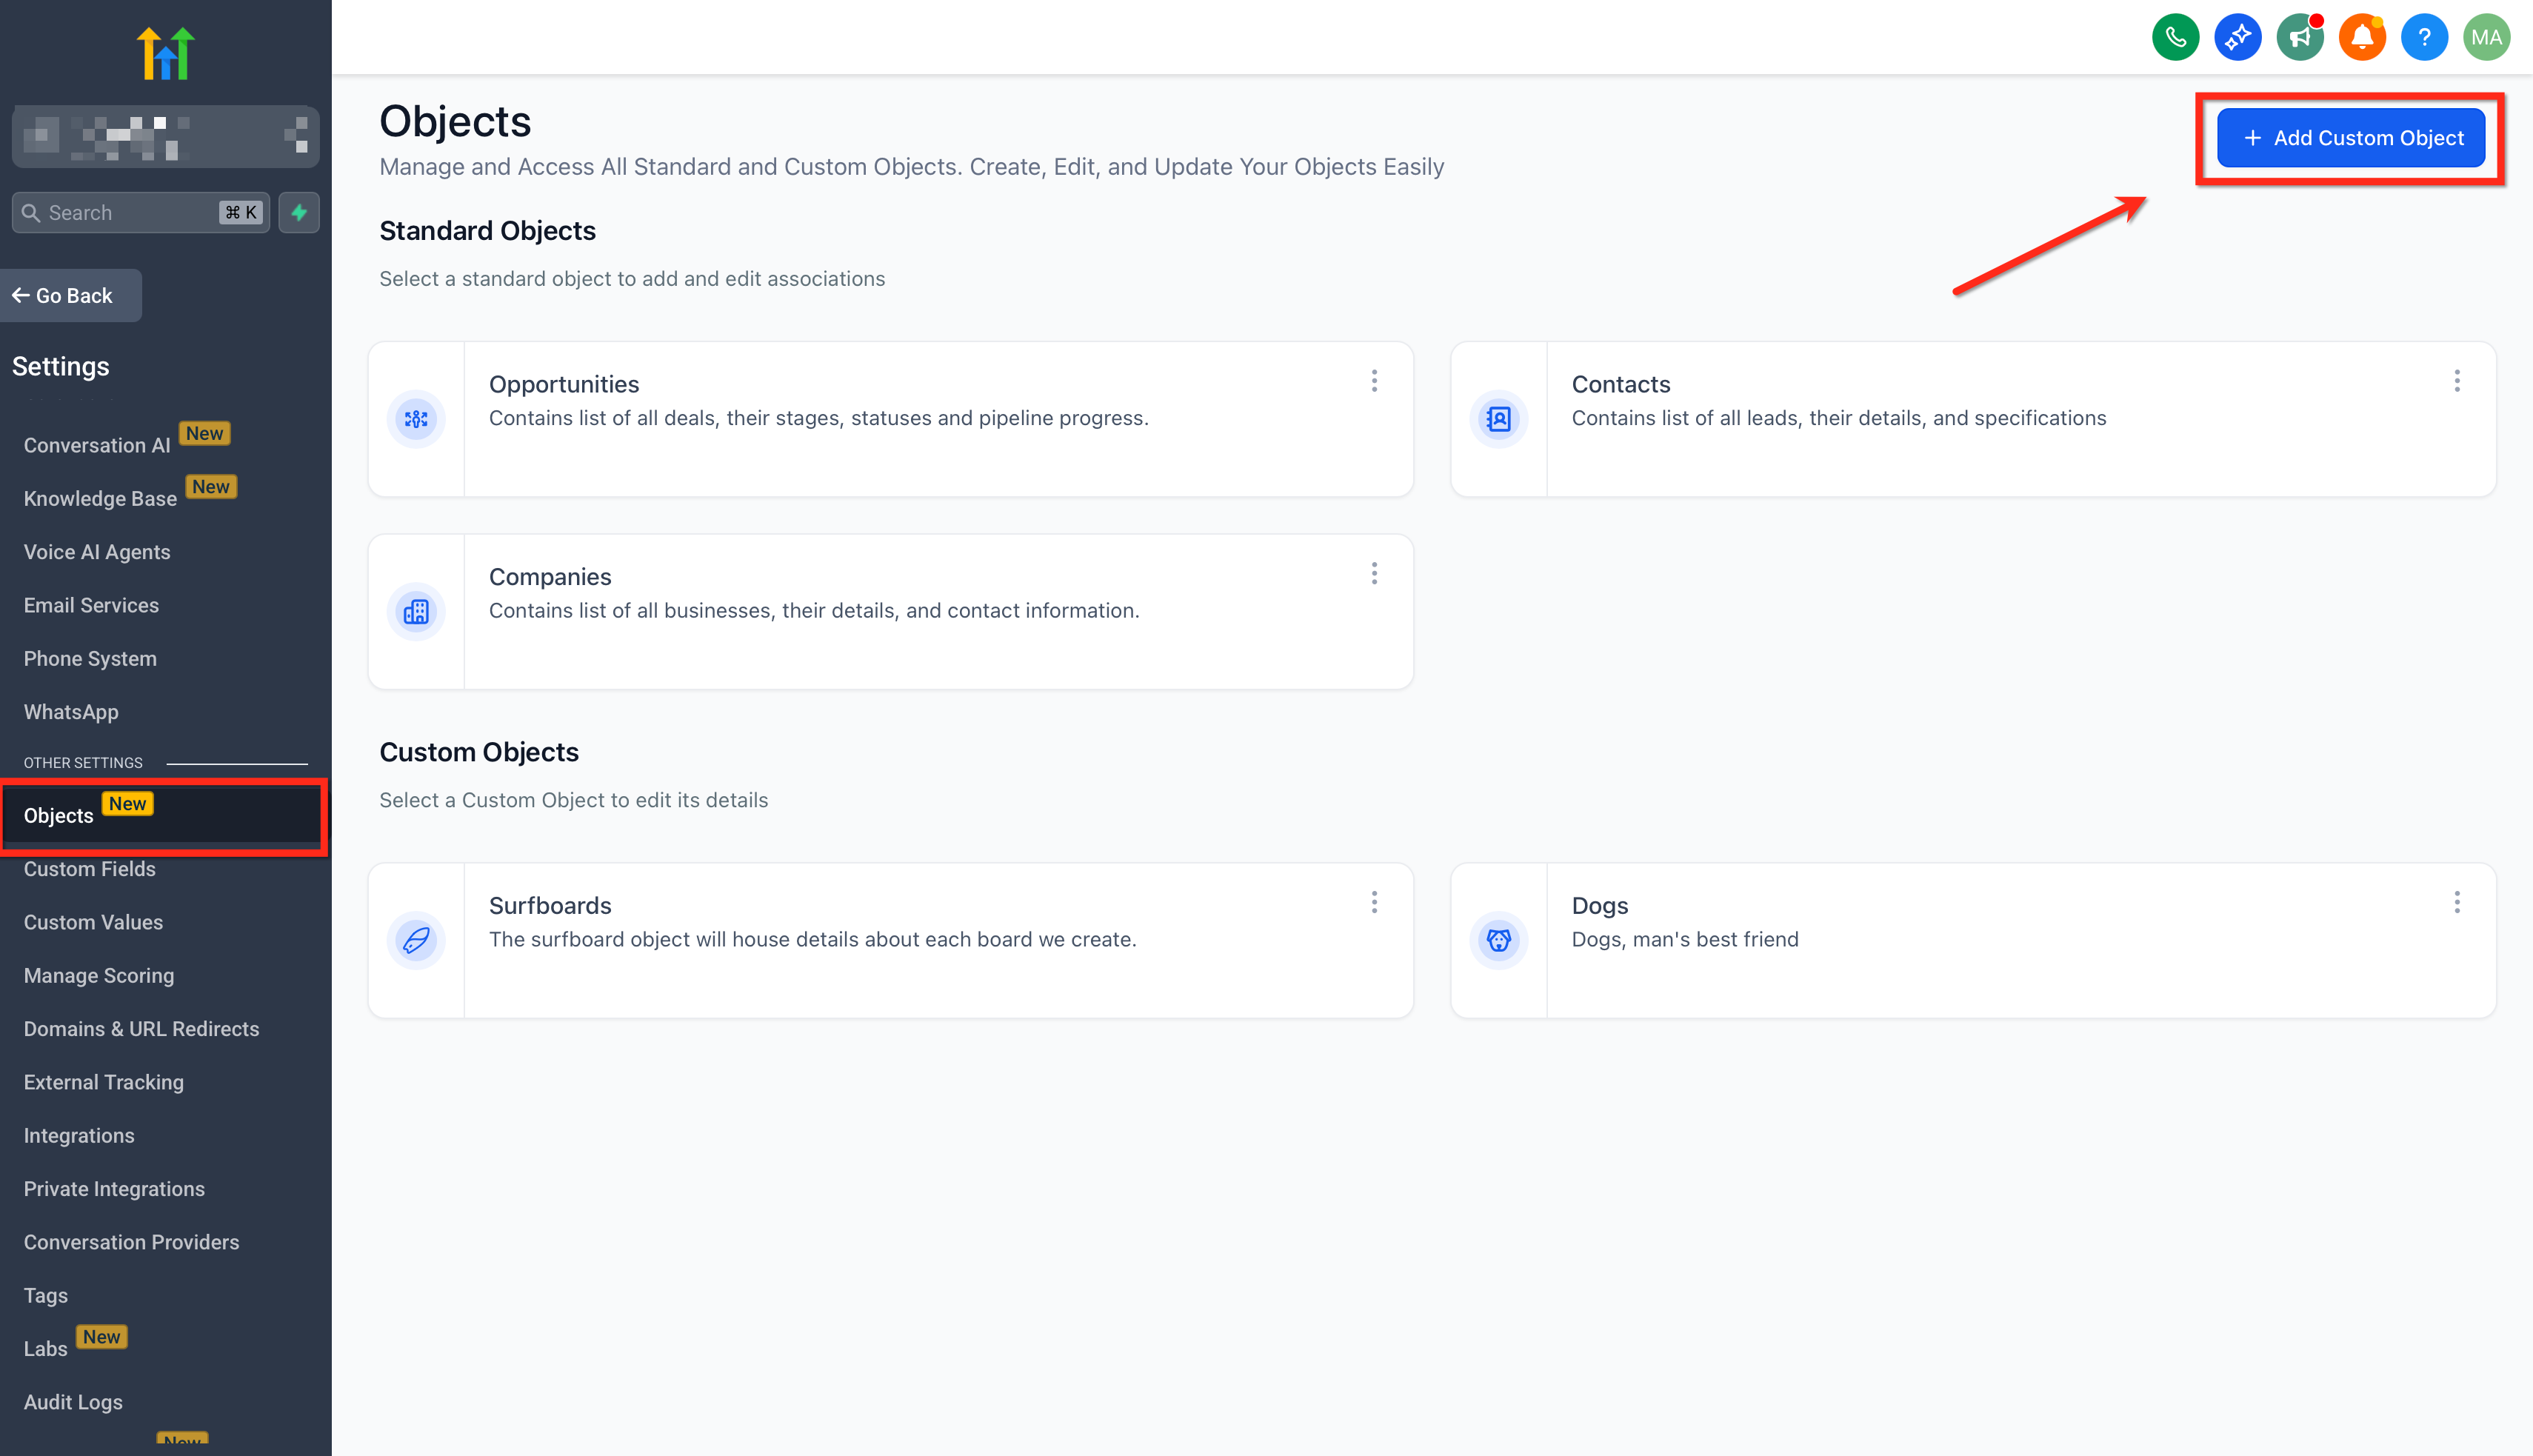
Step 1 — Create the object
Go to Account settings → Objects.
Click Add custom object.
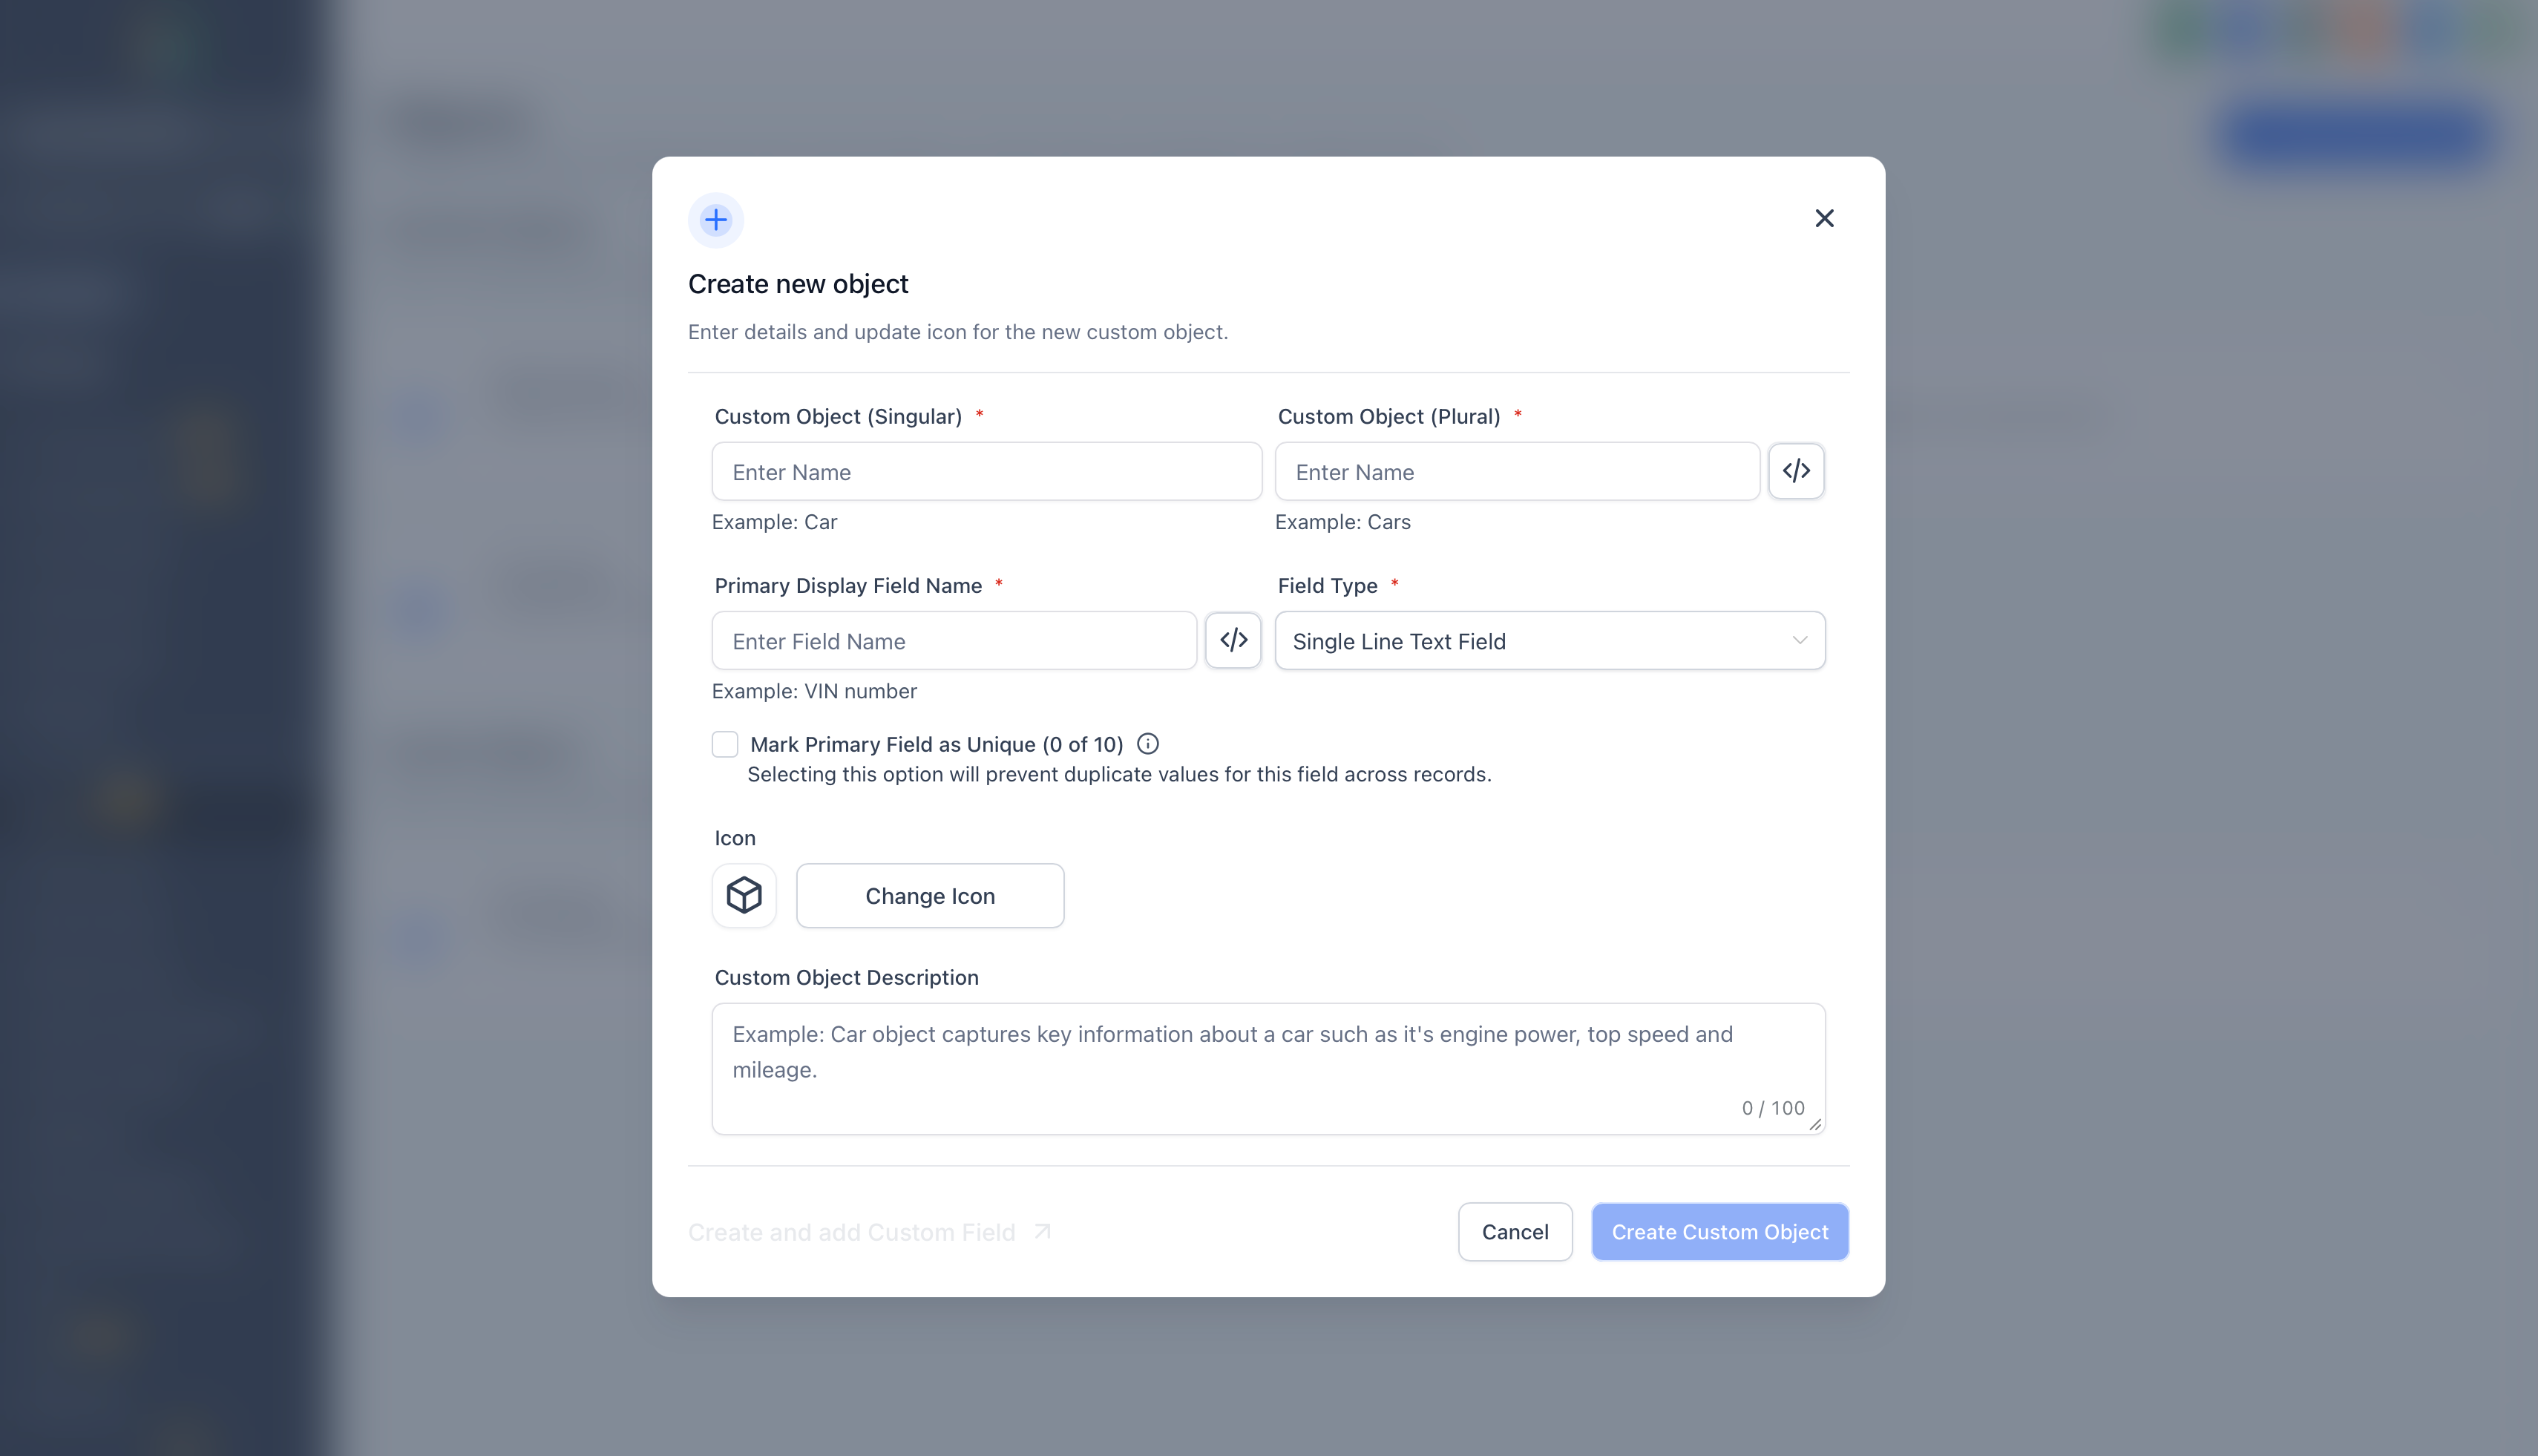
Step 2 — Add the object details
Enter the singular name (e.g. Pet).
Enter the plural name (e.g. Pets).
Check the internal name and the primary field (created by default). You can edit the internal name while creating the object by clicking </>.
Provide a label for the primary display field (e.g. Pet name, Pet identification number).
Choose an icon and add a description to help your team understand the purpose of the object.
Click Create custom object.
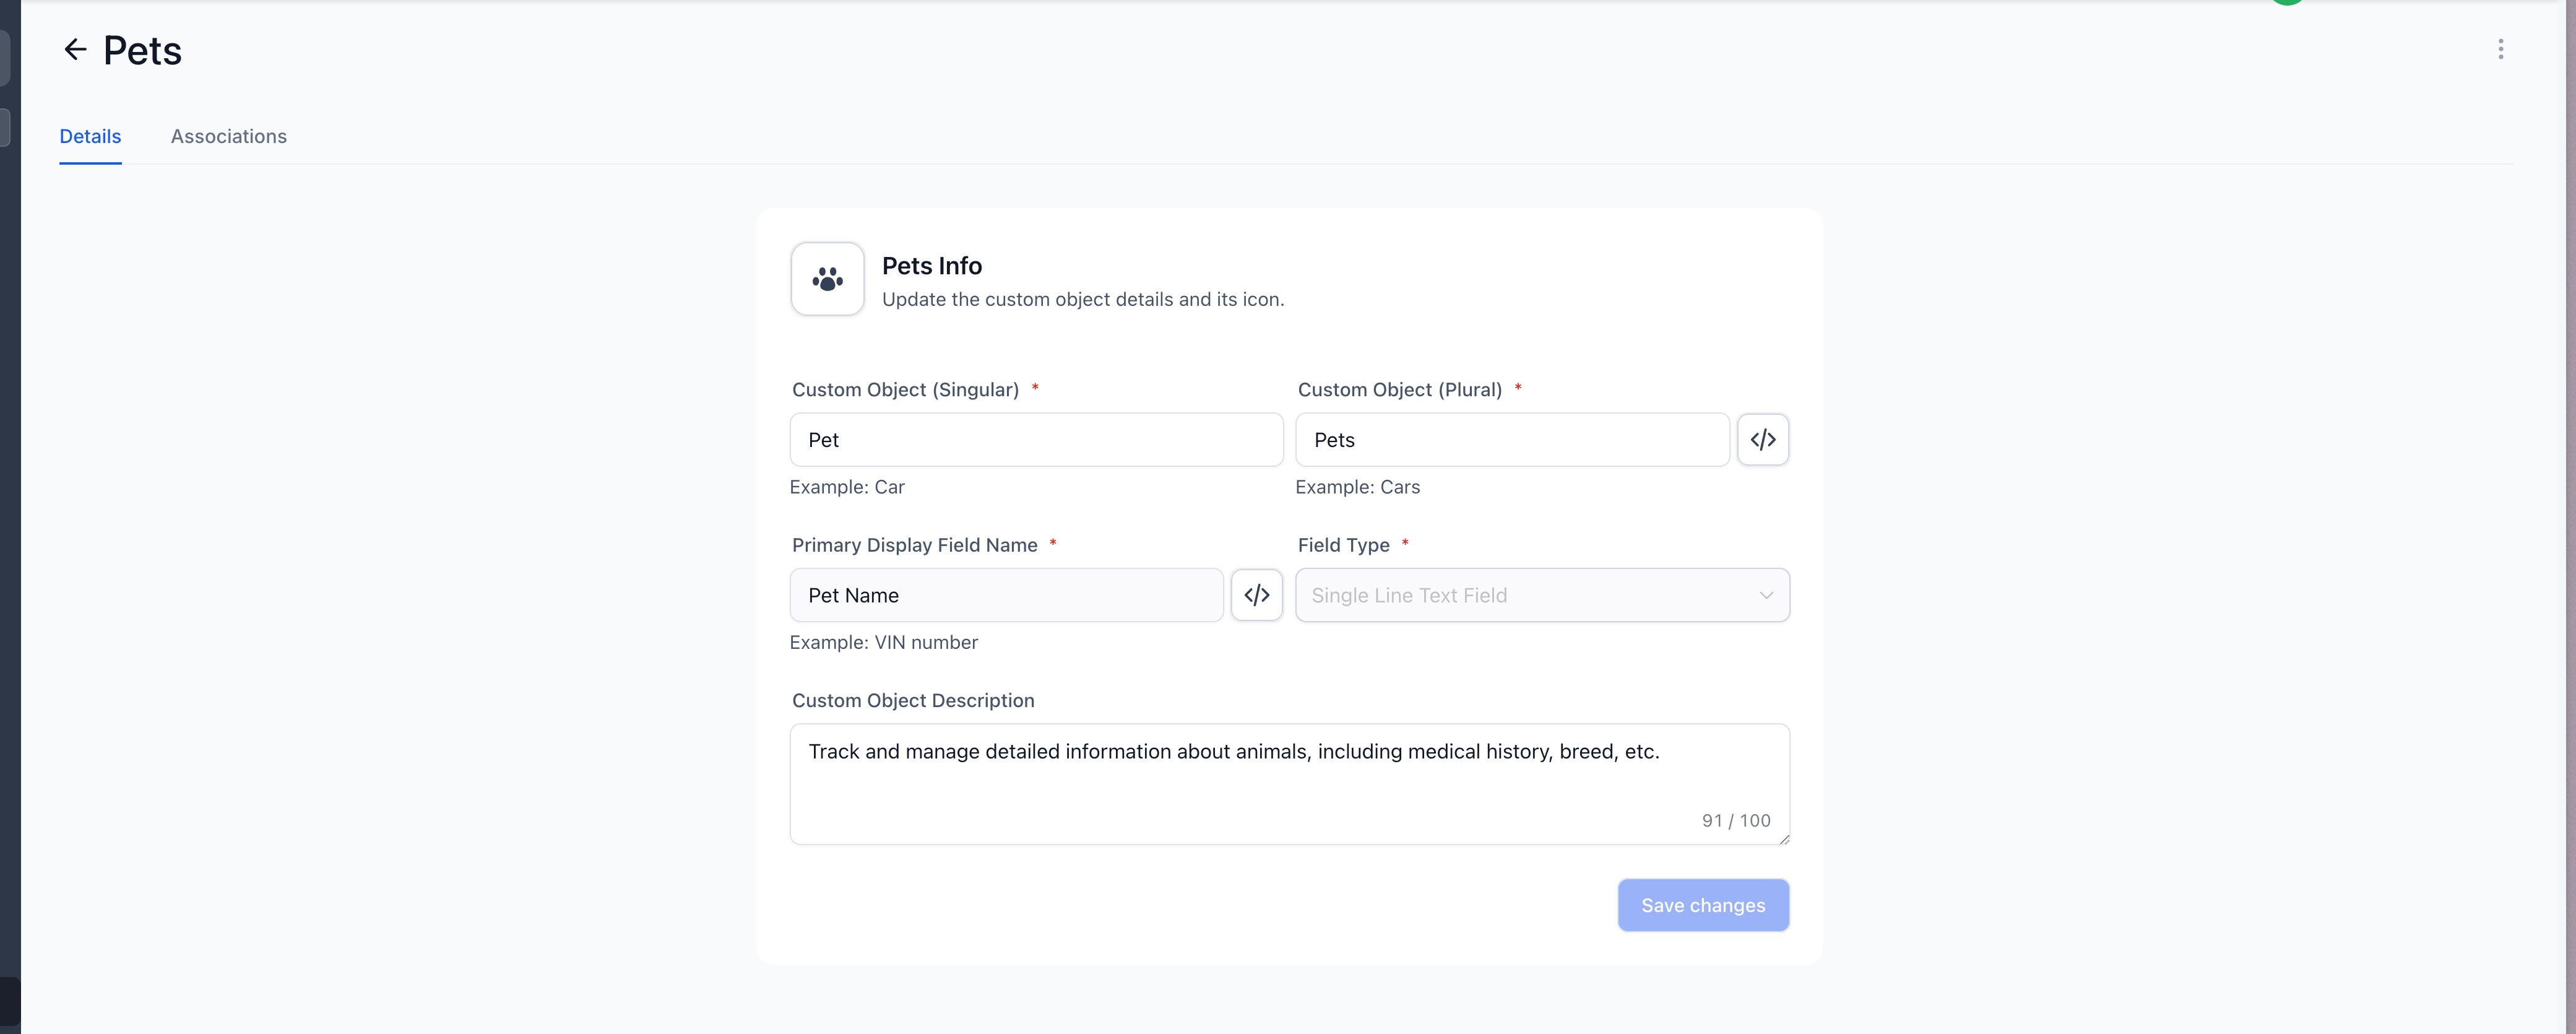
Step 3 — Edit the object details
Once created, the object appears on the Objects page.
Click the object to open it and edit its details.
Optional — Delete a custom object (irreversible)
Click the ⋯ (three dots) next to the object name.
Choose Delete.
Type DELETE to confirm.
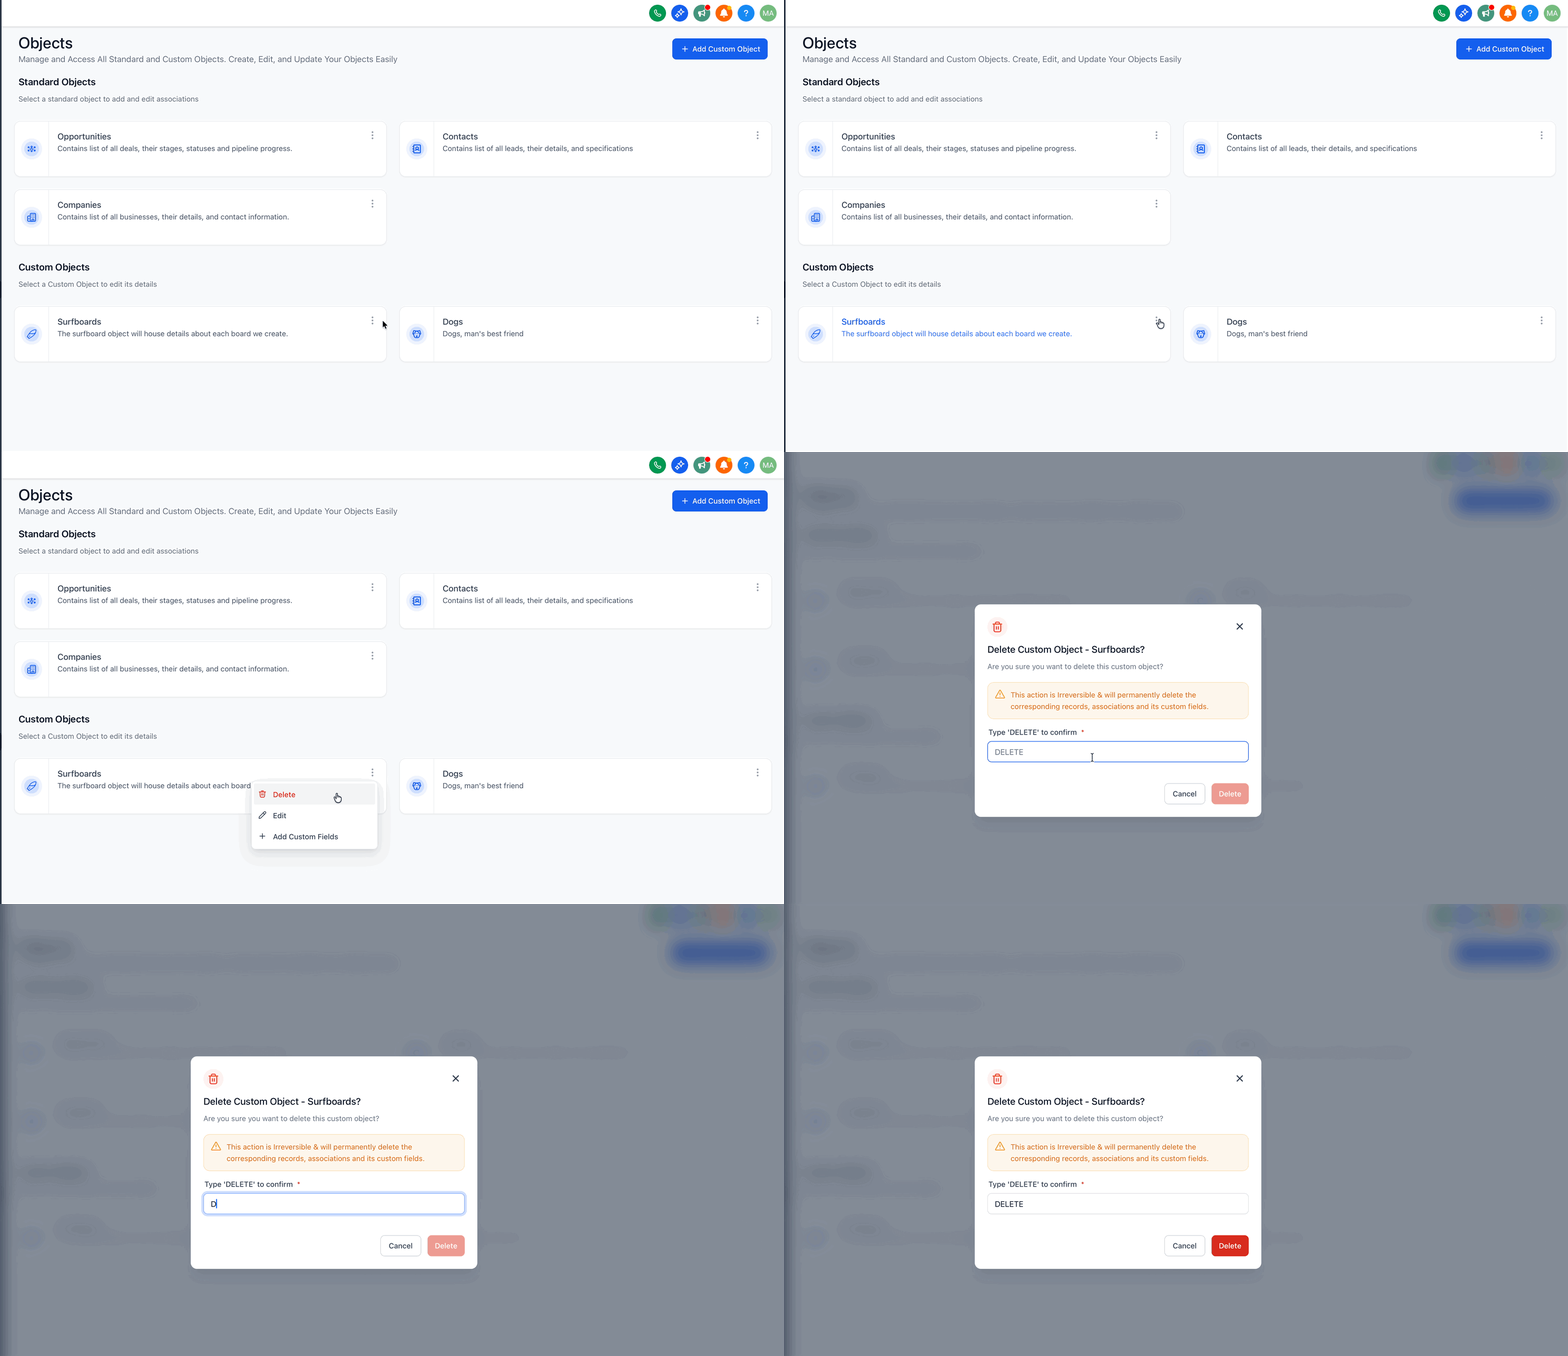
Important: deleting removes the object and all the records, associations, workflows and custom fields linked to it. This operation cannot be undone.
Using custom objects in workflows (automations)
Once you have created a custom object (with its fields and associations), you can automate the processes related to that object using object-based workflows. This means the workflow runs on the custom object record itself (not just on the contact). It lets you trigger automations when a custom object record is created or updated, and run actions such as creating/updating related records, clearing fields or sending object data to other tools.
Triggers available for custom object workflows
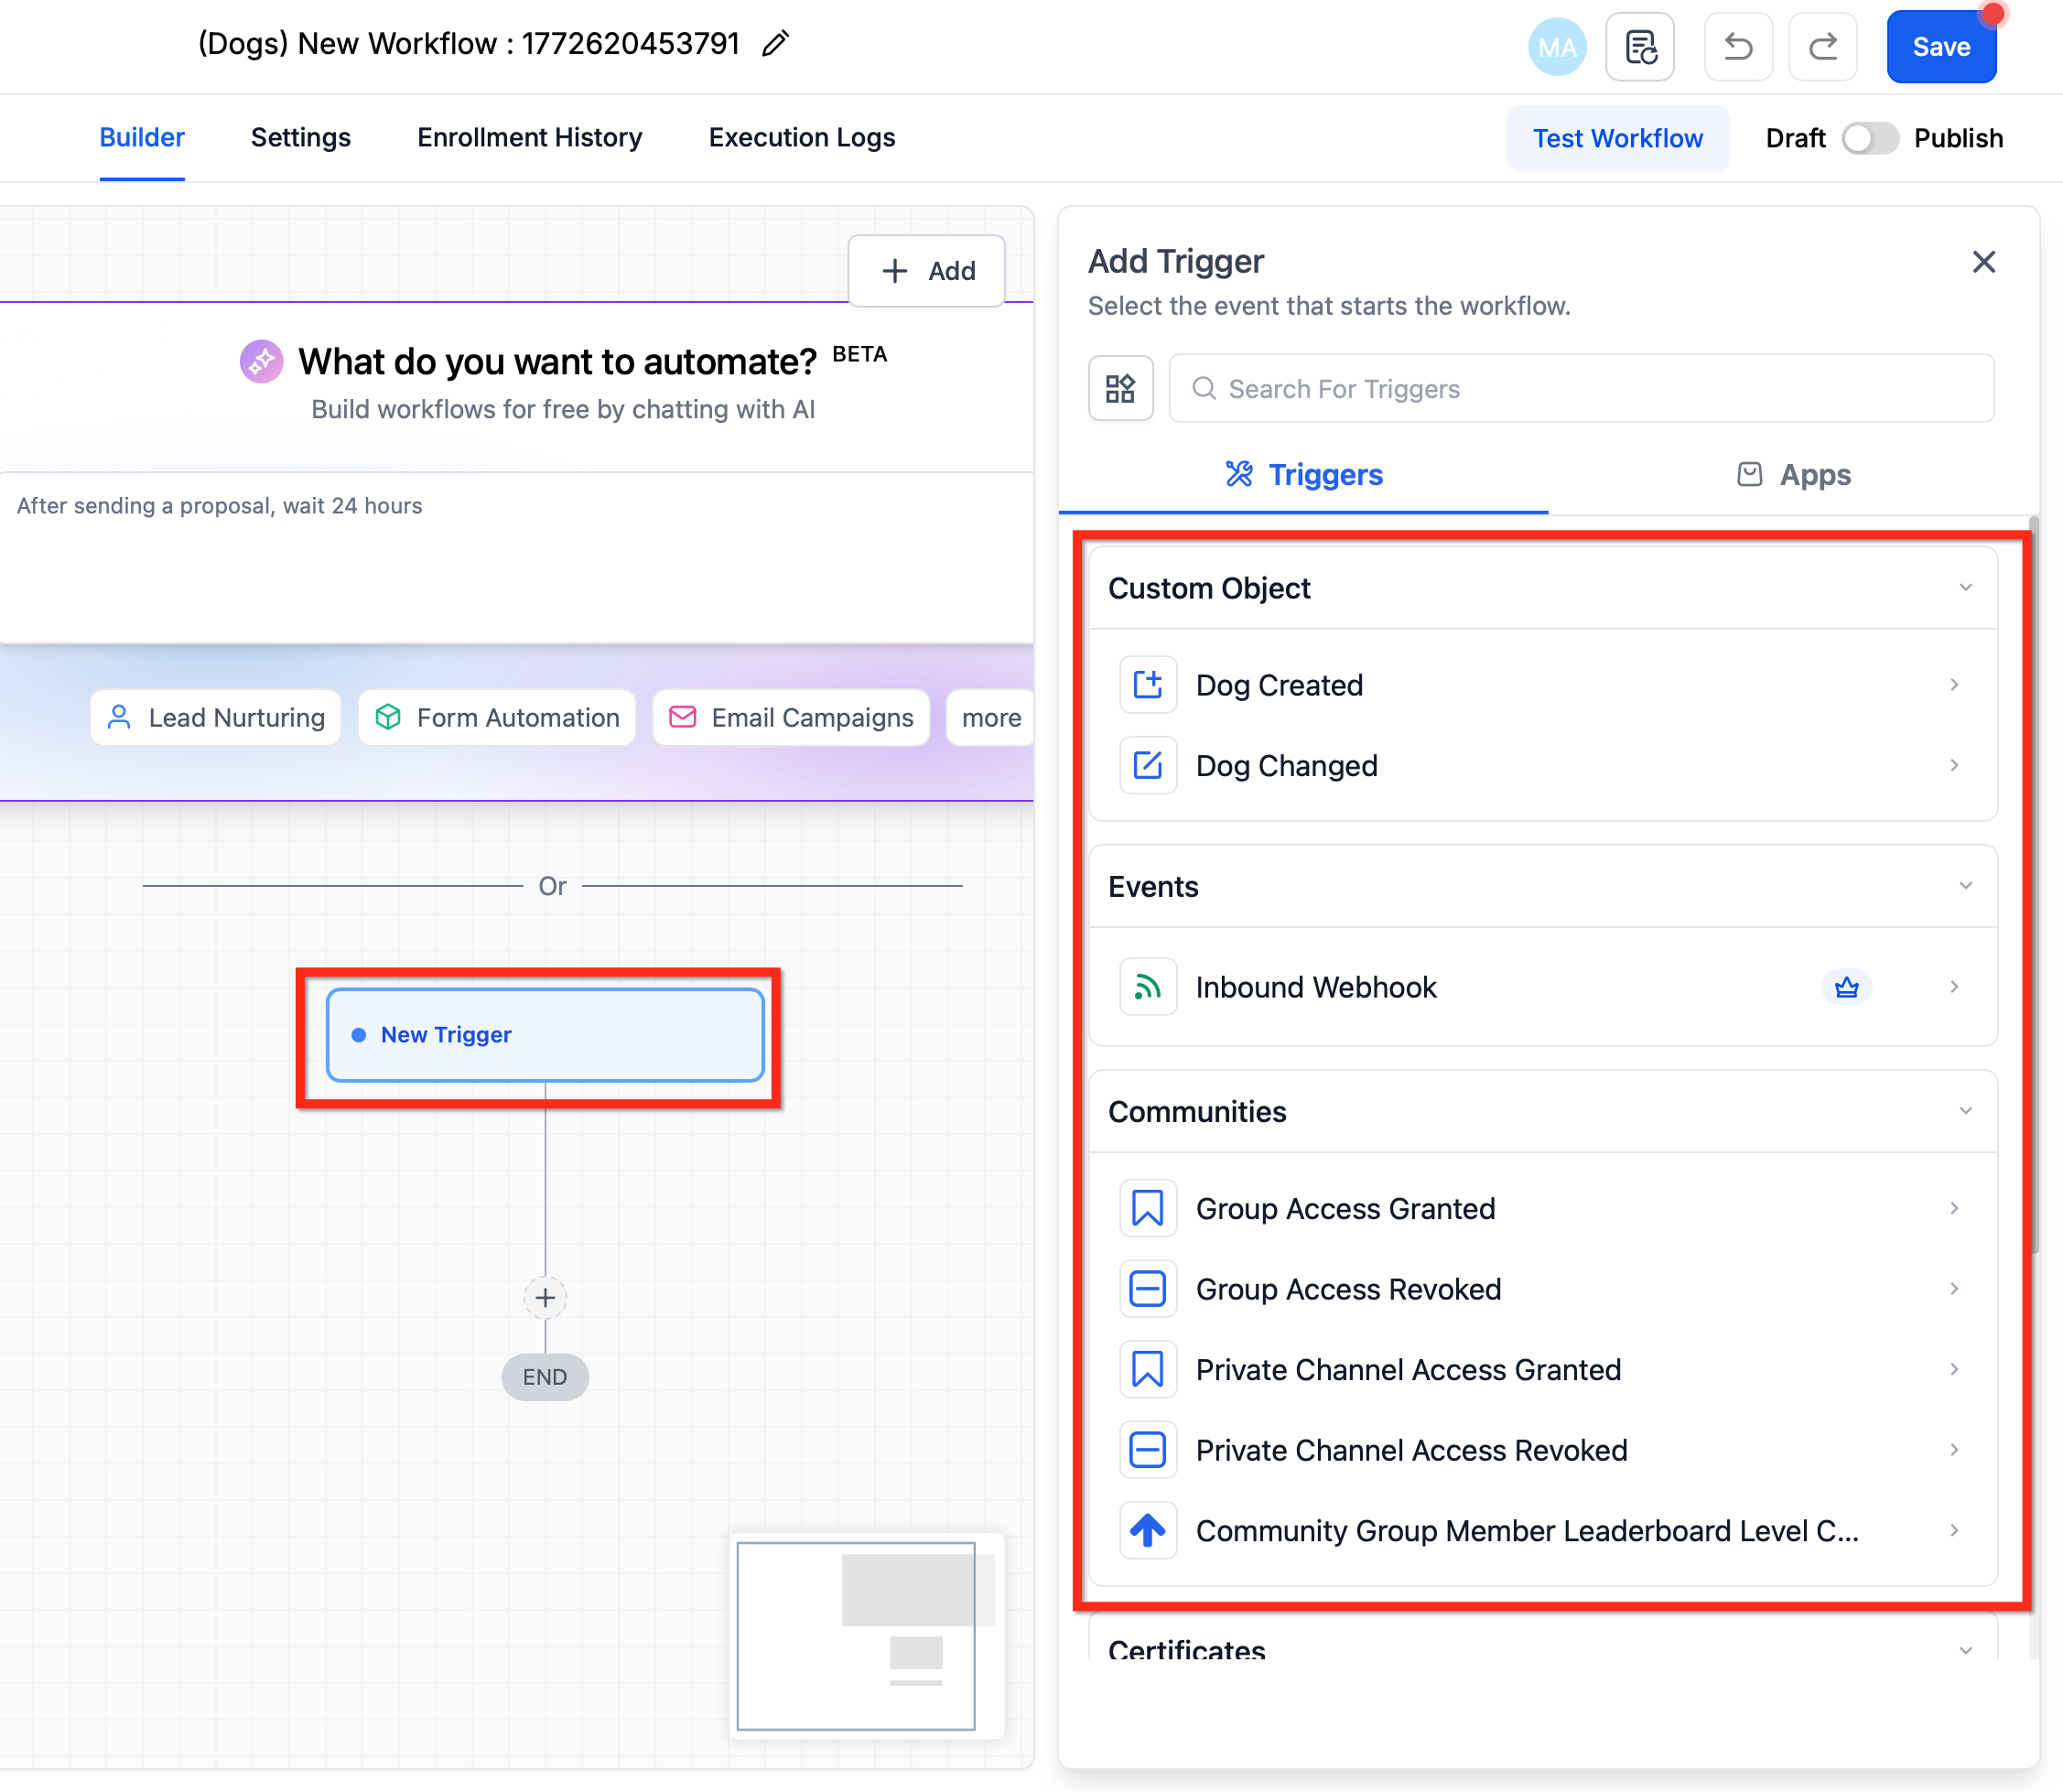
In object-based workflows, you can start an automation using these trigger types:
| Trigger name | What it does |
|---|---|
| [Custom Object] Created (e.g. House Created) | Starts the workflow when a custom object record is created. |
| [Custom Object] Updated (e.g. House Updated) | Starts the workflow when a custom object record is updated or edited. |
| Inbound webhook | Starts the workflow when an inbound webhook is received (useful for updates from external systems). |
Actions available for custom object workflows
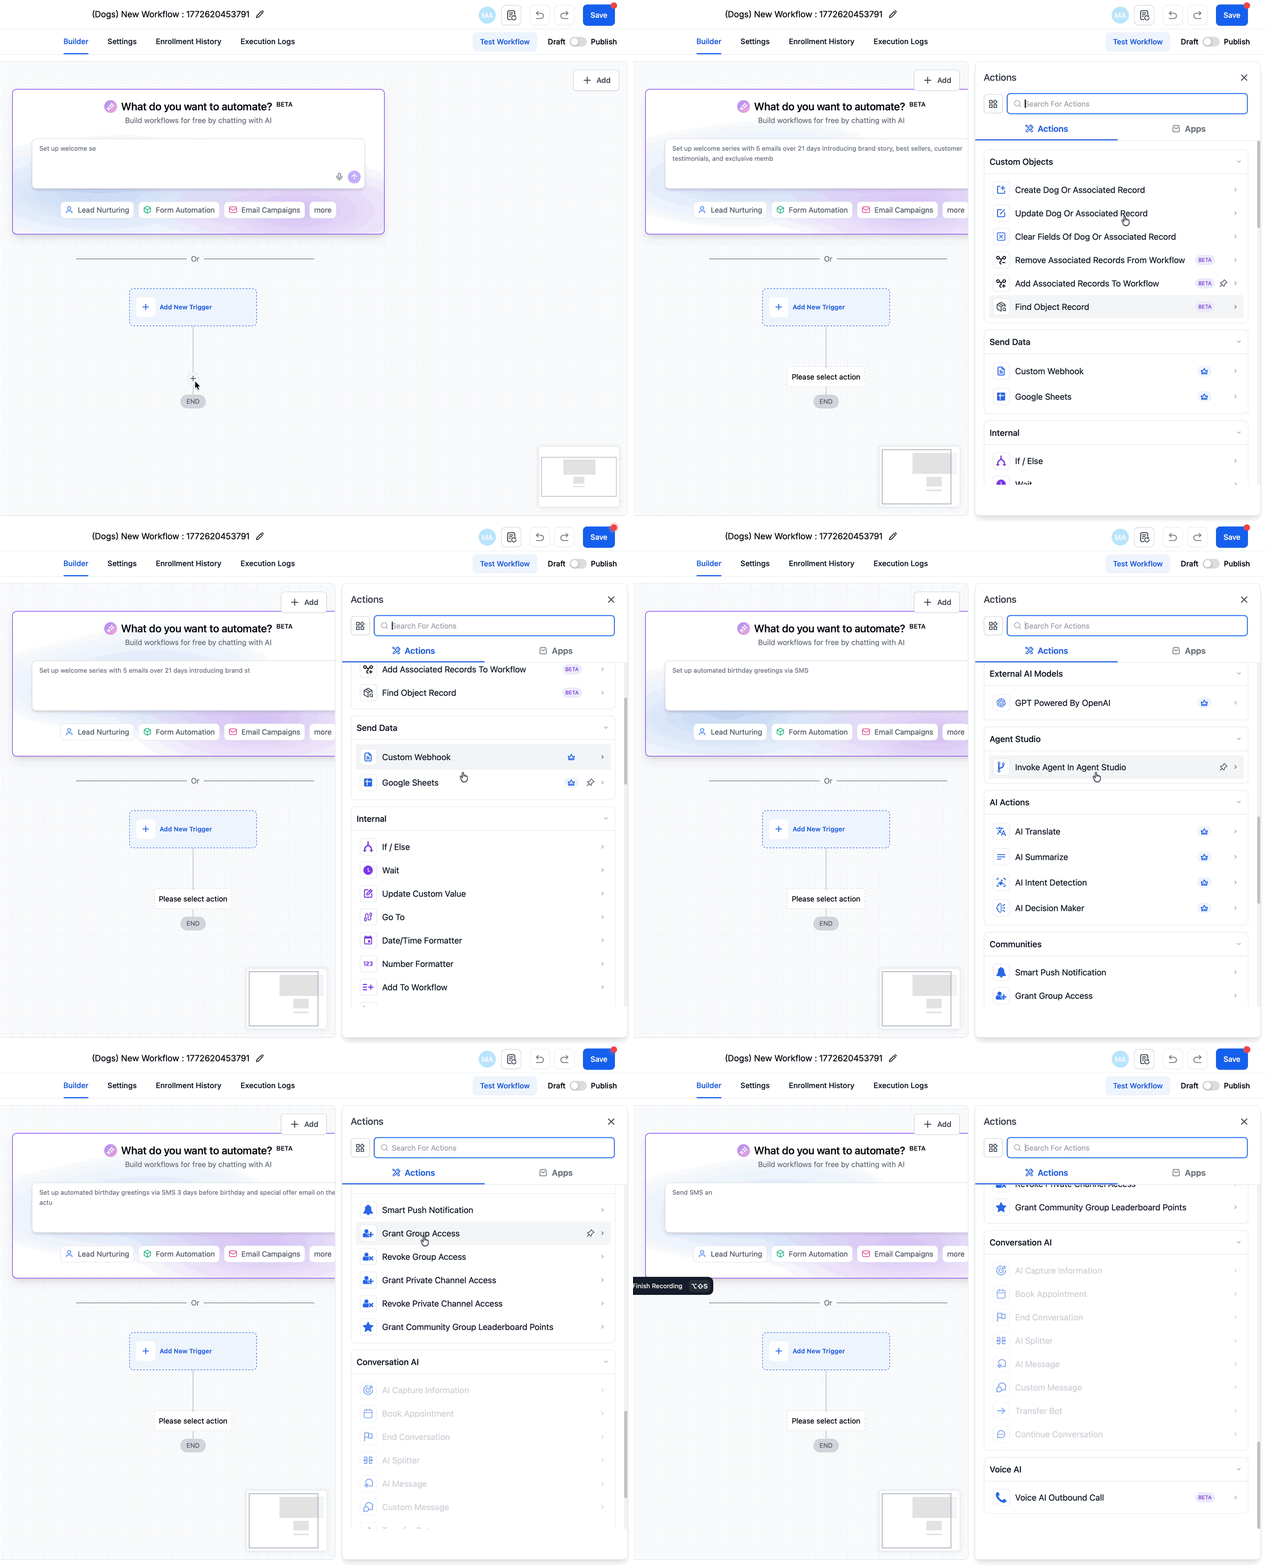
After a trigger fires, you can automate the next steps using actions such as:
| Action name | What it does |
|---|---|
| Create [Custom Object] or Associated Record | Creates a new custom object record (or a record associated with it). |
| Update [Custom Object] or Associated Record | Updates the fields of the custom object record (or of an associated record). |
| Clear [Custom Object] or Associated Record fields | Clears the selected fields of the custom object record (or of an associated record). |
| Custom webhook | Sends the custom object data to an external endpoint. |
| Google Sheets | Sends/logs the custom object data to a Google sheet. |
You can also combine custom object automation with the common workflow utilities such as If/Else, Wait, Go to, Formatters, Update custom value, Add to/Remove from workflow and more, to build more advanced logic.
How to create a workflow for a custom object
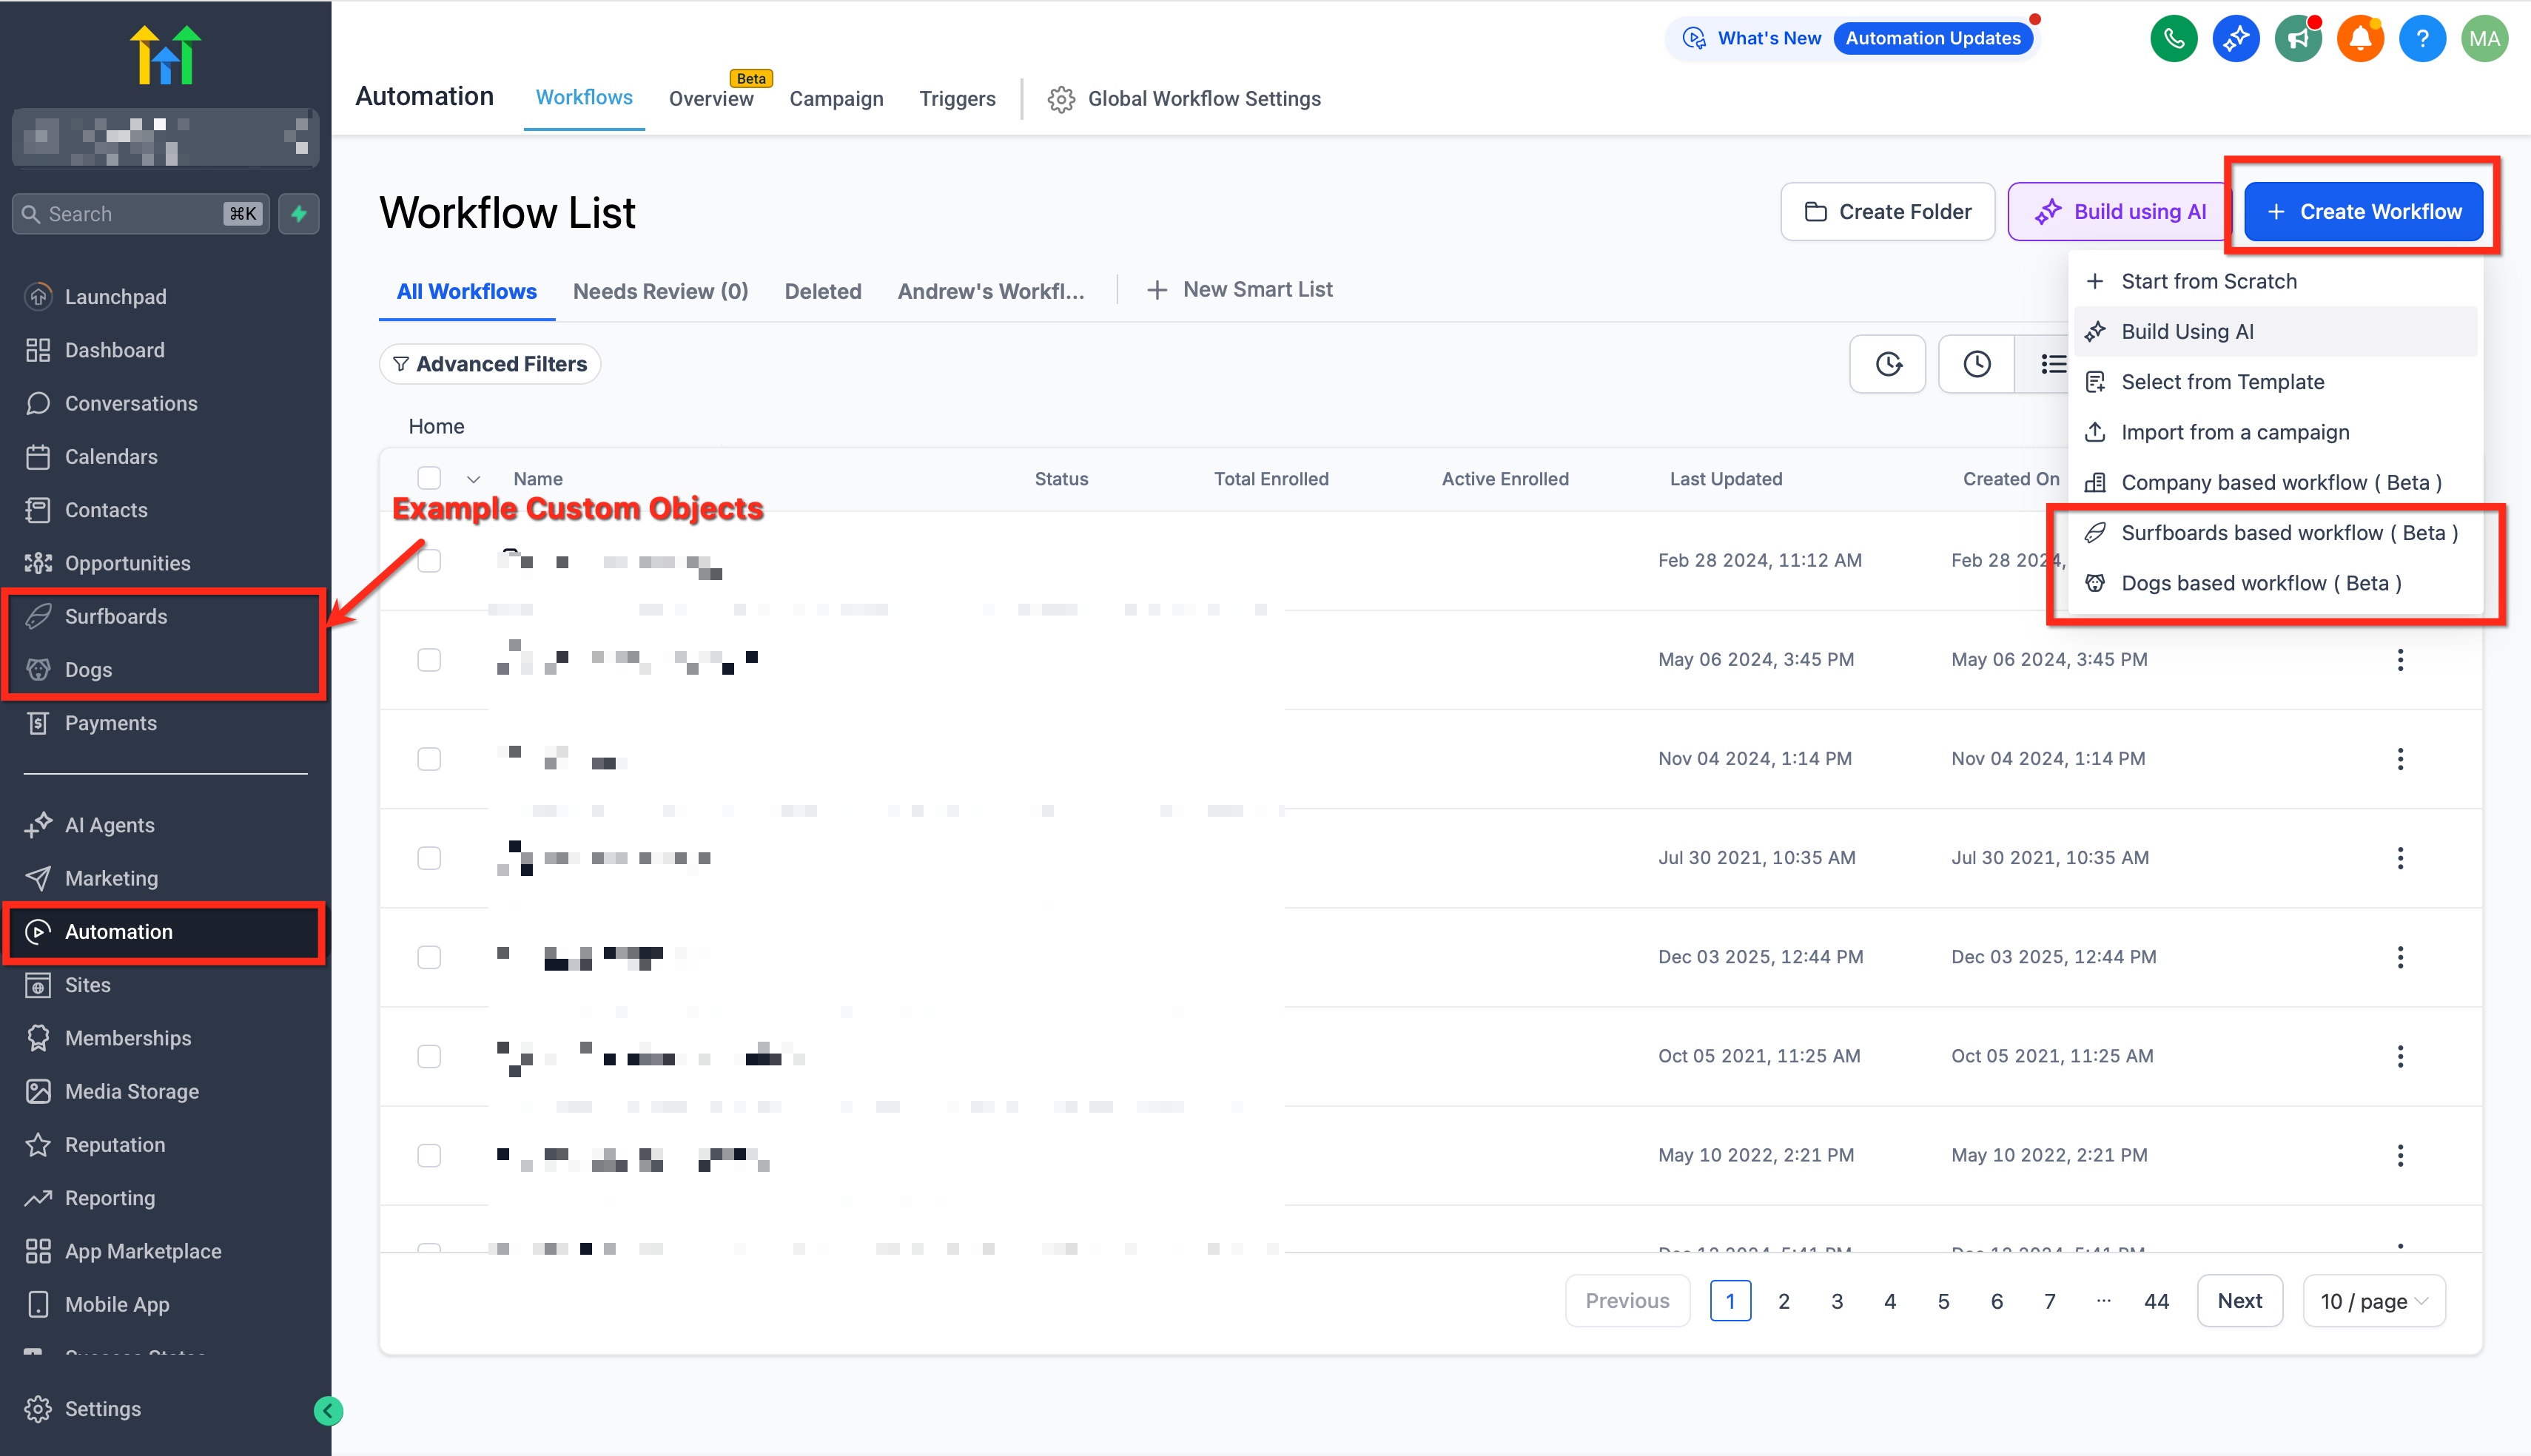
Go to Automations and click + Create workflow → Workflow based on [Custom Object] that you want to use (for example: House, Vehicle, Policy, Pet, and so on).
Add a trigger, then set up the conditions/filters as needed.
Add the workflow actions you want to run, then publish.
Find out more: Using custom objects in workflow triggers and actions
Frequently asked questions
Who can create or edit custom objects?
Only administrators at account level. Standard users have read-only access.
How many custom objects can I create?
Up to 10 per account, available on all plans.
Can I change the internal name or the primary display field later on?
No, once the object has been created these fields cannot be edited.
Where are custom objects currently supported?
See the support matrix table above for current availability and planned features.
What happens if I delete a custom object?
Deletion is permanent and removes the object and all the related records, associations, workflows and custom fields.
How can I automate actions when a custom object is created or updated?
Use the custom object triggers and actions in workflows (for example, create/update/clear, find record, webhook).